Yes, an orphanage will go up in flames instantly(boxwood stove thread)

  • Active since 1995, Hearth.com is THE place on the internet for free information and advice about wood stoves, pellet stoves and other energy saving equipment.

    We strive to provide opinions, articles, discussions and history related to Hearth Products and in a more general sense, energy issues.

    We promote the EFFICIENT, RESPONSIBLE, CLEAN and SAFE use of all fuels, whether renewable or fossil.
Status
Not open for further replies.
I'm with the last three replies.

The pig is tight. Really tight. Fire goes out when I screw the vent shut. After burning off the paint
it didn't smoke at all today and one 6" round n' a split the same size lasted for hours.
The 5pm load is mostly coals with some wood still up front. (the 2421 burns front to back being
narrow and deep.) The casting is garbage, but the seams n' seals are smoothed and cemented
with refractory lining. Front gate completely sealed off. No runaways yet. Still leery of a full box
but a few thick N/S pieces is giving steady heat 5-6 hours thus far. From what I understand so far this is
some long lasting usable heat from a crap stove. The Cheapster is pleased as-is with this unit. It'll
be out in the spring or I'd try to make it more efficient. Living in the forest and getting rid of air leaks
has this thing doing the best it reasonably can. We're warm and the house is intact. Plenty of fuel
cut n' ready. As asvised, I'm working on next winters stacks now.

Cheap n' warm

Edit/ addition
We're burning more than two pieces at a time. The above burn was just getting better understanding of
the operating dynamics of the unit. Mama was a stover for a few years when she lived on the Washington/
Canada border (near Bellingham) and is pleased that this is working out. Her last stove had glass,
heat exchanger tubes, fan forced. It cooked a 2 and 1/2 story house. She's done some reading over
my shoulder and expected much less out of the pig performance wise. We do like the look, but also
like the look of glass, black square box, and the river rock walls the more we discuss it.
The pig happens to work well as we have 1380 ft of air in a ranch style shanty. The actual square footage is lower as the semi-finished garage w/ bedroom is separated but included in the legal total.
Even a crap stove can heat this retirement sized home. Bigger than a cottage, small by "normal" American
and Canadian standards. Perfect after we boot the last offsprings on their way. LOL
 
Last edited:
  • Like
Reactions: jatoxico
You seem to have a very good attitude about it cheap. You made it as good as possible for the time being and are aware of its short comings. Well done and start saving for a real stove lol.
 
The Jotul 602 and the 118 are a similar look and they are 'real' stoves [emoji6]. The 602 is small but the 118 should be able to fit quite a bit of wood in.
 
The Jotul 602 and the 118 are a similar look and they are 'real' stoves The 602 is small but the 118 should be able to fit quite a bit of wood in.
There have been allot of good box style stoves made through the years. I have one of the best old ones made although it is not in use right now. That is the cawley lemay 600 with a good early secondary combustion system. But honestly i would go for a more modern stove for the reduced clearances and the increased efficiency.
 

Attachments

  • emoji6.png
    emoji6.png
    1.1 KB · Views: 134
Thank you Holler.

You are one of the people I'm learning from.
Got the CO detector installed nice n' low today. Gave back the IR
thermometer I borrowed . Furnace thermostat still set at 64,
and it's showing 76 in the hallway 16 ft from Frankenstove.

That is all. Scroll on. Cheeeeeeeeeeeeeeeap
 
  • Like
Reactions: bholler
Whazzerface (Mrs. Cheap) took a couple of pics but unfortunately I wasn't around.
I'da asked her to shoot some images of the liner, bricks, modified damper, sealed drawer,
basically a frontal closeup pic with the door open.
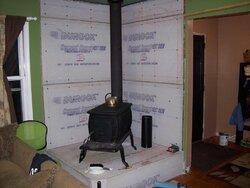
Here's a general visual of the safety setup fully functioning. We'll do the walls nice n' pretty
after I get back to work and can generate the extra $$.

That was day one doing the small kindling fires to cure the beast. The meltables and burnables were
of course moved away. Single wall to the collar and 8 feet of insulated stainless straight up to the cap.
The Durock is out an inch from the OSB on studs. The Durock hasn't gotten hot yet. Warm only and
a bit warmer in back but one can keep their hand on it. Not hot by any standard (other than absolute zero).
Chimney lost it's shine day 2. lol Once up to speed little to no smoke is visible atop the stack.

One thing leads to another and even at one or two boards every payday stuff is happening in three rooms
now. Notice the missing trim boards, can of paint, and shiny black door. The "hardwood" floor is a Pintrest
deal. Sheet pine plywood w/knots. Lines of individual boards drawn on with a sharpie then double urethane
over stain !! Three rooms for $190. Mrs Cheap gets some wood on the ball from time to time. She rocks.
She made the coat rack/ shelves herself and sanded/ painted !!

12674298_10154065871780628_264629539_n.jpg
 
Ok i see some issues. What is that cement board spaced off the wall with? There also is no air gap top and bottom for air circulation. What is the structure of the hearth made of? Are you sure you have the 16" in front of the stove on the hearth?
 
The cement board is held out with HYC spacer kits.
The box sez "For use with HYC stove boards and wall shields" No PN on the box.
They are 1" sheetmetal stampings.

Top spacing is only 1/2" along the entire top for upventing between cement and OSB.
There IS a gap there but not obvious in the pic. Both sides 1" also down to the base.
There's full flow behind there. Luckily it's not heating up either. Hearth base is 5/8"
cement board on a fiberglass mat on OSB. Warm but not hot under the unit thus far.
Personally I want more insulation so the ceramic shiny gray tiles will probably be the first
thing. They look to be not quite 1/2" thick but everything helps. The base of the firebox
is sand and brick and isn't getting crazy hot underneath.

It's functioning very well and clean indoors. No smoke alarms or CO issues.
This is because we're staying careful and not getting complacent. No large
fires, (box 1/2 full), damper at 3/4 open at all times. I'd rather stay closer to
500 degrees and lose a lil' effieciency. Endless fuel available. We feel very safe
other than thickening up the base some more.
 
There's no 1" bottom opening. It's not a valid NFPA 211 heat shield without a 1" gap top and bottom. That is what allows a convective airflow behind the shield. The sides can be sealed. Tile has very little insulation value.
 
Last edited:
And you need allot more floor protection.
 
Went to find the 2421 docs on US Stove for the stove. Found this notice there:
The 2421 is a heavy duty, cast iron constructed wood stove. (NOT FOR RESIDENTIAL WOOD BURNING USE).
 
Yeah i always found that amusing. What a piece of crap.

Not that I don't agree with your last sentence but isn't the not for residential use thing because it's not epa approved?
 
Not that I don't agree with your last sentence but isn't the not for residential use thing because it's not epa approved?
No has nothing to do with epa it has to do with liability and they want to be covered if their dangerous stove burns your house down.
 
  • Like
Reactions: tarzan
Indeed it's a scary piece.
Laid a later of brick on the hearth base as there was plenty of bricks
extra. Luckily it's not heating up other than warm to the touch.
None of the cement board is heating much. The OSB and cement board
walls do not go to the floor, and do not touch each other.
Open studs and air draw from behind the base. The Owens-
Corning has been removed from behind the base for a convective updraw.

A decent explanation is that it's actually a freestanding hearth and walls. It's attached to,
but not a part of the house. There's more airflow than it would seem. With the
box fan on, air flows in behind the left and out the right side. All defending aside, The piece you
typed, Green about opening up the top gap further are this evenings project. Those words
hit home a bit. Even with open sides all the way to the top, the top itself and 1/2" gap
doesn't seem like much. Our contractor used our instruction book and another book
called "United States Installation and Maintenance Guide"
Ironicly both instruction manuals had full instrux for in home installation and safety
setup. (including the manual that came with the stove) LOL
 
Last edited:
No. It's a little short of 16". From the firebox, yes. From the deck sticking out, no.
Looking closer at the pic, the top gap is visible but not prominent from the lower angle of
the camera and the board out an inch from the backing boards.

This setup morphed over to prep for the next stove (cube with glass) after researching this stove a bit.
Smaller fires and shopping for a better stove are the order of the day. This setup should be great
for an EPA unit.
 
It's good you are running it as safely as possible. Being unemployed is not fun. Hope the tide turns soon for you and the stove can replaced with one a bit more suited for safe residential burning.
 
  • Like
Reactions: tarzan
Thank you for the nice words, and the company has started callbacks !!

(Insert crazy happy smiley emoticon here)

NotTooCheapForASaferStove
 
Burned something similar in a cabin once in a while. So did my dad, brother, and great grandparents. It's still there, burning occasionally, cousins own the place now. There was a damper in the flue, shut it when the logs were burning well, or turn the whole stove and three feet of pipe orange.

I also burned a MEGA PLUS size version of that stove, made from plate steel, and we heated our home full time with it for a few years. The first winter I was worried about using the damper, but started using it when I realized burns were absolutely impossible to regulate. It helped a lot with stabilizing heat output for an hour or two, but we weren't happy until we went to an EPA stove.

Using the damper did not cause more creosote.
 
My neighbor heated his 2,000 sq. ft. wood shop, at least the downstairs, with one for 30 years and didn't burn it down. Some folks just bought the place and one of the first things they did was get it the hell out of there. ;lol
 
  • Like
Reactions: CheapBassTurd
Two week update: (PS How is yours doing, BrewCap, and others caught by the price and antique look?)

The pig is operating safely and the main house furnace has turned on one morning only.
Been going to bed with a 1/2 load mostly done. Closed damper and intake knob. (The
damper still has good breathing closed.) No CO alarms yet. Smoke detector once.
The base has a layer of firebrick added under the stove. They barely get warm. Hadda bunch
so they were made into insulation until needed.

It's hungry. Very hungry. Best description is mainly splits all sizes 8-10 lbs the most massive.
A load to heat the house up from cool is between 30-45 lbs total with a 30 lb start and a few more
added in-cycle. 5 hours of solid heat and two more if it's not windy on coals. That constitutes a cycle.
We (usually me) bring the ash/ coal to the front and remove half or so, and reload, push the coals against
the fresh stock. Coals go into the center of a stump we're burning out. Stump is very safely located in the
center of the yard and why it's getting cooked out.

The temps vary thru the cycle and we make adjustments with the fan system a couple of times.
It is apparent this stove will safely and effectively heat a home. The beginning price has already
come at a high price by being a pain in the butt. The extra hours spent splitting, scavenging,
and babysitting the stove make it not worth the price, even with the safety upgrades.

Will it get us thru layoff (almost over!) and the rest of the season? Yes.
Da Cheapster loves sticking it to the power company so another stove is a definite.
This one isn't worth the hassle unless one is retired and bored, or shop use.

On the positive side, we can cram the thing with small splits and get major heat when wanted.

Again, I'm curious as to how potbellies/ boxstoves are working out for regular users.
 
I just saw the update on this, good to see it's working well. I did add the firebrick as well, since Tractor Supply was doing the end of season sale and had them for $.69. Certainly cut down on the interior space, but seems as if it's allowing it to burn the coals a little more completely as well, I expect due to the fact it's created a more streamlined chamber.The "ash trap" has been sealed off with a plated I welded up and topped with a gasket, now that part is merely decoration. I can also kill the fire right away from the knob. I have a lot of wood that is not fully seasoned, and I have been mixing that with some seasoned and some Liberty bricks as well. With either the mix or just the straight Liberty bricks, I have no problems keeping the stove at the temp that works best for us(400-425).
We've had a warm winter, to this was the first time we've had to be able to test the stove out with burning 24/7. I've found that after the addition of the firebricks, the ashes have not been adding up like before, so every 2 days, I do a complete empty of the stove, and the firebricks hold the heat for a quick restart.
Raking a few coals to the front, loading it up and adjusting with the screw damper allow for a nice ,long N/S burn. I cut my pieces at 24" so the firebox is nearly full at that point. I've been keeping my living room around 80* with a 20* outside temp with no issues. Burn time is still 5-7 hours will a full load of the wood mix, I can get almost 9 with the liberty bricks alone.

Everyone here had me concerned and the other day I spotted a pretty impressive crack in the side when I came home. Turns out the worry was unfounded, and I can simply blame my great danes for flipping slobber on the side and it baked on;lol.

All in all I am quite happy with the stove. Will I rush out and sell it because I'm going to kill everyone? No
Will I be looking for a bargain come spring on another stove? Sure, but thats in my nature.
The wife wants to see the flames, and to have something that sits east/west vs N/S. I also explained the prices and the fact all our wood is cut at 24"(all 6 cords) and she better get the Stihl out and trimming then...so I expect we'll continue to use this cheap deathtrap as every calls it.
 

it's cute, but doesn't really apply as a replacement for the one currently using, the point in the initial purchase was cost, I have about $7 invested in upgrades, and have a functional stove in place. Like I said earlier, I will look into a replacement at some point down the road, but it's not going to be easy with the criteria, the main one is that it must take a 24" log,as I have 6 cords currently split to that, to maximize the depth of this stove.

My local HD has two of the englanders as returns just sitting on pallets right now that could be acquired for a sub $400 price tag, it's not not in the cards right now to replace.
 
Last edited:
  • Like
Reactions: CheapBassTurd
I'm with ya, Brew.

It also has it's upsides like low cost and safe warmth with some prep.
Overall this is worth it, if even for the learning experience.

PS. I too, am running two footers but in a different way. 12" splits end to end.
Leaves room for a few E/W pieces.
Had all three chains sharpened and the third just went on.
Your Stihl will be busier with the short splits but much easier to carry
around and stuff in the firebox.
 
Status
Not open for further replies.