
Im on my 2nd fan and have only been burning since November. the 1st one made some weird noises when the stove got hot (it had been sitting since 07) Buck sent me a new one and it makes high pitched sounds every now and then, I believe its a rheostat thing. if my wife runs the toaster in the kitchen the stove fan picks up by 50%..IDK
Buck model 91 ( went 325 miles round trip to get )
- Thread starter coltfever
- Start date
-
Active since 1995, Hearth.com is THE place on the internet for free information and advice about wood stoves, pellet stoves and other energy saving equipment.
We strive to provide opinions, articles, discussions and history related to Hearth Products and in a more general sense, energy issues.
We promote the EFFICIENT, RESPONSIBLE, CLEAN and SAFE use of all fuels, whether renewable or fossil.
You are using an out of date browser. It may not display this or other websites correctly.
You should upgrade or use an alternative browser.
You should upgrade or use an alternative browser.
- Status
- Not open for further replies.

I got up to speed real quick operating this stove. It helped having a catalytic stove before I bought this one.
I bought my replacement motor from buckstoveparts.com and told them I wanted a the 3 speed motor that will fit into the fan housing of the newer Buck 91. All you will get is a motor and brackets mounted to it. You will also need a 3 speed switch and the little rubber groments that fits on the screw holes. You will have to remove your fan off your old motor and use that. No instruction on on how to change the wiring from reosat to 3 speed. As you can see in the picture I just wrote down on a piece of paper how it should be wired. What they do now if you need a replacement for the 91 or 80 model buck you have to buy the whole complete fan housing part number PE 910714 which is what comes in your stove but that set up for again for reosat. Alittle more trouble my way but its what I wanted to do. Lows are going to be in the 30's tonight . Fire it up.
I bought my replacement motor from buckstoveparts.com and told them I wanted a the 3 speed motor that will fit into the fan housing of the newer Buck 91. All you will get is a motor and brackets mounted to it. You will also need a 3 speed switch and the little rubber groments that fits on the screw holes. You will have to remove your fan off your old motor and use that. No instruction on on how to change the wiring from reosat to 3 speed. As you can see in the picture I just wrote down on a piece of paper how it should be wired. What they do now if you need a replacement for the 91 or 80 model buck you have to buy the whole complete fan housing part number PE 910714 which is what comes in your stove but that set up for again for reosat. Alittle more trouble my way but its what I wanted to do. Lows are going to be in the 30's tonight . Fire it up.
Last edited:
mellow
Resident Stove Connoisseur
So what is the 91 like compared to the app 52? Are you getting longer burns? Heating more/better? Control easier?
Larger deep firebox that I really like. Longer burn times also but thats because it will hold larger splits. I have to say the 91 puts out more heat than the other stove. I dont know why but it is easier to control. Real easy to check the combusters and clean or change when needed. Its not housed together with the damper housing like the 52. With the 52 Bay I would have backpuff after a couple of hours in the burn. This 91 has never backpuffed one time. I'm glad I made the change over to the Buck 91. I'm not putting down the the 52 Bay at all. Its a good stove but in my opinion I like the Buck 91 better.So what is the 91 like compared to the app 52? Are you getting longer burns? Heating more/better? Control easier?
jetsam
Minister of Fire
Question not related to the stove: What is this thing called? I was just browsing this thread and saw it and said, "THAT WOULD MAKE PULLING MY INSERT SO EASY THIS SPRING" =D

Jet its called a duct jack / material lift. They vary in size and lift weight. All I used it for was to lift it up on the hearth only. I never rolled it across the floor with the stove on it. I used thick PVC pipe for rolling my stove in place. I then raised it alittle at a time. I would set wood blocks under the stove just in case the lift decided to drop down. It worked great. Sure saved the strain on the old back.Question not related to the stove: What is this thing called? I was just browsing this thread and saw it and said, "THAT WOULD MAKE PULLING MY INSERT SO EASY THIS SPRING" =D
View attachment 173984
mellow
Resident Stove Connoisseur
I'm on a Pro Flex 8 inch liner.Do you have an 8" liner installed? Can't remember.
Bmore
Burning Hunk
Colt,
How did you connect the liner to the insert? Your clearance looks as tight as mine and I had a TOUGH time. I had to re-pull mine and reconnect it this season. Just curious of the other methods/products out there. Love my 91 so far... Good luck with yours.
Thanks!
How did you connect the liner to the insert? Your clearance looks as tight as mine and I had a TOUGH time. I had to re-pull mine and reconnect it this season. Just curious of the other methods/products out there. Love my 91 so far... Good luck with yours.
Thanks!
Woody Stover
Minister of Fire
http://www.buckstove.com/partsstore/product.php?productid=264&cat=137&page=1Colt,
How did you connect the liner to the insert? Your clearance looks as tight as mine and I had a TOUGH time. I had to re-pull mine and reconnect it this season. Just curious of the other methods/products out there. Love my 91 so far... Good luck with yours.
Thanks!


Bmore
Burning Hunk
Thanks Woody, you sent me it before and I did get one to use the second time. I see flame light a little through the bottom gasket during start ups but no smoke. Might need to tighten again. So far so good. Hope Colt used the same.
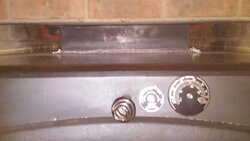
I used an adapter boot from my other install. This way I didn't have to try to raise and lower my liner. Measured height of stove which was close to my other one. I think I had to trim about an inch off the liner. Liner was already at the correct angle. Just slipped the adapter boot back in place. Tighten the clamp on liner, already had holes pre drilled on the buck. Slide stove in place, tighten bolts to stove. Good to go. I was kinda surprise myself how well it went. I did recheck my measurement a few time though. While I had my other insert out I needed to make a little change before I put my new stove in place. I just had a halfway made blockoff plate before and this time I made a better one with sheet metal. If you notice in the picture with the lift the adapter boot is already attached to the liner. There was about an 1/8 inch space between the adapter and the insert. Putting scrap sheet metal on the hearth made sliding the stove easy and protect the brick .
Attachments
Last edited:
Bmore
Burning Hunk
Woody Stover
Minister of Fire
Nice. Looks like she's crankin' too...what is that, about 450 on the stove meter?If you notice in the picture with the lift the adapter boot is in place before I slide the stove in. There was about an 1/8 inch space between the adapter and the insert. Putting scrap sheet metal on the hearth made sliding the stove easy.
Yea that was Sunday morning 450 on the stove temps and combusters holding around 1300 for a few hours.Nice. Looks like she's crankin' too...what is that, about 450 on the stove meter?
Last edited:
- Status
- Not open for further replies.
Similar threads
- Replies
- 39
- Views
- 5K
- Replies
- 78
- Views
- 11K
- Replies
- 28
- Views
- 5K
- Replies
- 22
- Views
- 15K