
interesting.Well I set out to install a plenum on Tundra today...got a little sidetracked, we'll see how this turns out.
As part of my plenum install I wanted to keep the air flow through the furnace air jacket from "short circuiting", going up the back of the firebox, right up over the HEs and out. Very little contact time with hot things.
The longer I studied the issue and thought about the airflow through this thing, the more I have become convinced that I want to block most of the huge open space (highlighted in red) on the back side, channel the air right up to the factory side air deflectors.
View attachment 173600
View attachment 173601 The backside of the firebox, from the left side. Wide open spaces back here...I highlighted the blower in green.
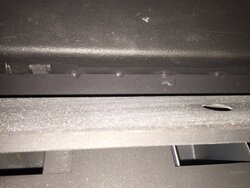
View attachment 173603 Here's what I came up with, it is just setting on the HEs here.
View attachment 173604 The new air deflector in place, from the left side.
View attachment 173605 I also decided to make a deflector to channel the air in the front corners around the HE cleanout box.
View attachment 173606
View attachment 173607
View attachment 173608 Just clipped onto the factory air deflector using a couple short pieces of S clip
View attachment 173609
View attachment 173612 Complete
View attachment 173613 Now almost all the air has to get up close and personal with hot things. I know these pics make it look like I have things really choked off, but believe me, it is not as tight as it looks, there is plenty of room for air flow. There is still some air able to come up past the deflector in the back as I kept it 1//4" - 3/8" up off the firebox and left a 1/4" or so gap around the HEs too.
I think this is gonna make a real difference, I decided to put the old top back on and use the same 3 ducts connections that I have been using, just to compare...so plenum postponed again. It's pretty warm here right now, I'm not even sure when I will be able to fire up and try this out!
Everything Drolet Tundra - Heatmax...
- Thread starter brenndatomu
- Start date
-
Active since 1995, Hearth.com is THE place on the internet for free information and advice about wood stoves, pellet stoves and other energy saving equipment.
We strive to provide opinions, articles, discussions and history related to Hearth Products and in a more general sense, energy issues.
We promote the EFFICIENT, RESPONSIBLE, CLEAN and SAFE use of all fuels, whether renewable or fossil.
You are using an out of date browser. It may not display this or other websites correctly.
You should upgrade or use an alternative browser.
You should upgrade or use an alternative browser.
For you guys that wanted a picture of the "wing" on the back of a Caddy, went back to the stove shop for some paint today...remembered my camera this time.
 This is from standing behind the furnace, to the left of the stove pipe connection, you can see the shadow of the center HE on the wing.
Much to my surprise, there is a panel screwed to the legs supporting the back of the firebox, so my theory that the blower can push air straight under the firebox on the Caddy was wrong.
 For the guys that have never seen a Caddy in person, here is a pic of the difference in the air jackets between Caddy/Tundra. This a pic from the front side, the left corner, straight down. The red line would be the front of the firebox/furnace on a Tundra. As you can see all the radiant heat that Tundra loses to the basement is captured by the Caddys air jacket design.
Just as a point of reference, the blue line represents where I had to weld up my HE a couple weeks back.
Oh, and I also remembered to check the top of the firebox this time...I couldn't get a pic of it so y'all just hafta take my word for it, but Caddy does NOT have the flame shield on the top of the firebox like my Tundra does. I'm saying this could very well be one of the main reasons that the heat output of the Tundra seems to be a little less than a Caddy. After all, if you think about it, the stove top is the main heat exchanger on a wood stove, and the Tundra firebox is good sized, so if you lose good heat exchange there (because of a "two ply" top) its gotta affect overall heat output IMO.
This is from standing behind the furnace, to the left of the stove pipe connection, you can see the shadow of the center HE on the wing.Much to my surprise, there is a panel screwed to the legs supporting the back of the firebox, so my theory that the blower can push air straight under the firebox on the Caddy was wrong.
For the guys that have never seen a Caddy in person, here is a pic of the difference in the air jackets between Caddy/Tundra. This a pic from the front side, the left corner, straight down. The red line would be the front of the firebox/furnace on a Tundra. As you can see all the radiant heat that Tundra loses to the basement is captured by the Caddys air jacket design.Just as a point of reference, the blue line represents where I had to weld up my HE a couple weeks back.
Oh, and I also remembered to check the top of the firebox this time...I couldn't get a pic of it so y'all just hafta take my word for it, but Caddy does NOT have the flame shield on the top of the firebox like my Tundra does. I'm saying this could very well be one of the main reasons that the heat output of the Tundra seems to be a little less than a Caddy. After all, if you think about it, the stove top is the main heat exchanger on a wood stove, and the Tundra firebox is good sized, so if you lose good heat exchange there (because of a "two ply" top) its gotta affect overall heat output IMO.

Also, update on my air deflector mods from last Saturday...finally got cold enough to fire back up mid week, so I have been using it for a few days now. I would say this was a worthwhile mod, not night and day difference, but overall heat output to the house is up for sure. Where I was struggling to heat the house with this thing back in the fall during 20s-30s* weather, it is doing it pretty easily now...heck it was high 20s here this morning and I had the house starting to get a little warm (73-74) from just 3 or 4 splits of Elm. I would say this is a result of the sum total of all the mods/repairs I've done more than any one thing.
So far I have...
-Added the temp controller. This has not only helped efficiency IMO, as a side benefit, it is a great convenience, just load n go!
-Done a "super cleaning" of the HEs, this definitely helped. And I can tell a real difference in heat output whenever I clean them now if it has been a week or two since it was done.
-Added a the third duct connection, to the front port.
-Added a "turbulator" to the center HE. Not a huge difference, but I do believe it helped some.
-Fixed the "cracked" weld (or just added to the almost non-existent factory weld) This was a biggy, it really changed the way this thing runs, my wife even noticed a difference afterwards.
-Added additional air deflectors in the air jacket. The biggest change that I noticed right off the bat is that the "hot spots" around the front duct connector evened out...a lot! The front pipe always ran about 10* hotter than the two in the middle, now they are all about even. The whole HE cleanout box area seems to run cooler now, it got really hot around there before!
As far as future plans, I will still likely do a full on plenum yet at some point, and I am still working on getting the parts to do a true "automatic infinitely variable speed" mod on the blower (not just 1 or 2 (or 4) different speeds like Heatpro and Max Caddy has)
laynes69
Minister of Fire
I did place a wing at the rear of my heat exchanger. While I can't say for sure it helped, I know it hasn't hurt anything. I used a couple of hard drive magnets and a thin sheet of aluminum.
I would think the false top on the tundra has something to do with the 2-8" outlets. Maybe too much heat and not enough flow?
I read something that made me think of the tundra vs the Caddy the other day. Someone with a gas furnace was talking about blower speeds. They wanted more heat so they lowered their blower speed. With the same output of the furnace from the higher speed, they noticed even though the air temperatures were higher, it took twice as long to satisfy the thermostat. When they increased the volume of air, temps were cooler but the thermostat was satisfied quicker. Having an open plenum on the Caddy has to make a pretty significant difference.
That makes sense. The lower delta TWith the same output of the furnace from the higher speed, they noticed even though the air temperatures were higher, it took twice as long to satisfy the thermostat. When they increased the volume of air, temps were cooler but the thermostat was satisfied quicker
 of the higher blower speeds means less heat going up the chimney...so more heat to the house (overall) I know what they are saying though, the higher blower speed feels cooler, and "drafty", plus, on a wood furnace higher blower speeds mean more blower cycling
DoubleB
Minister of Fire
Other people have made fancy temp controllers to control their Tundras better. I made a simple snap-disc system as an alternative.
First thing was to add a 0-60 minute bathroom timer to the thermostat terminals, as others have done (bottom of diagram below). It’s so easy and effective, it’s a must-have to improve things quickly.

I also rigged up some sheet metal holders and installed 2 snap discs on the 6” HX tube that sticks out the rear of the furnace, and multi-purposed the stove pipe screw holes to also retain the metal holders, as shown below. The far snap disc is an adjustable 210-250F Grainger #6UEA9 and the near snap disc is a 120F Grainger #6UDY9. I wired the 210-250 snap disc in series with the overtemp damper cutout (top left of diagram). I wired the 120F snap disc and a simple light switch in parallel with the thermostat terminals that open the damper (bottom left of diagram).

The 210-250F snap disc provides overtemp protection by cutting out the damper motor. Even though it resets 40F below the cutout temp, the HX tube temperature ranges widely depending upon burn rate so it only takes a couple minutes for the snap disc to reset after the damper closes.
I chose the 210-250F temp range based on what my IR gun showed me was about the temp when I wanted the damper to close. I installed, but even as low as 210 would let the furnace get too hot. Turned out the surface was hot enough but there was warm air blasting out of the rear panel and cooling the rest of the snap disc. So I sealed it with aluminum tape, but then the complete lack of airflow meant that even set up at 250F, the snap disc tripped and closed the damper way too soon. I slightly crimped a metal shim and put that under the snap disc, and now it opens the damper circuit just at the right time when set to 230F.
On a typical start, the snap disc might hit the high limit and close the damper, and secondaries might fail within a couple minutes, at which time the snap disc resets and gives another try.
As for the 120F snap disc, its purpose is on really cold days, I can close (turn on) the “burn coals” switch. After a burn has peaked and I have coals left, the 120F snap disc cools enough to close the circuit and open the damper. Not only do I get heat sooner from the coals on a cold day, but more so to burn them down so we can start another load sooner. Same thing as others have done with their temp controllers.
So, it’s somewhat fool-proof now:
Load furnace
Set timer to 20 minutes if lots of coals; 30 minutes if few coals.
Turn on “burn coals” switch if really cold or windy.
If “burn coals” switch is on, wait at least 4 hours between loads and let LP furnace fill in the gaps if necessary (hardly ever).
I also multi-purposed the rear screws for the rear outlet plate to secure a sheet metal guard of sorts to help protect the snap discs, especially the 110V snap disc on the far side.

All in all, it seems to work quite well, further optimize burning, and keep things safe and under control. I’m pretty pleased for an experiment for $35 and some tinker time.
Compared to the micro controller alternatives described in previous posts, I don’t think this option can be adjusted as easily or quickly or inexpensively. However, I also think this option is very effective once dialed in, might be less expensive overall, and is easy enough for a smart monkey to understand, find replacement parts, and repair down the road.
Just for the record, this was my second experiment. My first attempt was just to replace the OEM over-temp snap disc (L-200 in diagram) with a lower-temp snap disc. I tried 120F and 125F snap discs from Grainger ($6 each) because they were the warmest ones that had the smallest temp differential between opening and resetting the circuit (10 deg F). I wanted a small temp difference because the plenum doesn’t change temperature much between blazing hot fire during warm-up and enough temp to get/keep secondaries cruising. After experimenting a while, even the 125F snap disc would close the damper too cool and too often during start-up such that it took several cycles of smoldering until the secondaries lit. If I went with a higher temp snap disc, I mostly could find only a 40F temp differential, which would either have been too hot a limit to be any better than OEM, or else the larger temp differential would have made the smoldering even longer until the snap disc reset. Plus, since the L-200 snap disc (or its replacement) only senses plenum temperature, it’s subject to variation due to HX cleanliness, air filter condition (and airflow), house temperature (cold air return), etc., and I found it just was too variable and slow-reacting to be much good to effectively prevent excessive temperatures while also allowing enough heat-up to light the secondaries. So, in my experience replacing the L200 snap disc with a lower-temp snap disc is not a great option.
First thing was to add a 0-60 minute bathroom timer to the thermostat terminals, as others have done (bottom of diagram below). It’s so easy and effective, it’s a must-have to improve things quickly.
I also rigged up some sheet metal holders and installed 2 snap discs on the 6” HX tube that sticks out the rear of the furnace, and multi-purposed the stove pipe screw holes to also retain the metal holders, as shown below. The far snap disc is an adjustable 210-250F Grainger #6UEA9 and the near snap disc is a 120F Grainger #6UDY9. I wired the 210-250 snap disc in series with the overtemp damper cutout (top left of diagram). I wired the 120F snap disc and a simple light switch in parallel with the thermostat terminals that open the damper (bottom left of diagram).
The 210-250F snap disc provides overtemp protection by cutting out the damper motor. Even though it resets 40F below the cutout temp, the HX tube temperature ranges widely depending upon burn rate so it only takes a couple minutes for the snap disc to reset after the damper closes.
I chose the 210-250F temp range based on what my IR gun showed me was about the temp when I wanted the damper to close. I installed, but even as low as 210 would let the furnace get too hot. Turned out the surface was hot enough but there was warm air blasting out of the rear panel and cooling the rest of the snap disc. So I sealed it with aluminum tape, but then the complete lack of airflow meant that even set up at 250F, the snap disc tripped and closed the damper way too soon. I slightly crimped a metal shim and put that under the snap disc, and now it opens the damper circuit just at the right time when set to 230F.
On a typical start, the snap disc might hit the high limit and close the damper, and secondaries might fail within a couple minutes, at which time the snap disc resets and gives another try.
As for the 120F snap disc, its purpose is on really cold days, I can close (turn on) the “burn coals” switch. After a burn has peaked and I have coals left, the 120F snap disc cools enough to close the circuit and open the damper. Not only do I get heat sooner from the coals on a cold day, but more so to burn them down so we can start another load sooner. Same thing as others have done with their temp controllers.
So, it’s somewhat fool-proof now:
Load furnace
Set timer to 20 minutes if lots of coals; 30 minutes if few coals.
Turn on “burn coals” switch if really cold or windy.
If “burn coals” switch is on, wait at least 4 hours between loads and let LP furnace fill in the gaps if necessary (hardly ever).
I also multi-purposed the rear screws for the rear outlet plate to secure a sheet metal guard of sorts to help protect the snap discs, especially the 110V snap disc on the far side.
All in all, it seems to work quite well, further optimize burning, and keep things safe and under control. I’m pretty pleased for an experiment for $35 and some tinker time.
Compared to the micro controller alternatives described in previous posts, I don’t think this option can be adjusted as easily or quickly or inexpensively. However, I also think this option is very effective once dialed in, might be less expensive overall, and is easy enough for a smart monkey to understand, find replacement parts, and repair down the road.
Just for the record, this was my second experiment. My first attempt was just to replace the OEM over-temp snap disc (L-200 in diagram) with a lower-temp snap disc. I tried 120F and 125F snap discs from Grainger ($6 each) because they were the warmest ones that had the smallest temp differential between opening and resetting the circuit (10 deg F). I wanted a small temp difference because the plenum doesn’t change temperature much between blazing hot fire during warm-up and enough temp to get/keep secondaries cruising. After experimenting a while, even the 125F snap disc would close the damper too cool and too often during start-up such that it took several cycles of smoldering until the secondaries lit. If I went with a higher temp snap disc, I mostly could find only a 40F temp differential, which would either have been too hot a limit to be any better than OEM, or else the larger temp differential would have made the smoldering even longer until the snap disc reset. Plus, since the L-200 snap disc (or its replacement) only senses plenum temperature, it’s subject to variation due to HX cleanliness, air filter condition (and airflow), house temperature (cold air return), etc., and I found it just was too variable and slow-reacting to be much good to effectively prevent excessive temperatures while also allowing enough heat-up to light the secondaries. So, in my experience replacing the L200 snap disc with a lower-temp snap disc is not a great option.
STIHLY DAN
Minister of Fire
Other people have made fancy temp controllers to control their Tundras better. I made a simple snap-disc system as an alternative.
First thing was to add a 0-60 minute bathroom timer to the thermostat terminals, as others have done (bottom of diagram below). It’s so easy and effective, it’s a must-have to improve things quickly.
View attachment 174152
I also rigged up some sheet metal holders and installed 2 snap discs on the 6” HX tube that sticks out the rear of the furnace, and multi-purposed the stove pipe screw holes to also retain the metal holders, as shown below. The far snap disc is an adjustable 210-250F Grainger #6UEA9 and the near snap disc is a 120F Grainger #6UDY9. I wired the 210-250 snap disc in series with the overtemp damper cutout (top left of diagram). I wired the 120F snap disc and a simple light switch in parallel with the thermostat terminals that open the damper (bottom left of diagram).
View attachment 174153
The 210-250F snap disc provides overtemp protection by cutting out the damper motor. Even though it resets 40F below the cutout temp, the HX tube temperature ranges widely depending upon burn rate so it only takes a couple minutes for the snap disc to reset after the damper closes.
I chose the 210-250F temp range based on what my IR gun showed me was about the temp when I wanted the damper to close. I installed, but even as low as 210 would let the furnace get too hot. Turned out the surface was hot enough but there was warm air blasting out of the rear panel and cooling the rest of the snap disc. So I sealed it with aluminum tape, but then the complete lack of airflow meant that even set up at 250F, the snap disc tripped and closed the damper way too soon. I slightly crimped a metal shim and put that under the snap disc, and now it opens the damper circuit just at the right time when set to 230F.
On a typical start, the snap disc might hit the high limit and close the damper, and secondaries might fail within a couple minutes, at which time the snap disc resets and gives another try.
As for the 120F snap disc, its purpose is on really cold days, I can close (turn on) the “burn coals” switch. After a burn has peaked and I have coals left, the 120F snap disc cools enough to close the circuit and open the damper. Not only do I get heat sooner from the coals on a cold day, but more so to burn them down so we can start another load sooner. Same thing as others have done with their temp controllers.
So, it’s somewhat fool-proof now:
Load furnace
Set timer to 20 minutes if lots of coals; 30 minutes if few coals.
Turn on “burn coals” switch if really cold or windy.
If “burn coals” switch is on, wait at least 4 hours between loads and let LP furnace fill in the gaps if necessary (hardly ever).
I also multi-purposed the rear screws for the rear outlet plate to secure a sheet metal guard of sorts to help protect the snap discs, especially the 110V snap disc on the far side.
View attachment 174154
All in all, it seems to work quite well, further optimize burning, and keep things safe and under control. I’m pretty pleased for an experiment for $35 and some tinker time.
Compared to the micro controller alternatives described in previous posts, I don’t think this option can be adjusted as easily or quickly or inexpensively. However, I also think this option is very effective once dialed in, might be less expensive overall, and is easy enough for a smart monkey to understand, find replacement parts, and repair down the road.
Just for the record, this was my second experiment. My first attempt was just to replace the OEM over-temp snap disc (L-200 in diagram) with a lower-temp snap disc. I tried 120F and 125F snap discs from Grainger ($6 each) because they were the warmest ones that had the smallest temp differential between opening and resetting the circuit (10 deg F). I wanted a small temp difference because the plenum doesn’t change temperature much between blazing hot fire during warm-up and enough temp to get/keep secondaries cruising. After experimenting a while, even the 125F snap disc would close the damper too cool and too often during start-up such that it took several cycles of smoldering until the secondaries lit. If I went with a higher temp snap disc, I mostly could find only a 40F temp differential, which would either have been too hot a limit to be any better than OEM, or else the larger temp differential would have made the smoldering even longer until the snap disc reset. Plus, since the L-200 snap disc (or its replacement) only senses plenum temperature, it’s subject to variation due to HX cleanliness, air filter condition (and airflow), house temperature (cold air return), etc., and I found it just was too variable and slow-reacting to be much good to effectively prevent excessive temperatures while also allowing enough heat-up to light the secondaries. So, in my experience replacing the L200 snap disc with a lower-temp snap disc is not a great option.
That was a well thought out post thank you. There is much more to wood heat than the average person would think.
Other people have made fancy temp controllers to control their Tundras better. I made a simple snap-disc system as an alternative.
First thing was to add a 0-60 minute bathroom timer to the thermostat terminals, as others have done (bottom of diagram below). It’s so easy and effective, it’s a must-have to improve things quickly.
View attachment 174152
I also rigged up some sheet metal holders and installed 2 snap discs on the 6” HX tube that sticks out the rear of the furnace, and multi-purposed the stove pipe screw holes to also retain the metal holders, as shown below. The far snap disc is an adjustable 210-250F Grainger #6UEA9 and the near snap disc is a 120F Grainger #6UDY9. I wired the 210-250 snap disc in series with the overtemp damper cutout (top left of diagram). I wired the 120F snap disc and a simple light switch in parallel with the thermostat terminals that open the damper (bottom left of diagram).
View attachment 174153
The 210-250F snap disc provides overtemp protection by cutting out the damper motor. Even though it resets 40F below the cutout temp, the HX tube temperature ranges widely depending upon burn rate so it only takes a couple minutes for the snap disc to reset after the damper closes.
I chose the 210-250F temp range based on what my IR gun showed me was about the temp when I wanted the damper to close. I installed, but even as low as 210 would let the furnace get too hot. Turned out the surface was hot enough but there was warm air blasting out of the rear panel and cooling the rest of the snap disc. So I sealed it with aluminum tape, but then the complete lack of airflow meant that even set up at 250F, the snap disc tripped and closed the damper way too soon. I slightly crimped a metal shim and put that under the snap disc, and now it opens the damper circuit just at the right time when set to 230F.
On a typical start, the snap disc might hit the high limit and close the damper, and secondaries might fail within a couple minutes, at which time the snap disc resets and gives another try.
As for the 120F snap disc, its purpose is on really cold days, I can close (turn on) the “burn coals” switch. After a burn has peaked and I have coals left, the 120F snap disc cools enough to close the circuit and open the damper. Not only do I get heat sooner from the coals on a cold day, but more so to burn them down so we can start another load sooner. Same thing as others have done with their temp controllers.
So, it’s somewhat fool-proof now:
Load furnace
Set timer to 20 minutes if lots of coals; 30 minutes if few coals.
Turn on “burn coals” switch if really cold or windy.
If “burn coals” switch is on, wait at least 4 hours between loads and let LP furnace fill in the gaps if necessary (hardly ever).
I also multi-purposed the rear screws for the rear outlet plate to secure a sheet metal guard of sorts to help protect the snap discs, especially the 110V snap disc on the far side.
View attachment 174154
All in all, it seems to work quite well, further optimize burning, and keep things safe and under control. I’m pretty pleased for an experiment for $35 and some tinker time.
Compared to the micro controller alternatives described in previous posts, I don’t think this option can be adjusted as easily or quickly or inexpensively. However, I also think this option is very effective once dialed in, might be less expensive overall, and is easy enough for a smart monkey to understand, find replacement parts, and repair down the road.
Just for the record, this was my second experiment. My first attempt was just to replace the OEM over-temp snap disc (L-200 in diagram) with a lower-temp snap disc. I tried 120F and 125F snap discs from Grainger ($6 each) because they were the warmest ones that had the smallest temp differential between opening and resetting the circuit (10 deg F). I wanted a small temp difference because the plenum doesn’t change temperature much between blazing hot fire during warm-up and enough temp to get/keep secondaries cruising. After experimenting a while, even the 125F snap disc would close the damper too cool and too often during start-up such that it took several cycles of smoldering until the secondaries lit. If I went with a higher temp snap disc, I mostly could find only a 40F temp differential, which would either have been too hot a limit to be any better than OEM, or else the larger temp differential would have made the smoldering even longer until the snap disc reset. Plus, since the L-200 snap disc (or its replacement) only senses plenum temperature, it’s subject to variation due to HX cleanliness, air filter condition (and airflow), house temperature (cold air return), etc., and I found it just was too variable and slow-reacting to be much good to effectively prevent excessive temperatures while also allowing enough heat-up to light the secondaries. So, in my experience replacing the L200 snap disc with a lower-temp snap disc is not a great option.
So the bath timers.. are you guys using these to bypass the controller or snap discs? For loading? So stove can surge up before the controls start holding the flu temps? I assume so as where we want to keep flu is no where near where it really needs to go on initial load.
Maybe better to ask again instead of assume it use. Brenndatamo or however he spells it. lol. mentioned why he used it briefly on the phone with me but I'm not sure I understood him correctly. What function exactly is the bath timer performing and whats the benefit?
Yeah, that's about the size of it. It is easy to set 10-20-30 whatever minutes on it, and not worry about forgetting to shut off the factory manual switch, or relying on the tstat, which even though it may be calling for heat when you are loading, it may let the damper shut as soon as you turn your back...before firebox is up to temp.So stove can surge up before the controls start holding the flu temps
sloeffle
Minister of Fire
Would you have to replace the motor with a DC motor and some controls or can you use the existing motor ?As far as future plans, I will still likely do a full on plenum yet at some point, and I am still working on getting the parts to do a true "automatic infinitely variable speed" mod on the blower (not just 1 or 2 (or 4) different speeds like Heatpro and Max Caddy has)
The cats meow would be to have the damper and fan speeds all automated. So you basically could load and go.
lol sorry that last part confused me. I understood the initial idea is correct though. gives fire box time to get up to temp, burn any surface moisture out of wood before stove begins being controlled. makes sense. currently mine is simply set to run off of firebox temps measured at the face of the stove with probe clamped on. This allows the fire to build to its max level then damper down unless therm is calling for heat. The only other function I have is its set to open when face temps are low enough draft is measuring low. So I am controlling draft but not using flu temps to do so. gives me a wider range and is easier to dial in. still going off manometer readings just using firebox temps. so my range is very small. HYS set to like 25 or 30. This seems to work nicely. kinda acts as the timer for loading keeping door open until firebox reaches proper temp. I may go back to flu temps but seems as is I can keep draft proper long as possible using surface temps of firebox. I may benefit from a timer if I change my setup but honestly its kinda load and go the way it is. maybe I could gain more control using flu temps, timer I dunno seems like I just load it close the door and forget it as it is. only thing I don't like is it gets hotter than I have max temp set for closing damper when I feel firebox has reached proper level, if therm is calling for heat.. this is where the timer would benefit I believe. I have remote control over my therm so I have been just turning it off when loading an back on after fire box reaches temp. timer would be helpful. Even though therm causes firebox to go hotter or damper to stay open longer than I have set, it still never reaches the high limit level. Only time that happens is on a really fully load on super hot coals or when starting a top down fire. A few times during instances like those the high limit switch came on right before the fan then damper reopened after a few minutes.
Yeah, that's about the size of it. It is easy to set 10-20-30 whatever minutes on it, and not worry about forgetting to shut off the factory manual switch, or relying on the tstat, which even though it may be calling for heat when you are loading, it may let the damper shut as soon as you turn your back...before firebox is up to temp.
lol sorry that last part confused me. I understood the initial idea is correct though. gives fire box time to get up to temp, burn any surface moisture out of wood before stove begins being controlled. makes sense. currently mine is simply set to run off of firebox temps measured at the face of the stove with probe clamped on. This allows the fire to build to its max level then damper down unless therm is calling for heat. The only other function I have is its set to open when face temps are low enough draft is measuring low. So I am controlling draft but not using flu temps to do so. gives me a wider range and is easier to dial in. still going off manometer readings just using firebox temps. so my range is very small. HYS set to like 25 or 30. This seems to work nicely. kinda acts as the timer for loading keeping door open until firebox reaches proper temp. I may go back to flu temps but seems as is I can keep draft proper long as possible using surface temps of firebox. I may benefit from a timer if I change my setup but honestly its kinda load and go the way it is. maybe I could gain more control using flu temps, timer I dunno seems like I just load it close the door and forget it as it is. only thing I don't like is it gets hotter than I have max temp set for closing damper when I feel firebox has reached proper level, if therm is calling for heat.. this is where the timer would benefit I believe. I have remote control over my therm so I have been just turning it off when loading an back on after fire box reaches temp. timer would be helpful. Even though therm causes firebox to go hotter or damper to stay open longer than I have set, it still never reaches the high limit level. Only time that happens is on a really fully load on super hot coals or when starting a top down fire. A few times during instances like those the high limit switch came on right before the fan then damper reopened after a few minutes.
oh ok I get what your saying. not sure why I got that confused makes perfect sense now. thx
I have noticed some smoke staining, light creosote oil drips around the top of my chimney. I expect it around the rain cap some but its down the sides of the final stack a good foot or so. As well some slight discoloration has occurred its seems in the last few feet of that final stack piece. It all seem minimal and is minor not much oil dripping. I say oil cause its pretty much the color of clean motor oil. Any ways flu is 15' draft has never really gotten that high the baro did get stuck once but still i don't think draft went much over .07 or .08 and not for long. flu may have hit 500 at stove output measured on surface of pipe. Is any of this normal? Do you think I over drafted the chimney or does some discoloration occur sometimes? I need to go up and check the cap it seemed like I had it in tight but looks like smoke comes out under neath the bottom flange. maybe I didn't get it tight enough or should I be using a gasket? Just seems odd to have smoke coming under the bottom rain shield but maybe its just flowing out under it from the top of the flu I dunno. Thoughts?
Sorry, I missed this post somehow.Would you have to replace the motor with a DC motor and some controls or can you use the existing motor ?
No, a page or two back @STIHLY DAN suggested using a controller meant for use on a AC unit...sounds almost perfect for what I am trying to accomplish with the blower. I have one coming to try out. I would have one installed already, but the putz that I ordered from on Amazon apparently was just kidding when he put up his for sale ad!

DoubleB
Minister of Fire
a controller meant for use on a AC unit...sounds almost perfect for what I am trying to accomplish with the blower. I have one coming to try out.
Can't wait to hear your results. I'm devising a VFD setup too. I asked the motor guy at work and he said I need to be careful to make sure the VFD is compatible with the motor otherwise it can prematurely age the motor bearings and windings/insulation and cause other problems. So I called the motor manufacturer today to see if they could recommend a suitable VFD. Conversation went like:
Me: Is there a suitable VFD for this model #?
Mftr: No, because this motor is used in a furnace blower.
Me: Is there a different motor you make that would be amenable for a VFD?
Mftr: Only if the furnace already has an ECM-controlled motor.
Me: So are you saying there is no suitable VFD for the motor because of how the motor is designed, or because it's used in a furnace?
Mftr: Because it's used in a furnace.
Me: So is there a suitable VFD for this motor if it's not used in a furnace?
Mftr: No.
It was clear he didn't feel any incentive to entertain my inquisitiveness, so I'm curious if anyone here knows how to know if a particular VFD is suitable for our blower motor.
I don't plan to go cheap if that means I'd damage the motor. However, I even see home improvement stores have var speed drives for ceiling fans, and if that type of thing is suitable, I think I have a fail-safe circuit in mind where I could use that.
DoubleB
Minister of Fire
With all of the talk about blower speed controllers I figured it would be a good time to post this description of the one that I recently built for my Tundra using the factory motor and the high and low speed lead leads from the motor. I ran the hot lead to the motor to the com on a relay, high to the motor to NC and low to NO on the relay so it will fail to high. The relay is connected to a temp controller that is monitoring the air temp coming off of the furnace. Switches to high at 105 and back to low when the temp drops to 100 (for now).
I'm thinking of the same thing, except putting the VFD inline with the motor speed 1 terminal. That way, if the VFD or its leg fails, I still have the relay switch to NC if temp gets too hot (or if the relay fails), at which time the other leg energizes the motor at one of the other speed terminals. In fact, I suppose electrically a I could probably even use the same blower speed terminal, since the relay couldn't short-circuit itself.
Guess what guys?! I finally figured out why Tundras crack! They're made wrong! 
") (Well, I guess I should say that SBI fianlly figured it out)
(Well, I guess I should say that SBI fianlly figured it out)
I am serious though, the HE cleanout box shouldn't have been welded to the face of the furnace. When the HE tubes heat up, they get longer...and they are attached in a very solid manner to the back of the firebox...so something has to give. Since they are attached to the front panel of the furnace, they are pushing hard on the top of this big flat panel...and it is welded to the firebox...so the "fulcrum" point (and weak point) is where the two come together...right at the top of the loading door...which is already a weak spot due to the square corners...and that causes a stress riser...and that causes cracks when the HEs expands and contracts a number of times. Carbon steel will crack pretty easy when flexed in the same spot repeatedly.
You might argue that the HE tubes and the firebox are both hot, so both expanded, but, they are not going to expand at the same rate sooo...and the HEs are being cooled by the blower (more so than the firebox I'd say) so there is that expansion/contraction fight going on too.
I figured this out last night after looking at pics of our new member @Digger79 's brand new warranty Tundra. He said the HE box is no longer welded to the front panel and there is rope gasket used to seal up the gap so all the blowers SP doesn't leak out there. There is a sheet metal cover used to trim out over the gap. After seeing his pic I went down and stared at mine for a while, and then the light came on...aha, that's what it is! And this explains why Caddys don't have the problem, due to the slightly different design, the HE box is not attached to the firebox like the Tundras are (were). So if the Heatpros are not welded there I say they will be crack free.
Here are the pics Digger sent me.


(Well, I guess I should say that SBI fianlly figured it out)I am serious though, the HE cleanout box shouldn't have been welded to the face of the furnace. When the HE tubes heat up, they get longer...and they are attached in a very solid manner to the back of the firebox...so something has to give. Since they are attached to the front panel of the furnace, they are pushing hard on the top of this big flat panel...and it is welded to the firebox...so the "fulcrum" point (and weak point) is where the two come together...right at the top of the loading door...which is already a weak spot due to the square corners...and that causes a stress riser...and that causes cracks when the HEs expands and contracts a number of times. Carbon steel will crack pretty easy when flexed in the same spot repeatedly.
You might argue that the HE tubes and the firebox are both hot, so both expanded, but, they are not going to expand at the same rate sooo...and the HEs are being cooled by the blower (more so than the firebox I'd say) so there is that expansion/contraction fight going on too.
I figured this out last night after looking at pics of our new member @Digger79 's brand new warranty Tundra. He said the HE box is no longer welded to the front panel and there is rope gasket used to seal up the gap so all the blowers SP doesn't leak out there. There is a sheet metal cover used to trim out over the gap. After seeing his pic I went down and stared at mine for a while, and then the light came on...aha, that's what it is! And this explains why Caddys don't have the problem, due to the slightly different design, the HE box is not attached to the firebox like the Tundras are (were). So if the Heatpros are not welded there I say they will be crack free.
Here are the pics Digger sent me.
Last edited:
Boy, I dunno. Maybe, but would that cause other issues, hard to say...since I have not seen the new design in person I am wondering what else has changed "under the skin".Do you think it's worth cutting some welds on older ones? I haven't had my top off, are they only welded from the front? Just from memory there aren't many welds around the HE door. Any more observations from the wings you added?
The new air deflectors have made a difference, but I am waiting for the next cold spell to come in this weekend to compare it to the last cold spell before I make a judgement of just how much difference it has made..
Yeah, but it is welded solid on the top and sides...that's the real problem.Never mind. Went down to load up and looked at the welds around heat exchanger door. Four of the five welds on the bottom are cracked completely. I have no cracking anywhere else so maybe I am immune to that now since the heat exchanger can flex.
It's not a VFD, just a simple speed control, lowers the voltage (to a point) The blower is a PSC motor so it will be OK with this controller since it is designed for PSC AC motors.I'm curious if anyone here knows how to know if a particular VFD is suitable for our blower motor.
Here's the link http://r.search.yahoo.com/_ylt=A0LEV7hSk7pWSScAV4YnnIlQ;_ylu=X3oDMTByOHZyb21tBGNvbG8DYmYxBHBvcwMxBHZ0aWQDBHNlYwNzcg--/RV=2/RE=1455096787/RO=10/RU=http://www.icmcontrols.com/Head-pressure-control-with-support-for-two-pressure-OR-two-temperature-controls-120600-VAC-ideal-for-line-voltage-AC-and-refrigeration-systems-Prodview.html/RK=0/RS=a3dfOCUbULpR2L3EUruSmP5a5Is-
Similar threads
- Replies
- 15
- Views
- 17K