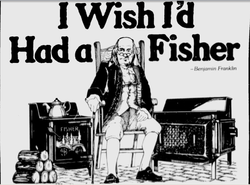
I Wish I had a Fisher
- Thread starter vasten
- Start date
-
Active since 1995, Hearth.com is THE place on the internet for free information and advice about wood stoves, pellet stoves and other energy saving equipment.
We strive to provide opinions, articles, discussions and history related to Hearth Products and in a more general sense, energy issues.
We promote the EFFICIENT, RESPONSIBLE, CLEAN and SAFE use of all fuels, whether renewable or fossil.
You are using an out of date browser. It may not display this or other websites correctly.
You should upgrade or use an alternative browser.
You should upgrade or use an alternative browser.
- Status
- Not open for further replies.
Dang it Coaly now you are making ME want a bear lol.... My vigilant is good but once it drops below twenty outside it supplements my furnace...
The difference between the Vigilant and Fisher is there is never rebuilding or replacing gaskets. You can drop them off a truck with no damage and they are very fixable if you ever need to weld the steel plate. 24 inch wood for a Mama, 30 for Papa and there is no furnace.

The difference between the Vigilant and Fisher is there is never rebuilding or replacing gaskets. You can drop them off a truck with no damage and they are very fixable if you ever need to weld the steel plate. 24 inch wood for a Mama, 30 for Papa and there is no furnace.
not to hijack his thread, but you also forget to mention the fringe benefits too, such as cutting and splitting 24-30 inches vs 18 inches my back would love that lol
Being manual draft control vs thermo you control the heat more than the stove does.
And no need to be on a 3 year plan for firewood vs a newer stove
Almost sold on one....
Here's the best I've got.
Guaranteed to warm up your lover this Valentines day !!
From Medina NY ; Like new = Early = Vintage Mama Bear ! CLEAN !! (not green)
Built with the correct Fisher specification tapered legs

4 FIN patented "EZ-Spin" draft caps with steel inserts

Stainless door handle spring will never tarnish or wear

Low Miles

A real steel
 for only $200 !!
  Not good enough ? Make an offer !
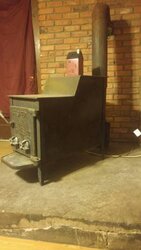
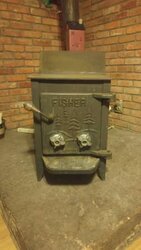

It's actually on Craigslist right now for $200 ! Or make best offer before it's too late !
I didn't ask, and the picture is too far away, but this could be one of the rare misspelled doors spelling Patented - "Patended" !!
**Craigslist ad removed**
UHM coaly that is not exactly what the ad says ...
But i did text him he is about 4 hours west of me. and we agreed on a price
But i did text him he is about 4 hours west of me. and we agreed on a price
That was MY best sales pitch, but it's good to welcome another to the Fisher family of stove owners !!
The seller probably didn't even know it was a Mama Bear, then alone having the better stainless handle and first style EZ-Spin patented draft caps.
(many fabricators didn't taper legs as shown on leg details in drawings) You got a really nice stove.
Now IF patented is spelled "Patended" on the door, you drop if off right here and TRIPLE your money on the spot !!
We now have something in common. I picked up my first Fisher on the coldest day of the year too, in 1985 !
You need me to sell that Honey Bear Chuck?

hmmm 4 hours out to get the stove and then probably another 7 hours in the truck to get it to you then 3 more hours back home to tripple my money... that is a lot of seat time.
Now my other problem is figuring out how to get it to fit in my room, it is going to stick out into my room a full 18 inches more than my VC which means rearranging my living room.
Now my other problem is figuring out how to get it to fit in my room, it is going to stick out into my room a full 18 inches more than my VC which means rearranging my living room.
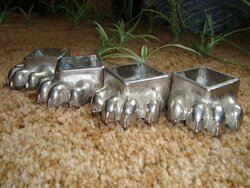
Ah, but you get to see and touch a new XL out of the box ! Some original Oregon side vent stoves, a refurbished Coal Bear, and well,,,, the rest of the Bear family! Maybe even some "bear" feet you never knew existed if you're into that sort of thing.
In case it's not a "Patended" door, and you end up installing it; Not knowing what your hearth situation is, these stoves were originally made to sit across the hearth so they don't take up any more room than they have to. A sawzall and grinder is all it takes to cut a new hole in the side and have a pipe welded for the outlet on the side you need it. Steel plate is so easy to work with compared to cast iron ! It doesn't change any plans for a baffle and it's easy to cap the back. With the flat cap you have a place for inlet and outlet of a water coil or secondary air tubes.
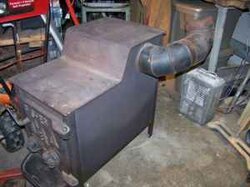
In case it's not a "Patended" door, and you end up installing it; Not knowing what your hearth situation is, these stoves were originally made to sit across the hearth so they don't take up any more room than they have to. A sawzall and grinder is all it takes to cut a new hole in the side and have a pipe welded for the outlet on the side you need it. Steel plate is so easy to work with compared to cast iron ! It doesn't change any plans for a baffle and it's easy to cap the back. With the flat cap you have a place for inlet and outlet of a water coil or secondary air tubes.

There you go I have pictures for you, it does not appear to be a misprint on the doors, there are numbers on the bottom that I cant make out maybe the patent number. My stove set up is similar being in a corner. I have 1/2 durarock behind the stove with only a 1/2 air gap. Looks like I need to increase that to 1", I don't use a raised hearth I just use more dura rock on the floor, I still haven't decided how I want to finish it, the plans for this summer is to redo the one exterior wall behind the stove and get some insulation in there.
Dont give me more ideas, I am terrible, especially when I have oxy acetylene grinders and welders. Besides cutting one up and altering it to me takes away from the stove.
On a side not my son was skeptical of my decision to but ANOTHER stove, until I showed him what people are asking for them on CL.
Coaly beginning to think you are a bad influence. Also realizing that I am not the only one with a wood stove "thing" I like to try them all out and see what works best for me. Kind of like buying a vehicle when you first buy one you think you know what you want and need, then you see another and say huh maybe that may work better for me.
And there is a set of feet on ebay right now for 275.00 I dont think I am that far in YET.... lol
So needless to say the stove is home and waiting to be installed. Not sure I will be so impulsive next time around to make that kind of a run for a stove.. but for $100.00 how could I pass it up. Worse comes to worse and I dont like it I can always double my money atleast.
She is finally installed, replaced the bricks that had chunks missing out of them, and cleaned out all the ash that had built up around it. To say it is a bear to move around in an understatement.
It is currently cruising at 450-475 range with flue temps around 300. I don't have more than 4 small splits in there about 16" in length right now. Just taking her out for a test drive. I have the pipe damper set at about 45 deg, and the draft caps in to about 1 1/2 turns from closed.
I noticed that someone put a door gasket on there and it is in there pretty tight so I will have to dig that out. Also the knobs are not set up the same on the inside. The one closest to the handle looks like a piece of threaded rod with a bolt on it and the knob appears to screw into that. The opposite one appears to have a bolt through the knob and has a nut on the back. I assume the one closest to the door is the correct one and the other is a home grown fix but not sure.
Next plan is to find someone to sell me the metal for the baffle.
Water is simmering in the steamer and is it 71 in here... although it is 31 outside so not much a test for her but just wanted to see how she would do before I loaded her up. But they are calling for -4 on Thursday so hopefully her and I will be comfortable by then enough so that I can load her up and see how she does.
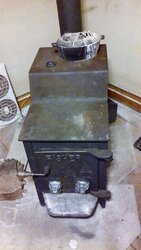

Gee, Mamas I get by myself, Papas I take the wife  . There is a huge difference moving a Papa. The last Mama we installed was down very narrow steps. I lay planks on the stairs and put a 4 X 4 across doorway at top to winch it laying down. She's on the bottom steering to keep it on the ramp. Otherwise they stay on wheels.
Your draft cap bolts in the close up picture look right on the outside. They should be soft bolts with no markings on the heads. They should have a half nut under cap on the outside of door and many had half nuts inside as well, but some have full nuts that work fine. When the draft cap is closed, it's nice to have the bolt head stick out of the cap by about half the head so a wrench goes on it easily. Otherwise a very thin socket is needed to reach into the cap. I think they are 4 inches long. I have new originals if you need any. Unmarked heads 4 inches long are hard to find.
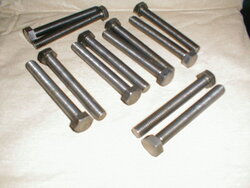 New old stock from when they closed Woodland Park CO.
I keep them oiled in a plastic bag like pets.
 . There is a huge difference moving a Papa. The last Mama we installed was down very narrow steps. I lay planks on the stairs and put a 4 X 4 across doorway at top to winch it laying down. She's on the bottom steering to keep it on the ramp. Otherwise they stay on wheels.
Your draft cap bolts in the close up picture look right on the outside. They should be soft bolts with no markings on the heads. They should have a half nut under cap on the outside of door and many had half nuts inside as well, but some have full nuts that work fine. When the draft cap is closed, it's nice to have the bolt head stick out of the cap by about half the head so a wrench goes on it easily. Otherwise a very thin socket is needed to reach into the cap. I think they are 4 inches long. I have new originals if you need any. Unmarked heads 4 inches long are hard to find.
 New old stock from when they closed Woodland Park CO.
I keep them oiled in a plastic bag
 like pets.
Is that close clearance pipe? 18 inch clearance to combustibles for that and usually 50% reduction with shield down to 9 inches.
"She" will do a lot better with double wall pipe when you add the baffle too. The less heat you have to leave out, the more usable heat for inside.
"She" will do a lot better with double wall pipe when you add the baffle too. The less heat you have to leave out, the more usable heat for inside.
It is lowe's special pipe not close clearance that is all I have ever run on my stoves. It is 19 in away from the wall at the closest point and with the VC I seldom hit wall temps over 100 degrees when measured with an IR gun.
This is also just a test run for her I think that once I see what she can do and get comfortable with her I am going to rotate her to the right as you are looking at the stove and make it paralell to the wall, and run my heat shield down that wall.
This is also just a test run for her I think that once I see what she can do and get comfortable with her I am going to rotate her to the right as you are looking at the stove and make it paralell to the wall, and run my heat shield down that wall.
This is what I was referring to the one on the right hand side below the latch I am thinking is original the one on the left is the home grown. Also the cap on the right when I close it down tight I can still see flames reflecting out the top but the bottom appears to be touching the door. But the home grown one on the left appears to make a full seal all the way around. Notice the one on the left appears to be a nut and bolt, and the one on the right the threaded stud appears to be bolted in place and the nut through the knob appears to turn inside of that.
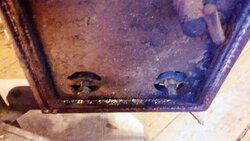
I am still young and dumb enough that I did it all by my self with the use of a hand cart, and my back. This summer I think I want to take mama to the barn and give her a new paint job, including the silver on the doors.

I am still young and dumb enough that I did it all by my self with the use of a hand cart, and my back. This summer I think I want to take mama to the barn and give her a new paint job, including the silver on the doors.
It is lowe's special pipe not close clearance that is all I have ever run on my stoves. It is 19 in away from the wall at the closest point and with the VC I seldom hit wall temps over 100 degrees when measured with an IR gun.
That's good, it looked extremely close.
The bolt on the right looks to be installed correctly. It is probably slightly bent, so the draft cap isn't exactly 90* to the door face. That's ok for now. When you remove it to paint, it can be straightened easily.
The bolt head should be on the outside and the bolt threads through the door. It should have a nut on each side of the door tightened against the door to prevent the bolt from moving. Remove hardware and clean all threads with wire brush.
To install, the bolt is threaded into cap until bolt head is just sticking out of outside of cap. One nut is installed partially onto the bolt, about even with the edge of cap that contacts door when closed. This is the position of the nut and bolt when cap is closed. Holding the bolt and nut from turning, the draft cap should turn freely until it contacts bolt head. This is the fully open position.You can grease the threads where draft cap travels at this point. Next thread bolt with draft cap assembly into door. The second nut goes inside the door. The draft cap spins back and forth the bolt threads. The adjustment I was referring to; Before tightening nuts against door, the bolt should be slightly sticking out of the draft cap when the cap is closed. Adjust the outer nut on the bolt so the bolt length on the outside is correct. Holding bolt head with wrench tighten inner nut against door. This will allow cap to open 3 turns or more and the bolt can be held when cap is closed.
Keep the threads lubricated by reaching through the hole on the back of door.
I try to exceed the clearances whenever possible, Even with the heat shields on the prior stoves I always had the backer board up with the air gap for the little extra money it costs, to me it is worth the peace of mind to have the extra shielding on the wall. . I plan to continue it up the wall and face it with faux stone in time.
Once I get a final resting place for the mama bear I plan to redo the hearth pad under her right now I just readjusted what I had to make it work for the tests.
I tried picking at the door gasket but it is jammed and cemented in there very well, might have to be a summer project to get that out and get it ground down to bare metal in there again.
When the fire is out, remove door and take outside to use a drill with wire wheel to buff the cement off door. Usually people stick gasket material in the door seal channel and it makes a dusty mess buffing off in the house. In the channel the heat of the stove makes it crispy and it chisels out when brittle. Not so easy on the cooler door.
I tried to just get the rope gasket out and it was lodged right in there I plan to attach the rope with needle nose. Once I have it out I am familiar with the cement removal from the VC, small chisel and hammer work good at breaking up the brittle pieces and wire wheel for the stubborn ones.
With not so great wood in the stove, it is 25 outside and 71 in the stove room 65 in the kitchen (the hardest room for me to heat for some reason, lack of air flow and insulation I assume even though it is right off the stove room) stove is avg about 385 with the IR , and at the point where the stove pipe enters the insulated pipe it is reading around 180. Normally 180 for a surface temp would freak me out as too cold but I guess I am supposed to almost double that for what is going on inside the pipe.
If it keeps performing like this I will be very impressed with it, especially when I am only putting 2-3 pieces in at a time. Real test will be the next few nights when it drops into the teens and below 0.
One thing I cant figure out is why is my steam pot working at these temps when it took temps over 500 to get it to start on the VC. 400 is 400 right and the surface area under the pot is equal so why did one stove seem to take more heat to boil the water than the other?
Time will tell if your flue is too cool. Is that with damper closed half or more? If so, try it farther open and see how much it comes up. Give it time to respond. Some of the things that does (other than burning more fuel) is allow higher velocity in flue giving smoke particles less dwell time in the chimney, less time to heat pipe - so internal flue gas temps are higher vs. surface temps and the air coming in the intakes faster creates more turbulence where the flammable gasses coming out of the wood mix with oxygen for a cleaner burn. Before getting excited about flue temp, you should see what it is mid burn with a full load with air open about 1 and a half turns. I'm guessing your stove top will be more like 600 and pipe before chimney 400. When I baffled mine, pipe temp averaged half of stove top. 600 /300. That varies greatly by wood load and where you are in burn cycle. I had to clean once mid season.
We normally ran 1 turn open for heating and 1 1/2 to 2 for cooking. After cooking a meal we had to turn it down to 1/2 turn to let the house cool a while. it was hard on the legs standing close cooking for too long too. The Kitchen Queen solved that with much larger cooktop and full thickness bricks across the front of firebox to keep you cool in front of it.
Ours was in the middle of kitchen and couldn't see buying propane when the stove was always hot.
Since contact area is the same under kettle, (conduction) radiation would be greater from the Fisher top being 3 times the size. I assume a cast iron kettle would absorb that radiation as well. Probably due to air flow as well. Cast Iron radiates heat away faster and probably had more air currents around the stove affecting the water temp. (the cast iron material of a kettle moves heat away fast - a steel tea pot with less mass heats water by conduction with less loss from air flow, so I would think a thin steel tea pot would heat more the same rate) I would think the kettle on a much larger surface doesn't get the cooling air currents from the shape of the VC. Probably shows the efficiency of heating the air and not the water? If a flat pan evaporates water the same rate on each stove, that would prove air cooling of the cast kettle has something to do with it.
That's just my guess that the co-efficient of thermodynamics has something to do with it.
It's easier to say "because a Fisher heats better" !

I normally put the damper to the point it just touches the sides of the pipe roughly just past 45 degrees, that is as far as it closes it doesn't lay flat. My draft caps are open about 1-1 1/12 turns, and I seem to get good heat at that level sometimes I am even closing the draft caps down to only 1/2 turn open.
I have yet to break 600 on the step top, usually 550-580 is my max but at that point my stove pipe is almost at around 4-500 so I am trying different damper settings to keep more of that heat in the stove. It shows that I definitely need to get that baffle in. With my pipe damper open wide when I open the door, if I do it slow enough you can actually hear the air rush in like a vacuum seal being broken, and the flames in the fire box are almost horizontal going to the back. I can get that affect with pipe temps in the 200's. Think I have a very strong draft for the stove.
Now its a matter of figuring out the draft controls
Edit: and I only remember the two laws of thermo dynamics so I will go with the fisher just heats better It was around 11 degrees last night and 71 in here, and 63 in the kitchen without the need for the furnace, so Ill take that any day, of course more would be better.
I have yet to break 600 on the step top, usually 550-580 is my max but at that point my stove pipe is almost at around 4-500 so I am trying different damper settings to keep more of that heat in the stove. It shows that I definitely need to get that baffle in. With my pipe damper open wide when I open the door, if I do it slow enough you can actually hear the air rush in like a vacuum seal being broken, and the flames in the fire box are almost horizontal going to the back. I can get that affect with pipe temps in the 200's. Think I have a very strong draft for the stove.
Now its a matter of figuring out the draft controls
Edit: and I only remember the two laws of thermo dynamics so I will go with the fisher just heats better
 It was around 11 degrees last night and 71 in here, and 63 in the kitchen without the need for the furnace, so Ill take that any day, of course more would be better.
Last edited:
- Status
- Not open for further replies.
Similar threads
- Replies
- 3
- Views
- 228
- Replies
- 8
- Views
- 342
- Replies
- 2
- Views
- 866
- Replies
- 1
- Views
- 674


