Secondary Air Pipes

  • Active since 1995, Hearth.com is THE place on the internet for free information and advice about wood stoves, pellet stoves and other energy saving equipment.

    We strive to provide opinions, articles, discussions and history related to Hearth Products and in a more general sense, energy issues.

    We promote the EFFICIENT, RESPONSIBLE, CLEAN and SAFE use of all fuels, whether renewable or fossil.
Status
Not open for further replies.

DaveOx

New Member
Feb 11, 2016
1
Pennsylvania
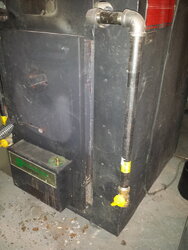
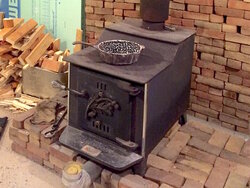
New to the site - great wealth of experience and knowledge here. I have an old Penn Stove Blue Flame c.1980 that I've been using for 17 years that was here in the house when we bought it.
PennStove.jpg

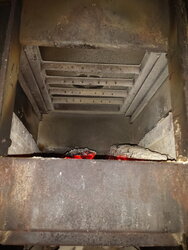
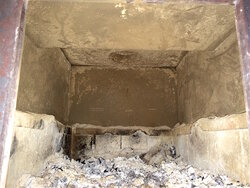
The internal flame baffle plate broke off the back wall (where those horizontal marks are, which seems too low anyway) so currently all my heat is flying up the flue.
Inside.jpg

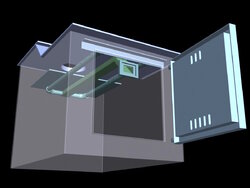
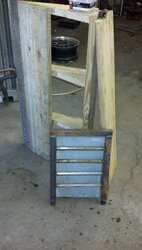
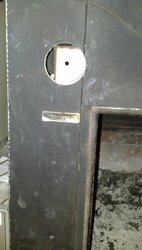
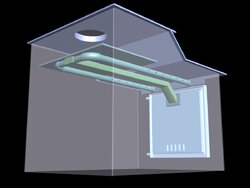
I've been pushing off the task of welding in a new plate, but with all the talk of efficiency I think I want to add a secondary air system along with it. My idea is to build a setup that includes the baffle and the air pipes and draws air through the top vent holes in the door.
SecondaryAir-Pipe-001.jpg SecondaryAir-Pipe-002.jpg

Any thoughts on this design? This stove EATS wood and I either need to do something like this mod or buy a new EPA stove.
 
Last edited by a moderator:
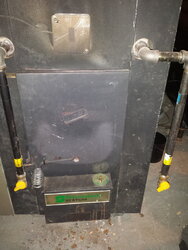
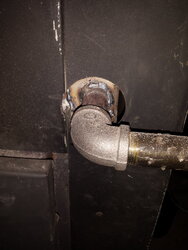
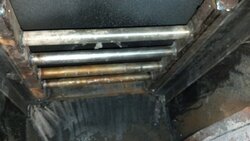
I did this with stainless tubing, prefabricated the tube frame and used a holesaw and 3/4" black iron pipe, the secondary exchanger rests on 1 1/2" ledges I welded only in the back corner seam and from corner seam of the fire box to prevent cracking due to expansion. I get steady clean, overnight burns with this Shenandoah AF-77 wood furnace addon now. As the stainless heats up it ignites the unburned gases that have to pass by on their way into the flue. There is no added baffle , as it prevents the flame from transferring to the firebox, hence preventing efficiency. Mind you, this is in my basement and not something in living space. so the 3/4" pipe intakes are visible. 20160213_134507.jpg
20160213_134456.jpg 20160213_134528.jpg 20160213_134522.jpg
 
Why would you not want a baffle on the woodfurnace? Of course the flame will transfer heat to the firebox. A baffle makes a longer air path which slows the gasses and allows for greater heat transfer. It would lower your flue temps and increase heat output.
 
Considering this is a retrofit, initially I had a ceramic baffle on top of the stainless secondary. However, the AF-77 has rollout issues, even with a lined chimney and excellent draft when you load it.

When I tested it with the baffle in place, the primary heat exchange surfaces are the flue pipe and ceiling of the firebox, as the lower half is lined with fire brick and the side walls do not absorb as much heat for transfer to the air stream. (heating air, not combustion air)

By removing the baffle, it greatly improved the heat transfer, stopped rollout upon loading and the exiting flue gas from the 40ft , stainless lined clay and brick chimney is mostly clear with little or no smoke 80 % of the time.

The fresh air introduced at the tip of the flame has turned out to be ideal for clean burn. It also cools the flue pipe on the inside, preventing creosote buildup.

These are my findings. But this is one stove, one design.
 
Here are few more shots, notice the ceiling of the firebox, it was very dirty burning unless burned hot, which went through way too much wood.


Image_2278.jpg Image_2325.jpg Image_2324.jpg
 
From the look of things, the rollout was caused by the baffle being too close to the top of the firebox. For sure secondary air makes a huge difference, but a baffle would help if configured correctly. I'm sure it's much more efficient, just watch the firebox for premature wear from the heat.
 
Last edited by a moderator:
Yes, the space was limited, but it rolls out as is from the factory design, the AF77 has a 6" flue.

In addition the fan forced cooling keeps the firebox walls cool, extending the life.

I tried different configurations of the baffle, making it smaller, hole-sawing 3" holes through it, no matter what it didn't help.

The ceramic baffles are intended to glow red and help re-combustion, but I found it did not work in this retrofit.
 
To add, my hope was , by baffling the exchanger, leaving the second air chamber flue entrance, closer to the loading door, the draft would capture the smoke before it rolledout, but nope.

I can load this at 9pm and it has a a partial log at 6 am with coals. It does the trick.
 
Before converting my stove, I did some research and came up with some 'unwritten' rules for 'the best' general secondary design. Guess you can do it any way you want, though most anything else would compromise some part of operation. I've posted a couple other times on the subject, but to re-cap:

1) Thin walled burn tubes - for the fastest heat/up and most effective transfer of heat to the secondary air.

2) Stainless steel tubes to prevent burn-out at elevated temperatures, especially in conjunction with Rule #1. I grabbed some 'scrap yard' stainless which was ~.062" wall, ~1 inch OD and have burned it for years up to orange heat with no apparent ill effects. So I suspect any general stainless variant will do (304, 304L, 316, etc) I don't think there is any need to seek out the 'exotic' stuff. Many have used iron pipe (seemingly 3/4" schedule 40 ?) This will likely work for a good many years, too, though the .110" nominal wall adds some thermal mass which slows heat-up times.

3) Secondary inlet air should be routed through the firebox to provide as much pre-heat as possible. This can involve relatively long air channels, and/or channels with relatively large cross sections so the airflow slows and has a long latency time. Large cross section generally preferred over just extremely long channels as the long channels may create too much resistance to air flow.

4) Lay tubes out perpendicular to the smoke flow. In most stoves this means the tubes run side-to-side, not front-to-back. This serves two purposes...the tubes create 'ripples' or turbulence in the flow which helps mix air and smoke for better combustion, plus the flame erupting from the back tube heats the next tube forward, making it more effective, next tube heats the one in front of it, etc.

5) Hole pattern - I basically copied the NC30 pattern and sizes and have been relatively pleased with it. I suspect much smaller holes might simply lead to more headaches laying out and drilling, much larger holes might not provide as much mixing / surface area for combustion.

6) Insulate the firebox and the baffle as much as possible - (I would say at least bricks on the walls/floor and some sort of hi-temp ceramic on the top) this keeps the most heat in the combustion area for the most thorough combustion...once the flue gas exits the combustion area and gets on top of the baffle, 'then' it's time to get as much heat out as possible / practical.

7) A glass door (edit: 'glass' meaning transparent ceramic such as pyroceram / neoceram) - or at least some porthole is ideal to view the secondary flames and adjust secondary air. Ideally, you want just enough air for complete combustion, but no excess. Any excess air just cools the whole works down and is counter productive. The secondaries will stop if you open, or generally even crack the door to take a peek, so some sort of viewing port allows for adjustment in the natural state.

8) Inlet area. I took a WAG and put in about 6 square inches of opening which turned out to be way too much. Though conversely, you can always close it down...opening up wider than your opening is hard! I typically have the secondary inlet open to expose about 3/4 sq. in. This typically doesn't require a lot of adjustment...more primary air automatically means less secondary. Though I might close the secondary down just a hair with a full load on a really cold night, when the stove is drafting really hard.
 
Last edited:
  • Like
Reactions: begreen
Nice info, Glass doors are ideal for heat transfer also.
 
Well, actually... that is another issue... (or two) ...

1) Heat leakage through the glass. Some modern stoves actually have metalized glass to reflect more heat back to the fire. This is again in consistency with Rule #6...keep the combustion zone as hot as possible. If running a steel door, a person might even consider bricking it up to some extent.

The 'ideal' configuration seems to be bordering on a gassifying boiler. A primary combustion chamber where the volatiles are baked out of the wood, and an extremely hot secondary zone where they are ALL burnt up, then a thermal transfer zone where 'all' heat is pulled out (if you have a forced draft) or all heat except what is needed for a natural draft. Of course, some convention has to be made to the layout of a stove/insert vs a boiler and that is where some of the compromise comes in.

2) I will go back up and put a note... I threw out the term 'glass' when it would be more correct to say 'transparent ceramic' ...aka pyroceram, neoceram, etc. Any stove retrofit should really use one of these materials vs an actual 'glass', though we always tend to say 'glass'.
 
I hear ya, but size, beauty, simplicity are all sacrificed to achieve it. People like wood because its simple and warm. The handling of wood is another issue of course. ;)
 
Status
Not open for further replies.