how can I get more heat out of my fire place insert older fisher insert direct connect block off plate no damper profile pic is my setup
Help with heat
- Thread starter bull
- Start date
-
Active since 1995, Hearth.com is THE place on the internet for free information and advice about wood stoves, pellet stoves and other energy saving equipment.
We strive to provide opinions, articles, discussions and history related to Hearth Products and in a more general sense, energy issues.
We promote the EFFICIENT, RESPONSIBLE, CLEAN and SAFE use of all fuels, whether renewable or fossil.
You are using an out of date browser. It may not display this or other websites correctly.
You should upgrade or use an alternative browser.
You should upgrade or use an alternative browser.
- Status
- Not open for further replies.
Much more information is needed.
First, is this a full size Insert or a Cub or Honey Bear Insert not designed to heat as much area?
The picture in your avatar doesn't show the size, but by the length of handles compared to the doors, it looks like a Cub or Honey Bear.
You can't simply baffle any stove or Insert unless the chimney is capable of it. Glass doors create other factors that requires the exact flow over glass and through firebox.
Does the insert have a round or rectangular outlet?
"Direct connect" means a liner is connected to the top of Insert and should extend to top of chimney. Is this what you have?
Most importantly is the size of flue all the way up and the material it is made of. This becomes more critical if this is in fact a Cub or Honey Bear.
Is the inner flue insulated, and is this an inside or outside chimney??
A close up of the front is needed to determine model and approximate year. (the intake style gives me an idea as it was changed over the years and will determine if a damper is missing)
This is the size of a full size Fireplace Insert. Let us know if yours is much smaller than dimensions given. Just the door opening size gives me a good idea of what you have.
Is the opening for air outlet above insert a single slot or double?
A Polar Bear has a different size opening and different circulation, but we'll get to that when we know what you've got.
Yours was UL listed and should have a tag with model. Big difference between a model made to heat 1000 sf and 2000 sf.
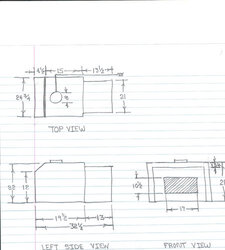

This is why I love this place everyone likes to help people out I will get measurements to you when I get off work but I will explain what I know diagram above looks closr to what I have you can get a 38-30 inch log in long ways has no face cover is why it is open also has open slot under ash tray two on each side an one across the top I usume for a fan as I have rigged up a temp. Blower on the side that blows out the top and it works great . Chimney is 13-8 tile that has concrete block layed around it 12'x4' with rock layed around it half in house half out with 6" pipe connected to stove direct connect . It burns good draws good fire last all night no complaints on that end it just doesn't seem to put out heat like my grandma bear in basement it wiil run you out . Wish it was up stairs but that's another story. Thanks for helping something needs to change though for next yr
This is why I love this place everyone likes to help people out I will get measurements to you when I get off work but I will explain what I know diagram above looks closr to what I have you can get a 38-30 inch log in long ways has no face cover is why it is open also has open slot under ash tray two on each side an one across the top I usume for a fan as I have rigged up a temp. Blower on the side that blows out the top and it works great . Chimney is 13-8 tile that has concrete block layed around it 12'x4' with rock layed around it half in house half out with 6" pipe connected to stove direct connect . It burns good draws good fire last all night no complaints on that end it just doesn't seem to put out heat like my grandma bear in basement it wiil run you out . Wish it was up stairs but that's another story. Thanks for helping something needs to change though for next yr
Does that mean your chimney flue is 13 X 8 rectangular masonry X 12 feet high and has a connector pipe going from Insert to a block off plate so it uses the 13 X 8 inch flue the rest of the way up? That is where your heat would be going and that certainly won't work if that is what you have, even with a full size Insert.
The faceplate only serves to close off the opening around insert and serves no function when directly connected to flue. It must however have a deflector plate, like a shield on an angle above the open slot that diverts heat away from mantel. Can't tell if it is there in your picture. It bolts on and extends outward, shown below in both pictures of different model Inserts.
The fireplace was designed to radiate heat from fire into masonry and circulate air through vents to help add a little convection heat into building. The problem is the masonry radiated outside and upward as well, so the firebox has a second box around it to remove the heat from convection around the back. Most heat from convection comes from the area around flue outlet that you can see in the slot across top. The cfm of the blower becomes critical and needs to be quite strong. (in the area of 225 cfm) It can blow into bottom, up back, and out top or into side and out top as you have it. Most side blowers aren't strong enough and need to be on each side as pictured below. The air will now be removed from firebox without heating masonry or using the vents built into masonry.
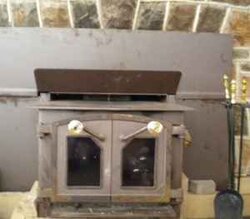 Honey Bear with slide control air wash under doors has a slot for intake air across entire front.
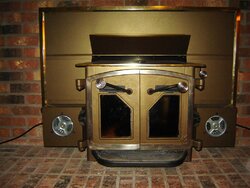 Full size Insert with side primary air intakes and damper control at right with dual blowers.
Mine is like the bottom has the two screw open vents on each side plus two little slide vents underneath the doors it is 32.5 deep 19.5 wide and the pipe goes from stove to the roof
You're describing a full size Insert. Is the door opening channel where door gasket is installed 10 1/2 high by 17 wide OR 8 1/2 high by14 wide? (The door opening would be the exact same size as your Grandma Bear 10 1/2 X 17 if it is a full size Insert. Grandma and full size Insert use the same doors)
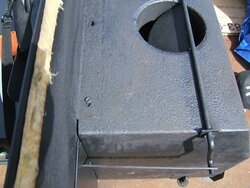
The sides across from outlet should have small 1/8 holes where screws were that had side brackets to mount a damper rod across. The early Inserts had a pull chain with keyhole shape hole through face plate. Later models had a lever with slot in face plate. I assume yours has a round 7 1/2 inch outlet hole in the top and is missing the damper. (considered 8 inch outlet) You must have reduced from 8 to 6 to connect to connector pipe or liner? Normally a "boot" is required to connect insert to liner and is notched for damper rod. If whatever the inner flue is were to be insulated, you could baffle it for much higher efficiency. If it is regular steel pipe being air cooled in the flue and not all the way to the top of original flue, I would not suggest an added baffle until you insulate the inner flue pipe.
Baffle thread here; https://www.hearth.com/talk/threads...d-fisher-more-heat-less-smoke-under-25.74710/
Damper as supplied with appliance;
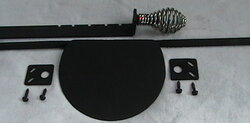


Yes it is 10.5 x 17 I would like to put a baffle in also if you stove is like mine what is your design thanks
OK, you have a full size Insert. Now I know the chimney requirements.
Once the chimney is 100%, you can think about a baffle plate.
You need 8 inch diameter minimum 15 feet high.
Downsizing to 6 inch diameter physically works fine but is technically against code. The code was written to prevent a firebox with minimum size outlet from being reduced smaller. Your Insert was designed with a larger outlet than necessary due to using existing larger flues built for a fireplace. Reducing the way you did works fine as long as all other parameters are met. From post #8 above I believe you only have a height of 12 feet. 6 inch diameter gives more resistance to flow with less capacity, so it should have more height than the minimum to compensate for the reduced draft.
Here's the key; a larger chimney doesn't create more draft. It is CAPABLE of more draft when given more heat.
Draft is measured at the flue collar where it is the strongest. The reason it affects heat output is the draft causes lower pressure in the stove, which allows higher atmospheric air pressure to PUSH into the intakes. IF you aren't creating low enough pressure with the correct chimney, you're not getting as much air and BTU is limited. In that case a baffle won't help, and slows the air even more. So we have to make sure you have low enough pressure created by the chimney first. The low pressure created by chimney is considered the engine that drives the stove. So you can see how a weak draft affects the output and it just won't burn correctly putting out the heat it should. I presume that is your low heat output problem.
Is the inner flue pipe stainless? If not, regular connector pipe will rust quickly in the environment of a closed flue. Holes through the pipe then allow cooler air to leak into the low pressure area of the flue cooling it and decreasing draft even farther. This can cause rapid creosote build up, especially if the chimney isn't the correct size which doesn't cause enough heat to be produced by the air / fuel mix in firebox. Air around the inner flue cools the flue gasses as well. You absolutely need 250*f all the way to the top. If your inner pipe cools more than that, again you aren't creating the draft necessary to get enough air into the stove to generate enough heat. (and will form creosote) Hence the reason for insulating the stainless liner to keep it hot. Your original flue is plenty large enough to do that.
IF you DO have at least 15 feet of stainless insulated chimney flue, you can baffle it.
Glass sooting can become a factor baffling yours. See if there is a flat piece of steel about 3" or 3 1/2 inches wide across the inside at top of doors mounted horizontal. This is to prevent smoke from dropping down across glass. A baffle should roll some of the smoke particles back down into the fire and changing the flow with glass doors is critical. Your baffle needs to be angled upward at the front, not flat. It needs to be 5/15 steel plate with corners cut as shown in the baffle thread. It's not difficult or expensive, but it needs to be right.
I will have to measure exact height of chimney and it is just stove pipe the fab metal sold me . If my clay pipe is 13x8 how do you get the stainless 8" down without smashing or tearing it and where is a good place to buy before next yr. Fire in stove now will have to wait and look for the metal above doors thanks douch for the help . This explains why my stove in basement will suck the doors closed sometimes because the flue is 20' high it is a grandma bear that does great my need to baffle it also
I was referring to a 6 inch insulated liner fitting easily. (That's what I would do) The stoves I tested when adding baffles were actually 15 feet from stove base to chimney top, but it was a 6 inch insulated metal chimney straight up. Many new stove manufacturers instructions require 15 feet from stove base, but that is only due to how they were tested and not what is physically needed to make them work. If you baffle it, that's the minimum you should have.
Depending on how much your pipe is being air cooled, you have next to no chimney. Like putting a 2 cylinder engine in a large vehicle.
If you can put a magnetic pipe thermometer on the inner flue pipe, double the reading for approximate inner flue temperature. Single wall pipe drops drastically as you go up loosing its heat to surrounding air.
I don't know which model Grandma you have, flat top doors had no baffle, but the later Model III had a baffle after 1980. They have arched top doors and no angle iron down the corners and a tag on rear shield. If you have a GM III with glass doors, the doors will be the same as your insert. GM IV will have a larger glass viewing area.
Grandma with solid doors should have a damper in connector pipe as well. There are factors to consider when adjusting the space where exhaust will flow above baffle. Elbows, cap, and screen all add resistance to flow, so that increases the area or smoke space to allow enough heat up for the larger chimney. Consider that chimney large engine that requires a lot of heat to make it work. And yes, that is the reason that stove has much more BTU capability. It would be as efficient as you could get with a 6 inch that high and baffled. With the 8 inch diameter you have twice the area to keep above 250* so a lot more heat is required to be left up. The more heat you can keep in the stove, the more usable heat you have for the house. The Insert will perform the same way with the same chimney, providing you have enough cfm blower. So connecting the Grandma to the flue upstairs would disappoint and have the same lowered heat output as the Insert now. Bottom line, the Insert doesn't get enough air inside it to create the BTU you expect. It needs a hotter flue.
Does the Insert tend to soot up the glass needing daily cleaning? You should be able to get it going by opening primary side intakes along with air wash open slightly, and when the flue is up to temp (that may not be possible with current inner flue) close side draft caps and burn with front air wash open only. Little to no glass cleaning is then required.
You may have a "Brass and Glass" Insert there as well. Can't see the trim on your picture. Many doors have been painted over and cover the brass plating. Lacquer thinner when cold will remove paint to test or ONLY metal polish for precious metals such as brass, gold and silver should be used to remove paint or clean the polished brass. The raised areas around door edge and around glass are the places to test and shown below. Not all are the more expensive Brass and Glass. They were available with black painted glass doors.
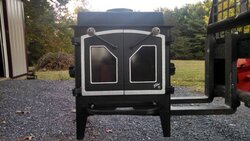 Raised areas were machined smooth and entire door was plated, then painted. The raised areas are wiped clean with mineral spirits to remove paint and over spray before final cure with heat. Grandma III with Brass and Glass shown.
Depending on how much your pipe is being air cooled, you have next to no chimney. Like putting a 2 cylinder engine in a large vehicle.
If you can put a magnetic pipe thermometer on the inner flue pipe, double the reading for approximate inner flue temperature. Single wall pipe drops drastically as you go up loosing its heat to surrounding air.
I don't know which model Grandma you have, flat top doors had no baffle, but the later Model III had a baffle after 1980. They have arched top doors and no angle iron down the corners and a tag on rear shield. If you have a GM III with glass doors, the doors will be the same as your insert. GM IV will have a larger glass viewing area.
Grandma with solid doors should have a damper in connector pipe as well. There are factors to consider when adjusting the space where exhaust will flow above baffle. Elbows, cap, and screen all add resistance to flow, so that increases the area or smoke space to allow enough heat up for the larger chimney. Consider that chimney large engine that requires a lot of heat to make it work. And yes, that is the reason that stove has much more BTU capability. It would be as efficient as you could get with a 6 inch that high and baffled. With the 8 inch diameter you have twice the area to keep above 250* so a lot more heat is required to be left up. The more heat you can keep in the stove, the more usable heat you have for the house. The Insert will perform the same way with the same chimney, providing you have enough cfm blower. So connecting the Grandma to the flue upstairs would disappoint and have the same lowered heat output as the Insert now. Bottom line, the Insert doesn't get enough air inside it to create the BTU you expect. It needs a hotter flue.
Does the Insert tend to soot up the glass needing daily cleaning? You should be able to get it going by opening primary side intakes along with air wash open slightly, and when the flue is up to temp (that may not be possible with current inner flue) close side draft caps and burn with front air wash open only. Little to no glass cleaning is then required.
You may have a "Brass and Glass" Insert there as well. Can't see the trim on your picture. Many doors have been painted over and cover the brass plating. Lacquer thinner when cold will remove paint to test or ONLY metal polish for precious metals such as brass, gold and silver should be used to remove paint or clean the polished brass. The raised areas around door edge and around glass are the places to test and shown below. Not all are the more expensive Brass and Glass. They were available with black painted glass doors.
 Raised areas were machined smooth and entire door was plated, then painted. The raised areas are wiped clean with mineral spirits to remove paint and over spray before final cure with heat. Grandma III with Brass and Glass shown.
My air wash vents seem to fill up with ash and the glass blackens up not much draft as you said unless it's cold outside it seems so I should get a insulated 6" stainless liner for next seadon
Yep, most ash drops directly to bottom, but some becomes airborne with the turbulence of flames. This is the fly ash that is dropping down the front as well as smoke particles making a mess on the glass.
The cost of the insulated liner will pay for itself in wood saved since you will lose a fraction of the heat up it.
Any household with 3 Fishers better be warm or there is something drastically wrong.
The cost of the insulated liner will pay for itself in wood saved since you will lose a fraction of the heat up it.
Any household with 3 Fishers better be warm or there is something drastically wrong.

What type insulated liner should I try and look for if I use6" what is used to hook to the top of my stove ??
See post #11 above. Search "boot" on this forum at top right of page. Many ways to connect with pictures on the forum. If you add a damper with rod you simply notch the boot to fit over the rod. My posts will recommend drilling and tapping the Insert top to bolt the boot in place. Others drill and use self tapping bolts or screws or even rivets. You can use gasket cement if yuo don't think it seals well enough or even use door gasket material for the best seal.
Brand of liner is up to you. Most companies make them in solid 2 foot sections for a straight up install or you may need a flexible liner to navigate crooked chimney flues. If you put your connector pipe in without a problem, it's the same way using stainless and screwed at each joint as required by manufacturer. There are different methods of insulating from blanket type insulation, loose fill, (which they now claim settles and packs over time allowing un-insulated pipe at the top where you don't want it exposed) to a wet cement slurry type poured down from the top. You'll find different grades of stainless for more corrosive coal use that you don't need, but I personaly use the more expensive material that is more corrosion resistant so I know I'll never need to do it again. The main thing is keeping air off the outside of liner preventing it from cooling.
Brand of liner is up to you. Most companies make them in solid 2 foot sections for a straight up install or you may need a flexible liner to navigate crooked chimney flues. If you put your connector pipe in without a problem, it's the same way using stainless and screwed at each joint as required by manufacturer. There are different methods of insulating from blanket type insulation, loose fill, (which they now claim settles and packs over time allowing un-insulated pipe at the top where you don't want it exposed) to a wet cement slurry type poured down from the top. You'll find different grades of stainless for more corrosive coal use that you don't need, but I personaly use the more expensive material that is more corrosion resistant so I know I'll never need to do it again. The main thing is keeping air off the outside of liner preventing it from cooling.
- Status
- Not open for further replies.
Similar threads
- Replies
- 1
- Views
- 812
- Replies
- 5
- Views
- 695
- Replies
- 5
- Views
- 620
- Replies
- 9
- Views
- 928

