
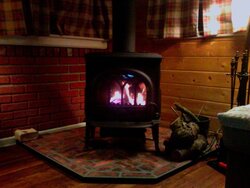
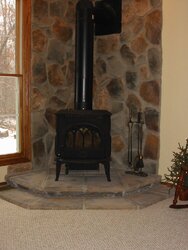
pic of new Jotul F3CB ...
- Thread starter argus66
- Start date
-
Active since 1995, Hearth.com is THE place on the internet for free information and advice about wood stoves, pellet stoves and other energy saving equipment.
We strive to provide opinions, articles, discussions and history related to Hearth Products and in a more general sense, energy issues.
We promote the EFFICIENT, RESPONSIBLE, CLEAN and SAFE use of all fuels, whether renewable or fossil.
You are using an out of date browser. It may not display this or other websites correctly.
You should upgrade or use an alternative browser.
You should upgrade or use an alternative browser.
- Status
- Not open for further replies.
North of 60
Minister of Fire
argus66 Put the model of that beautiful stove in as your signature. Your patience I see paid off. Nice job & looks cozey.
Somthing to be proud of there ya official wood burner. Congrats :coolsmile:
Somthing to be proud of there ya official wood burner. Congrats
:coolsmile:thanks a lot best upgrade to the house we ever made... so much better than fireplace i orignally planned on. glad i went with stove....
tutu_sue
New Member
Welcome fellow F3CBer. Congrats on a lovely install. Is your door handle really on the right side?
bbc557ci
Member
We have been burning our F3 for about three weeks so far, and love it. It pumps out some serious heat compared to our old Buck insert. What temp are you running yours at? The manual states anywhere between 400-600. My stove is currently at 650 (oops...better let her cool off a bit..)
Attachments
handle is on left side took pic with laptop so flipped everything, im still running around 400 to 500 but 1st burn hit 400 so that was my oops but no problems, beagler that set up is sweet id like to do rockwork like that as well u have any head on shots? mayby next yrs job? lets see some more pics of f3cbs
JimWalshin845
New Member
Nice job neighbor,
When you broke it in was there a lot of residue burn off? Were you pleased with the installation crew?
Real puuurrrty.... congrats!
When you broke it in was there a lot of residue burn off? Were you pleased with the installation crew?
Real puuurrrty.... congrats!
yeah 1st burn got a little smokey and set off smoke alarm 3 times. but now s all gone just slight smell when i hit 500 mark, guys who put it in were great had right answers to all my questions i learned to ask on here, did great job very pleased thanks jim
beagler said:We have been burning our F3 for about three weeks so far, and love it. It pumps out some serious heat compared to our old Buck insert. What temp are you running yours at? The manual states anywhere between 400-600. My stove is currently at 650 (oops...better let her cool off a bit..)
The manual says the 'optimal' temp is 400-600. With some wood I found it hard to keep it from going up to 650.
What are your corner clearances? They look very tight (3-4"?). What is behind the stone veneer?
BG,
From the back corners to the stone is about 4 inches. The wall shield does extend 12 inches past the corners like stated in the manual. It is unclear however, by the illustration on page 10 the length of the corner clearance. I have about 12-14 inches from the front corners to the wall shield. I am assuming it was installed correctly by my installer. He has been doing installs for 20 years and seemed very knowlegeable of 'codes.' What is you thoughts on this?
Behind the stone is a layer or mortar, metal cement board, drywall, studs, etc...
On an unrelated note. I noticed the paint chipping on my stove pipe adaptor near the screws. Does this mean anything?
JimWalshin845
New Member
jeffman3
New Member
That is a great looking install argus66! We looked at the same model stove before we bought the Tribute! I really like the way that Jotul F3 looks! Great stove and congratulations. We are doing our first real burn of the Tribute right now. Did break in first of course, and now just getting a feel for how this baby is going to run. It will take some time I'm sure, but We are burning! Welcome to the wood burning life style!
tutu_sue
New Member
We have the same stove and love it. The clearances are listed on page 11 of the manual, however you must read from page 9 through 12 to understand which part of the chart applies to your installation. Now that your install is completed you can call your town fire inspector for the final inspection.
beagler said:BG,
From the back corners to the stone is about 4 inches. The wall shield does extend 12 inches past the corners like stated in the manual. It is unclear however, by the illustration on page 10 the length of the corner clearance. I have about 12-14 inches from the front corners to the wall shield. I am assuming it was installed correctly by my installer. He has been doing installs for 20 years and seemed very knowlegeable of 'codes.' What is you thoughts on this?
Behind the stone is a layer or mortar, metal cement board, drywall, studs, etc...
On an unrelated note. I noticed the paint chipping on my stove pipe adaptor near the screws. Does this mean anything?
The F3CB requires 6" from corner to "protected surfaces" or 14" to unprotected surfaces. The stove is too close, especially if that is a wood stud wall behind the stove veneer. A protected surface needs an air gap of at least 1". Check manual pages 10 & 11 for clearances.
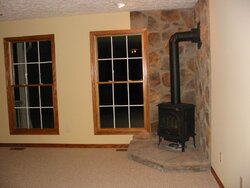
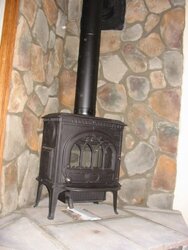
BG, please check out the pic of my corner clearance. Does this help? We have 15 inches from the back of the stove to the stone corner. Our stone was manufactured by Dutch Quality Stone. I"m not sure what you mean by veneer, so this may clarify what we have.
Attachments
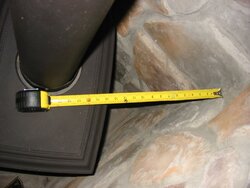
Unfortunately, that is not the way to measure corner stove clearances. Look at jeffman and argus66's installations. Note how much further from the wall their stoves are.
If the stone wall veneer was applied to durock or cementboard over wooden studs with no airgap, this is not a protected wall. There will be some degree of protection due to the thickness of the stone and cement board underlayment, but *unprotected* wall clearances must be used. The diagonal distance from the rear corner of the stove to the nearest combustible surface ( the studs behind the stone) should be no less than 14". Judging by this picture the corner is almost touching. Even if this were a properly designed *protected surface" that corner should be a minimum of 6" from the protected wall surface.
The inspector should have caught this right away or at least asked what was behind the stone wall. Did anyone ask to look at the manual? If there are metal studs behind the stone wall, then this is a better situation, but the stove still needs to move a lot forward to gain even minimum *protected wall* clearances.
Here is a link for an entirely different stove. It has different clearance requirements, but will show how to correctly measure corner stove installation clearances.
http://www.chimneysweeponline.com/chscraft.htm
Sorry to be the bearer of bad news, I know this is a bummer. But safety has to come first when burning. That stove can get very hot. However, all is not lost and perhaps a floor level hearth extension can be added and the stove move forward to gain proper clearances. This can be done so that it looks intentional. FWIW, it's easier to make a cardboard template of the stove an move it around until good placement is achieved that to move the actual stove.
I apologize for hijacking this thread, but BeGreen has really helped me by pointing out that my installer did not measure the corner clearances properly. After conversing with BeGreen and taking his advice, my installer came back out and did all the upgrades necessary to make my stove up to code. He installed double wall pipe, pulled the stove out to 14 inches and added stone to the front of the hearth. This was all done on his tab, not mine. Here is the final job. Thanks again BeGreen.
Attachments
jpl1nh
Minister of Fire
Gotta love how the knowledge on this site benefits people! Good call Be Green! And Beagler, kudos to your installer for coming back out and making it right. The best thing is that the install looks even better now than it did the first time. Cody, my 2 year old male beagle asked me to pass on a "AAAHHOOOOOOOO" to you. :lol:beagler said:I apologize for hijacking this thread, but BeGreen has really helped me by pointing out that my installer did not measure the corner clearances properly. After conversing with BeGreen and taking his advice, my installer came back out and did all the upgrades necessary to make my stove up to code. He installed double wall pipe, pulled the stove out to 14 inches and added stone to the front of the hearth. This was all done on his tab, not mine. Here is the final job. Thanks again BeGreen.
ansehnlich1
Retired Hearth.com Member
Just a comment to BG for pointing out beagler's situation.....nice job BG, and beagler too for taking the advice and having this setup brought up to code,
waddya learn early??? don't play with fire!")
waddya learn early??? don't play with fire!
- Status
- Not open for further replies.
Similar threads
- Replies
- 10
- Views
- 718