Doing rapid pace resto on a $190.00 Grandma Bear,question about surface pitting.

  • Active since 1995, Hearth.com is THE place on the internet for free information and advice about wood stoves, pellet stoves and other energy saving equipment.

    We strive to provide opinions, articles, discussions and history related to Hearth Products and in a more general sense, energy issues.

    We promote the EFFICIENT, RESPONSIBLE, CLEAN and SAFE use of all fuels, whether renewable or fossil.
Status
Not open for further replies.

bushman

Burning Hunk
Dec 28, 2014
156
Northern Michigan
image.jpeg
I broke down Sunday and picked up a neglected Grandma Bear that was on Craigslist for a little while. It's nothing special, just a black door model with angle iron corners and doors are stamped "80" with aluminum draft caps. The former owner was a bartering bandit and never ran this stove, it's was just sitting in his garage amongst other trading stock. Gotta give the guy credit, He did not budge on price much and I could only bring him down $10.00 and it was a rainy Sunday, perfect day to talk someone down at least $50.00.

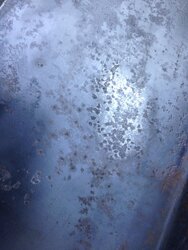
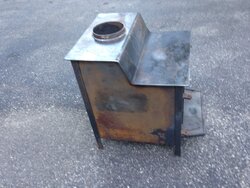
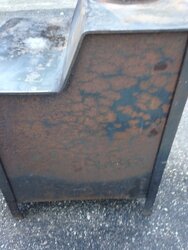
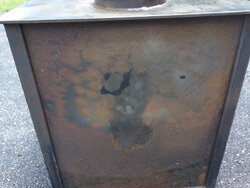
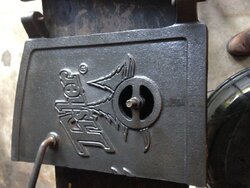
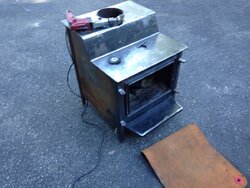
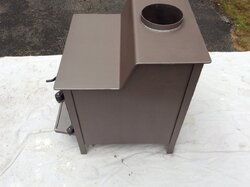
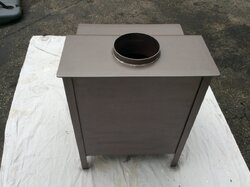
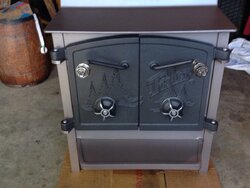
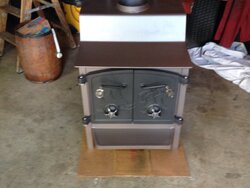
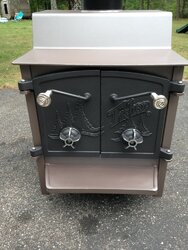
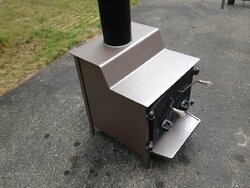
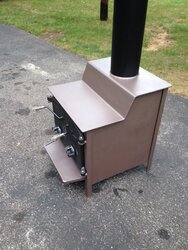
So I got the stove home and it's not too bad at all. Mostly surface rust and what I believe to be Stove Polish. Whatever is on the top, it's thick and will come off with a wire wheel and the orbital sander is the best tool so far. The sides are really easy to bring down to just steel, the top is another story. I keep opening up pitted areas that kinda remind me of the Sargent Castilo from Miami Vice, that's how I see it.

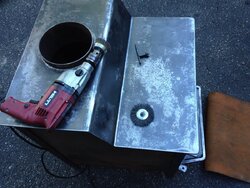
There's no problem getting the rust off, whats a good way to smooth it out?

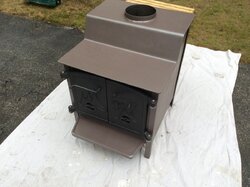
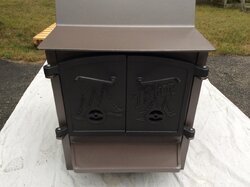
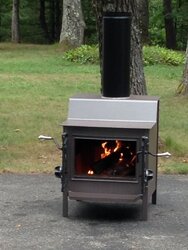
I may just send this stove to another owner and profit off my elbow grease after cleaning it up and giving a new CUSTOM paint job, thinking a Mahogany Metallic or Sand stove body with Black Fisher & pine trees on doors. Problem is I am already getting attached to it and might give my Isle Royale the winter off to try a real deal old school steel stove.
 
Using the stove like we did for years using the top for cooking and a humidifier kettle required a sanding and repainting the top each year. I was contemplating a quick coat of stove black when it was at its coolest to keep it looking good all winter. I'm glad I decided against it. Stove polish is almost impossible to remove. I've wire wheeled, sanded and wiped with mineral spirits and even lacquer thinner. Warmed it up and wipe and a rag still comes up black. Since you only need to remove it from the top, you can try a propane torch like you're removing paint. It is not a super high heat coating. It removes much easier from smooth steel than rough cast iron which it is for. Polish also allows water right through and is the main reason why paint is much better. Once you're convinced you have as much removed as possible, I like to use brush-able paint first and let it thicken in a small open container. Then apply it to the top with a plastic auto body filler spreader. Even a piece of stiff cardboard. It will fill the holes easily, allow to dry and lightly sand with a finish sander until as flat as possible before painting. After 2 coats and firing you shouldn't be able to see any signs of the pitting.

That model won't have a factory baffle like the later model III Grandma, so baffle it correctly before using and you'll have a good experience with a much warmer house than you're used to.
 
Agreed, affects of aging can look normal on a Grandma, but your Honey Bear is another story ! ==c
 
Yeah, it's really not so bad and it's just a cosmetic issue. Did any Fisher stoves come in the Bark Brown that did not have glass in the doors? I was kicking around painting the stove Bark Brown like I have seen on some of the glass door models, just have not seen any without glass with brown paint.

Honey Bear is going to be a breeze to do and looks like it will be my garage heater.
 
Bark Brown was available from some fabricators on all early stoves before the double doors.
Here's a thread with an article in the employee newsletter from Forrest Paints with the story of adding color to stove paint for Fisher making the first high temp paint other than black;
https://www.hearth.com/talk/threads/fisher-had-a-better-idea-brown.120797/

The later brown with glass door models is Metallic Brown. (Not Honey Glo) Still made by the same Forrest Paints under the Stove Bright brand.

Brochures and posters only show Metallic Brown on glass door stoves and Inserts and I've never seen a Metallic Brown solid door stove.
Here's a good example of Metallic Brown on a Honey Bear in sun light. Bark Brown is very flat and much darker.

3-16-82 Century 1.jpg 3-16-82 Century 2.jpg

Bark Brown on Mama Bear ready to cure paint;

Brown Mama ready to cure paint.JPG This stove was painted black when I bought it and I found the brown under the newer coat of paint. The sides at the bottom and legs where it doesn't get hot were in good shape under the new paint. Someone had stove blacked the cast iron door so I continue to black it as needed.

Brown Mama Bear Door 77.JPG

Here is the finished product in my kitchen that heated my house one season (1880 s.f.) but it was a mild winter (2011) or I would have needed to move a Papa into it's place since it was the only heat source.

Brown Mama Bear in kitchen 2011 2.JPG

Notice the fridge behind it about 5 feet away. This is the stove that soured the milk in the door overnight and I drew on the side with chalk where a baffle inside would deflect the heat forward. When first lit, I noticed a drastic smoke reduction and realized how similar it was to the factory baffle in later double door models. With a little fine tuning it was able to heat the area I needed it to.
 
Thanks for the information. I am making good progress with my wire brushes and am able to get the pits pretty well smoothed enough with some effort. In one of your earlier posts you did mention it goes fast, you are correct. The simplicity of the Fisher is pretty impressive.
 

Attachments

  • image.jpeg
    image.jpeg
    126.5 KB · Views: 332
  • image.jpeg
    image.jpeg
    167.4 KB · Views: 343
  • image.jpeg
    image.jpeg
    108.1 KB · Views: 323
  • image.jpeg
    image.jpeg
    156 KB · Views: 286
  • image.jpeg
    image.jpeg
    178.4 KB · Views: 317
  • image.jpeg
    image.jpeg
    181.1 KB · Views: 286
Here she is after a little more brushing. This is going well. I have a Hilti drill but, would rather a polisher angle grinder type device like Coaly is seen using.
 

Attachments

  • image.jpg
    image.jpg
    193.5 KB · Views: 333
  • image.jpg
    image.jpg
    209.9 KB · Views: 324
  • image.jpg
    image.jpg
    246.1 KB · Views: 320
Yeah, that's an antique all aluminum Black and Decker grinder / polisher. Low RPM but a knotted wheel is the most aggressive and cleans large flat areas quick.

Reconditioning NJ Mama Bear 5.JPG

The cup brush and flat wheels in a drill I use for details on the cast iron doors and antique stoves. Finishing a Atlanta Box 27 today.

Here's my next project I scored on eBay last night for a penny cheaper; 189.99 with shipping !

Sign 2.jpg Sign 3.jpg

One side lights up, the other side could be as simple as a bulb;

Sign 1.jpg
 
  • Like
Reactions: sauto1985
The last few weeks the surfing has been good on Lake Michigan and the day-night temps have been in the 90s so I let the project go into stasis. I did buy a wire brush for my angle grinder which takes a lot of the work out of work and really my project could have occurred over a couple days if I had my system down from start. Today I got down with the mineral spirits and spray bombs, now the stove is covered in metallic brown on the body with metallic black on the doors. This is to look at to decide if I want to just leave it as is or detail the Fisher castings with some more metallic brown.
 

Attachments

  • image.jpeg
    image.jpeg
    151.2 KB · Views: 322
  • image.jpeg
    image.jpeg
    118.8 KB · Views: 328
  • image.jpeg
    image.jpeg
    128.9 KB · Views: 309
  • image.jpeg
    image.jpeg
    135.5 KB · Views: 303
  • image.jpeg
    image.jpeg
    151.3 KB · Views: 345
I need to get a couple new pig tail handles and some more firebricks then this stove is done. I am happy with the black doors and its growing on me. Now I'm looking at my little Honey Bear, that's going to be a treat to restore. I really have to admit that I think I'm getting bit by the Bear.
 

Attachments

  • image.jpg
    image.jpg
    127.6 KB · Views: 365
  • image.jpg
    image.jpg
    118.3 KB · Views: 325
Looks sharp.

There seems to be somewhat of a cult attraction to the Fisher. Can I ask why? Build quality? Nostalgia?
 
Careful what you buy for handles if you want the correct shape. There are many spring handles close but not the original shape. The original shape is the Large Handle #RH-LDN (nickel) or RH-LDB (brass) from Woodman's. You probably want nickel that was normally used with black doors with aluminum color draft cap edges. Brass was used on "Brass and Glass" or brass plated doors and looks out of place on anything else.
 
After putting some elbow grease into the project and realizing how tangible this piece of steel & iron is, it hits me and if I had to explain it, Ha Ha you would not understand.

Build quality, nostalgia, simplicity, the recalling of Occams Razor all play into my enthusiasm. Stick your head in one, look around and be inspired.

I have ran a lot of different stoves over the years and this fall I will be heating with a Fisher. It's nice to have options and if it don't work out then it's back to a Isle Royale or an Efel that I'm knocking the enamel off. It's fun and I really enjoy trying different things. During the polar vortex a couple years back I switched in my Isle Royale from a Lopi Liberty. I just don't see this stove thing like a pick one and be dammed situation, so many yet to burn in!
 
That's the nice thing about a stove vs. an insert. Changing out an insert and making it look/work nice is much more of a hassle than a stove, which you can just swap out. I wish I had a stove, but it is what it is. Your Fisher looks great.
 
Thank you, velvetfoot and Coaly for your advice and appreciation. I am really just stoked about stoves in general and am committed to keeping my home at sub tropical temps in the winter with the least effort possible.
 
I finished my project and was able to season my paint yesterday, it was very fun.
 

Attachments

  • image.jpeg
    image.jpeg
    146.1 KB · Views: 341
  • image.jpeg
    image.jpeg
    102.3 KB · Views: 348
  • image.jpeg
    image.jpeg
    257.8 KB · Views: 327
  • image.jpeg
    image.jpeg
    178 KB · Views: 266
  • Like
Reactions: velvetfoot
Looks great! I like the Brown with black door scheme.
I'm considering using a propane burner without the firebricks inside to season the paint. Anyone ever tried curing paint that way?
 
Last edited:
Status
Not open for further replies.