Stainless top plate on concrete chimney block.

  • Active since 1995, Hearth.com is THE place on the internet for free information and advice about wood stoves, pellet stoves and other energy saving equipment.

    We strive to provide opinions, articles, discussions and history related to Hearth Products and in a more general sense, energy issues.

    We promote the EFFICIENT, RESPONSIBLE, CLEAN and SAFE use of all fuels, whether renewable or fossil.
Status
Not open for further replies.
Nov 19, 2015
58
Salem, NY
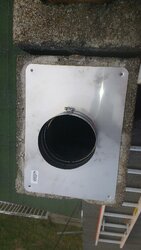
I have a liner kit ordered with insulation and flat top plate (13x18 to fit the block) and the clay tiles are coming out. I'm still trying to figure out how to mount the top plate on my chimney block chimney. There are two side by side, but I'm currently only working on one. I know a poured in place crown would be ideal but I may take the 13x18 down eventually and replace with 13x13 to make room for a window it was built in front of, so I'm hesitant to pour a crown over both flues. I'm looking for suggestions on an easy crown that will last 5-10 years.
The top plate could be mounted directly to the chimney block with some sheet metal capping the unused flue, but I'm not sure if that will shed water appropriately...
The previous crown was clay liner in concrete chimney block with cracked/detached mortar stabilizing the clay in the block. The two chimneys do not seem to be attached to each other with anything but a little mortar in between. Originally I was going to leave the clay tiles in, but they were so loose I decided to take them out and make room for a full 6" insulated liner.

I don't have any pics of the current crown, but some pics of the general layout can be seen here https://www.hearth.com/talk/threads/chimney-across-a-window-repair-or-replace.157041/#post-2107225

img_20161020_085641008-600x1067-jpg.186060.jpg
 
You might get some response if you add a photo of the top of the chimney to show what you are working with. I read your description, but can't quite picture what things look like up top, so I can't offer any recommendations. From the photo you did post I have to say it looks like a pretty groan botch job with the cinder block chimneys.
 
I'll try to get pics tonight. Until then, here's a sketch.
WIN_20161025_12_12_11_Pro.jpg
At this point the rectangular block is the one I'm working on. It is reduced to an open single wall block chimney. No liner, no crown/cap. The unused square chimney has a crumbling crown and clay liner which I am probably also going to remove. I would like to maintain access to that one for the day I install a stainless liner and put a stove in the basement. The mortar between the two is eroded an inch or two. I'll have to take out what's loose and replace. Then I have to figure out what to top it with. The top plate I have ordered is the size of the rectangular block, so I probably need something with a little overhang.
It seems the best solution would be to pour a concrete crown with proper overhang and drip edge. Leave two openings and temporarily plug the unused square chimney. Instead, I'm looking for a simpler short term solution because I may be making some changes in the next 5-10 years.
 
Is the top of the larger rectangular chimney perfectly flat? if yes, I would silicone the top plate to that with a good thick bead.
 
I think you should be fine with just using the new top plate you are getting that you say will fit on top of the 13"x18" cinder block chimney. You will fasten the top plate to the top edge of the cinder block using a generous coating of silicone caulk. When I installed my ss flex liner in the same size clay tile flue as the dimensions of your cinder block chimney that is how I sealed off the opening. The top connector has a ridge around it in the middle of its length, which is what keeps it from sliding down through the center hole of the top plate. When you install the flex liner you just need to pull up on it enough that it will make the top cap carry some of its weight. This will pull the top plate down tight on the top lip of the cinder block chimney and squeeze the silicone caulk to fill all the voids and "glue" it in place making a good seal.

A word of warning: When I installed my liner I dry fitted it to make sure I didn't cut the liner too short. Then I made my connection down below to the t-connector that was attached to my stove. When I made my top connection I pulled a little too hard on the liner and when I went back inside I could see that I pulled my t-connector at an upward angle. I had to go back up on the roof and loosen my connection and let a couple inches of the flex liner slide back down the chimney to straighten up my t-connector. Fortunately, I hadn't cut off the excess flex liner up top yet, so I didn't have to try spicing a few inches onto it to make things fit correctly.

As for sealing up the second smaller clay tile liner there are numerous ways to temporarily seal it off for future use. The easiest might be to just buy a rain cap for it and screw it in place with the fastening screws. Again, if you post an actual photo more ideas will probably be shared. Good luck.
 
IMG_20161025_164111552-800x450.jpg IMG_20161025_164127140-800x450.jpg IMG_20161025_164040332-450x800.jpg
Thanks for the input. The kit arrived today. The cap is slightly smaller than the block, but still has more than an inch on all sides.
It sounds like the consensus is to install as-is with no new crown. Please let me know if the pictures change anything.
 

Attachments

  • IMG_20161025_164040332-450x800.jpg
    IMG_20161025_164040332-450x800.jpg
    76.1 KB · Views: 180
Last edited:
I mean yea you could silicone the crap out of it and install it flat but you could possibly get water intrusion from having the water just pool there. Will it cause a ton of damage? Can't tell but if it were mea I'd install the cap flat in a bead of silicone, silicone around the pipe and then just make a tiny sloped crown on top of the stainless flat plate. Seriously anything to aid in shedding water can only help you even if the crown you make lays up on top of the stainless plate (you can nail lathe around it if you want a better crown).

Or if your really nasty with a metal bending brake you could make a little A frame and cut the pipe diameter out of it and slip it over the pipe and edges of the cinderblock.
 
I would recommend a poured crown over both chimneys personally
 
anything to aid in shedding water can only help
I can't really see it but I'm assuming there is a raised ridge in the plate, in a circle around where the liner comes through. That keeps water from running to the gap between the liner and the plate. That is what the top plates use that I've seen...then you attach a storm collar on the protruding liner to shield the gap between the liner and the plate.
 
Thanks, I'm leaning towards pouring it, but it's not my strong suit and I'm hesitant to invest the time in a crown that may be demolished in a few years. What recipe or pre-mix would you recommend?
I'd also be interested in what kind of mortar to use if I go that route.
 
Thanks, I'm leaning towards pouring it, but it's not my strong suit and I'm hesitant to invest the time in a crown that may be demolished in a few years. What recipe or pre-mix would you recommend?
I'd also be interested in what kind of mortar to use if I go that route.
@bholler uses fiber-reinforced concrete (not mortar.) I think he also adds an acrylic binder of some sort, but I don't quite understand what the benefit is, or what product he uses.
 
I can't really see it but I'm assuming there is a raised ridge in the plate, in a circle around where the liner comes through. That keeps water from running to the gap between the liner and the plate. That is what the top plates use that I've seen...then you attach a storm collar on the protruding liner to shield the gap between the liner and the plate.
The plate is drawn up to form a ridge about 1/4" high which the section of rigid pipe fits over. It looks like a good fit, but if I remember correctly it's only held by a few tack welds and gravity after the flex is connected.
 
  • Like
Reactions: Woody Stover
When we pour a crown we only give them a slight crown the top plate still sits on it fine
 
  • Like
Reactions: Woody Stover
I'm afraid this job just got more complicated (I should have noticed it sooner). Last night I took some measurements and discovered the chimney is almost 2' shorter than it should be. the high side measures about 15" from the top block to the roof. About 24" to where the crumbling clay liner ends. So the first solution that comes to mind is to add 2 or 3 blocks, but I can't find rectangular blocks to match. I can get square column blocks that match, so I was considering transitioning the rectangle to square. I'm guessing there has to be a simpler way to add a couple feet.
Is there an adapter that would transition from flex to insulated pipe?
 
Is there an adapter that would transition from flex to insulated pipe?
Yes there is but you could also just build up the extension with 4" block. But I would not give up on finding the rectangle block I know they are made we use them from time to time.
 
Yes there is but you could also just build up the extension with 4" block. But I would not give up on finding the rectangle block I know they are made we use them from time to time.
The one I need is called 16"x 20", actually a little smaller. The one I have found is a couple inches bigger. I had assumed that meant mine was obsolete. Are you saying the 16x20 still exists?
 
But like Isaid you could always just build it out of standard 4" block
 
I just got the call back from Chimney liner Depot to see what they recommend. They've suggested a rigid single wall extension on the liner. It seems like that might lose more heat than it's worth, but it would avoid any turbulence from the peak of the roof etc.
The oversize chimney didn't draw well and gathered a lot of creosote, but it rarely puffed smoke last year. Is height really a problem?
The 3 options (with a few variations) I see right now are, in order of complexity,
1. Install the liner as is and try it. (The rigid extension would be easy to add later)
2. Install the rigid extension for around $60
3. Build the masonry higher. I will run out of insulation. I could count on the masonry as a wind break and air gap insulation or I could stuff it with some Roxul.
 
They've suggested a rigid single wall extension on the liner. It seems like that might lose more heat than it's worth, but it would avoid any turbulence from the peak of the roof etc.
I dont know why they always recomend that it really is not a good idea it will collect allot of creosote being at the top and uninsulated. If you are doing an extension it really needs to be out of insulated class a chimney to work properly.
 
  • Like
Reactions: Squisher
I dont know why they always recomend that it really is not a good idea it will collect allot of creosote being at the top and uninsulated. If you are doing an extension it really needs to be out of insulated class a chimney to work properly.

If you are doing an extension...
That's a major part of the current question.
It worked OK without puffing smoke with a clay liner 3x the required size. The only real problem was creosote buildup. Could the switch to a properly sized insulated liner make me more vulnerable to wind gusts etc?
Is there any major reason I need to bring the height up to code?
 
I'd try it without the extension. It could be fine.
 
I'd try it without the extension. It could be fine.

I like that answer because of the reduced labor and because it will be easier to access for cleaning, but I'm also afraid of the added labor to re-work and the extra seam in the liner if I end up adding masonry later.
Can I get a few more experienced opinions?
 
If it worked ok when dumping into a large cavity before then performance should be notably improved with a full 6" liner. Test it out without siliconing down the top plate and see how it works.
 
Status
Not open for further replies.