Pictures Black Bear and Wood Tank Fram

  • Active since 1995, Hearth.com is THE place on the internet for free information and advice about wood stoves, pellet stoves and other energy saving equipment.

    We strive to provide opinions, articles, discussions and history related to Hearth Products and in a more general sense, energy issues.

    We promote the EFFICIENT, RESPONSIBLE, CLEAN and SAFE use of all fuels, whether renewable or fossil.
Status
Not open for further replies.
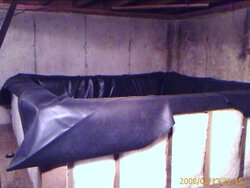
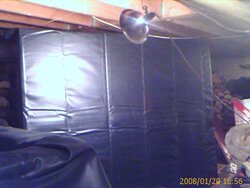
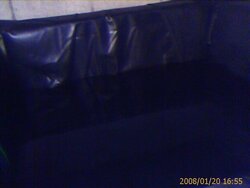
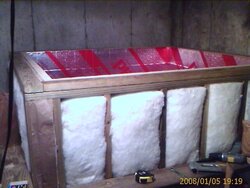
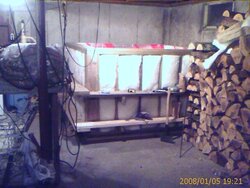
Yes this looks good to me, I too could add the steel corner braces, my tank is 6'X6X4' high, I am going to put steel straps across the top at the center both ways to help in any spreading at that point. I have bolted most of the points that I think could use it, before I add the insulation I will probably and more lag bolts to the floor on the edges. I have already got my EPDM liner, it is 15X15 and I also got a 10X10 for the top. I purchase the liner here http://www.webbsonline.com/catalog/liner/index.html I thought they were reasonalbe and I got my liners fast, I did not have to buy a whole roll of EPDM roofing.

Steve
 
You have a strong frame and so if water wants to be round why not oblige ? Add a few additional studs inside each corner to round the inside of the frame and then use four sections of sheet steel 4' to 5' long attached to the straight sections of the plywood sides and then your liner over it all.
What do you think?
 
I think Tony H is on to something.
 
That is really not a bad idea, it would reduce the amount your tank will hold or you would have to adjust for it. In my case I may not have enough room, I was going to go with the 4x8x4 tank size at first but I did not have the room.

Steve
 
you can build a round form by cutting radius whalers from plywood. then use 2-3 layers of thin plywood . used the same princaple many times building concrete forms for hydro electric project and many others.the plywood dosnt have to bend all the way around if radius is small ,just overlap the next layer.
 
Any results on this project?
 
I have been slightly busy lately but I have been moving forward, I will be putting the liner in hopefully this weekend and by next week have it all going.

I am waiting for a circ pump to arrive from ebay, here are a couple of pictures of my mess so far.

Steve
 

Attachments

  • tank5.JPG
    tank5.JPG
    47 KB · Views: 600
  • tank4.JPG
    tank4.JPG
    56.4 KB · Views: 606
Thanks for the update. I live in Central part of State as well. Would you mind showing me your project, hell I'll help ya with it...
 
Looks really good, Maine.
 
I love when a plan comes together. What do you think spend in time and money on this one?

Please keep posting updates.
 
sparke said:
Thanks for the update. I live in Central part of State as well. Would you mind showing me your project, hell I'll help ya with it...

Where do you live? you can take a look anytime. I am in East Millinocket.

Steve
 
ABGWD4U said:
I love when a plan comes together. What do you think spend in time and money on this one?

Please keep posting updates.

I would say I have about $800.00 in the tank and that will be including the top that I have got the materials for yet. I spent two Sundays on it and week nights off and on I would say I have about 30 good hours in it so far. I did spend a lot of time just figuring how I would do it. I still have to get the liner in and make the top, still thinking on how I want to get the plumbing in. I have been waiting for some carpet foam to put around the edges of the tank to protect the liner when I pull it over the top, this will also give me a cushioned surface for the top to rest on and hopefully seal better. I am also waiting for a circ pump hopefully will arive next week, I will also need another pump soon probably will order it next week. For now I will be using a water to air heat exchanger to heat the upstairs from the tank, I got most of that ready today, not sure how well that is going to work but it is all temporary untill I get the radiant floor heat in.

Everything that I am doing is an after thought so to speak and one system does not affect any other, this fall I replaced all of the pex pipe tieing the wood boiler to the oil boiler with copper, and at the same time put a flat plate heat exchanger in that same loop. Now I can tie in the tank with a seperate loop and never have to shut anything down. I will also have a seperate loop for the water to air heat exchanger that can be tied in without to much trouble and no impact to the rest of the working system. As far as heating DMW at this time I am circulating through the existing tankless coil on the oil fired boiler to an electric hot water heater with the coil unhooked, this works very well and gives us unlimited DHW. For now thlis is how I will leave the DHW, because I will be starting a fire probably every day this should not be a problem for now.

Now I can't wait to see how well the boiler will bring the tank up to temp, and see how well the plumbing will keep the boiler from going idle . Also not sure how well my Micky Mouse water to air heat exchanger system will work, considering it is a modine heater all torn apart.

This will be fun,

Steve
 
Good Ole Yankee Ingenuity. I like it! Unfortunately I am Winslow a few hours from you. I consider this Central Maine and you Northern!! :)

Let us know how it all works out.
 
It's a long drive up to Fort Kent from East Millinocket. I guess it's a matter of perspective.
 
I did get the liner in and it aint pretty, what a pain in the butt, I did it by myself and it took awhile, here is a picture of the mess. I will be making the top by this weekend and lining that with EPDM also, hopefully I will have the plumbing all in by next weekend and get to fill it up and test it out. If this works as planned it will make my life a little easier.

Steve
 

Attachments

  • tank liner.JPG
    tank liner.JPG
    41.2 KB · Views: 454
I Can't wait to hear your response after you get the tank online. I am at the beginning stages, looking at furnaces and then the system to put this all together. I have an 80 gallon dhw tank with solar collector and it has a closed loop from the collectors to a water jacket around the tank and I will probably just start with that for storage. I am thinking of building a 10x10 or 10x 15 tank in the crawlspace under the house. It will be something of a pain but getting that much storage and having the heat loss inside makes me think it might be worth it. I am thinking of concrete block over slab with surface bonding but will also have to consider a wood frame such as yours. I am thinking of only 2 ft height and would still have to do some digging. What fun all the plans and then to get to play with the toys. Too bad I cannot get my backhoe in there!

Also would like to see pics of finished project and any afterthoughts you may have.

Rob
 
I have a question about this tank. Why have corners and bolts and nails near a liner that could get torn?
Looks great hope it works! Here is an idea not sure if it would help with your project but may give others an idea.
I lived in the Philippines for a few years on n off for different reasons. I help out with two other ex-pats to build a water tank near a school that had no water tap near by. The tank would only get water from rain gutters. Now this was far in the bush and it did worked. We build this in a way that was called fero cement. I believe that's the name? Instead of using re-bar or any metal, we used bamboo and weave into shape of a big round ball after making it into flat strips. This was many years ago and I believe it was 10 maybe 12 ft high and round. I'm not sure of the size.
We did use cement with chop dry grass rice husks.
So why not try building the same tank round? This would not have any corners to have pressure on. My idea is to build it from chicken wire two layers perhaps 1" to 3" space apart to hold the cement. After adding the cement slowly between the wire you then you would need to smooth the inside and not even use a liner.
Just an idea to put out there maybe one of you could take this and get even a better idea.
 
Make sure the kids and wife are upstairs when you fill the tank! Maybe you should wear a flotation device too? :lol:

But seriously, hope it works.
 
greenmtnman said:
I have a question about this tank. Why have corners and bolts and nails near a liner that could get torn?
Looks great hope it works! Here is an idea not sure if it would help with your project but may give others an idea.
I lived in the Philippines for a few years on n off for different reasons. I help out with two other ex-pats to build a water tank near a school that had no water tap near by. The tank would only get water from rain gutters. Now this was far in the bush and it did worked. We build this in a way that was called fero cement. I believe that's the name? Instead of using re-bar or any metal, we used bamboo and weave into shape of a big round ball after making it into flat strips. This was many years ago and I believe it was 10 maybe 12 ft high and round. I'm not sure of the size.
We did use cement with chop dry grass rice husks.
So why not try building the same tank round? This would not have any corners to have pressure on. My idea is to build it from chicken wire two layers perhaps 1" to 3" space apart to hold the cement. After adding the cement slowly between the wire you then you would need to smooth the inside and not even use a liner.
Just an idea to put out there maybe one of you could take this and get even a better idea.

When I decided to biuld this tank I did do a lot of research, and found that this type of tank is very common for exactly what I want it for, to store heat. It is common mostly for solar systems back in the 80's. The reason it is square is that I can put it where it will fit and it was easy for me to make it this way. As far as the liner getting torn, it is very rugged stuff, it is sitting in the foam insulation there are no nails or screws exposed to it. As far as this tank failing well we will find out soon, however I did check with some people that have made these things before and they basically said I should not have a problem with the way it is constructed.
We will see soon.

Steve
 
You did do your reshearch....I myself wasn't saying this wouldn't work
I just wanted to point out that another way may be possible too. And giving the idea that helps others to come up with another idea. I have seen this tank made on other sites.
I sure your beyond the jokes that have been posted. I sure they are all waiting to here that iits working....
 
greenmtnman said:
You did do your reshearch....I myself wasn't saying this wouldn't work
I just wanted to point out that another way may be possible too. And giving the idea that helps others to come up with another idea. I have seen this tank made on other sites.
I sure your beyond the jokes that have been posted. I sure they are all waiting to here that iits working....

Yes beyond the jokes, I will be making another tank in another house probable this coming summer this tank I am going to make round and not out of wood, much like the type that Tarm USA sells with there boilers. On this forum someone has posted doing just that and it turned out well, and at much less cost then what you pay for the Tarm tank. I do think that doing the round tank is a much better solution, you can tear them down quite easy and move it if you have to, the one I made with wood is not going anywhere. Again I wanted to get this thing up and running as soon as I could and the wood tank seem to do that for me.

Steve
 
Do you have any idea when you'll be taping into the water supply?
I'm not familiar with Tarm USA sells.
What will your materials be to make this round tank?
 
Well it's still not pretty but I have the top done and it is full of water, and it seems to be holding for now. Hopefully in the next day or two I will have the plumbing done so I can start heating the water. I will be covering the rest of this mess with something so it looks a little better, but I am not much on how things look just how they work . The first picture should be of the top before I got it on, the second picture is the tank with about 2/3rds of the water in it, can't see it very well.

Steve
 

Attachments

  • tank top.JPG
    tank top.JPG
    43.4 KB · Views: 502
  • water.JPG
    water.JPG
    24.2 KB · Views: 505
Status
Not open for further replies.