
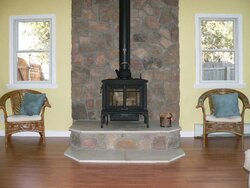
Here is my new set-up. This took me a veerrry long time to plan, but it's finally done! I built up the back section of the hearth using 2x10s with 3/4 plywood, durarock, then the sandstone you see. The lower part of the hearth is the sandstone right on top of durarock that was glued/screwed to the plywood floor. The face of the step and up the wall is cultured stone- dressed fieldstone. I would love to hear some feedback. Let me know what you think. I know I love it, but then again, I guess I have no choice now!
Avalon Arbor, Custom Hearth, Cultured Stone
- Thread starter woodburn
- Start date
-
Active since 1995, Hearth.com is THE place on the internet for free information and advice about wood stoves, pellet stoves and other energy saving equipment.
We strive to provide opinions, articles, discussions and history related to Hearth Products and in a more general sense, energy issues.
We promote the EFFICIENT, RESPONSIBLE, CLEAN and SAFE use of all fuels, whether renewable or fossil.
You are using an out of date browser. It may not display this or other websites correctly.
You should upgrade or use an alternative browser.
You should upgrade or use an alternative browser.
- Status
- Not open for further replies.
Fire Bug
New Member
Burn-1
Feeling the Heat
whphel
New Member
glassmanjpf
Member
Looks great! Is the stone on the wall placed over the sheetrock or did you use something like durarock? Also, how warm does the wall stone get? Enjoy
Hogwildz
Minister of Fire
Looks fantastic. What is the r-value requirement of the stove manufacturer for the heart?
1/2 Durock doesn't offer much heat resistance. You have very little heat transfer protection in that hearth.
Still looks great though.
1/2 Durock doesn't offer much heat resistance. You have very little heat transfer protection in that hearth.
Still looks great though.
Burn-1 said:Very well done. It's a sacrificial altar for wood.
A sacrificial altar indeed!
Thanks for the feedback. I will post more pics showing the ceiling and a fire.
To answer some questions-
Behind the stone there is 1/2" durarock on the studs- no sheetrock. The stones get slightly warm, except for maybe a less than 1 sq. ft. area directly behind the uppermost part of the stove where it gets pretty hot. At it's hottest, I can press my hand hard against it for more than 3 seconds.
In regards to the hearth, I thought 1/2" durarock offered great protection. I have two layers. The sandstone on the hearth just gets warm to the touch anyway- no crazy heat down there. At least not yet. Between the sandstone, the thinset, and the cement board, I am pretty well covered.
It looks really nice woodburn. Did you do the stonework yourself?
This may be the pictures, but the clearance to combustibles looks below code. This stove gets hot in the back. That's where the combustion is taking place. Assuming that is double-wall pipe for a flue, it needs a minimum of 14" from the back of the stove to the wall studs. Hard to tell from the pictures, but it looks more like 8-10"?
This may be the pictures, but the clearance to combustibles looks below code. This stove gets hot in the back. That's where the combustion is taking place. Assuming that is double-wall pipe for a flue, it needs a minimum of 14" from the back of the stove to the wall studs. Hard to tell from the pictures, but it looks more like 8-10"?
North of 60
Minister of Fire
Incredible,a shrine for wood burners. Now thanks for making my setup look like crap. 
Hope all is OK with what BeGreen has noted.
Hope all is OK with what BeGreen has noted.
RonB
Feeling the Heat
Shane
Minister of Fire
That is a nice looking stove. I've been thinking of getting one I really liked burning the Leyden in the showroom at my old job. The rear clearance does look short but I'm sure you read the manual and it's just a matter of perspective in teh picture.
Harley
Minister of Fire
ATVriderINmass
Member
Thank you for the compliments. I did not do the cultured stone, just built the hearth. The dealer came and installed the stone/stove.
In regards to the clearances- Wow! I am very impressed, BeGreen. You have an amazing eye. The back of the stove itself is 14" from the studs, making the back of the flue collar 8" from the studs. The piping is double wall. I know the manual says 14" from pipe to backwall, but the dealer said that clearance could be reduced. I replied to your other post in the Hearth Room. I will copy it here for you. See below.
Indeed I did check the clearances. I worked with both the Lopi dealer for the Leyden, and the Avalon dealer for the Arbor, before deciding on the Avalon. Both of those dealers said that by putting durarock/stone you can reduce the clearance by 1/3. If you use the 1” spacer method, you can reduce it by 2/3. The Avalon dealer installed the stove by moving it 1/3 closer to the wall. Both dealers are certified dealers/installers, and are NFI certified. I trusted their advice on this. Are they wrong about that?
Profile PM
Edit Quote
Let me know what you think about all this. This is a huge bummer for me. I certainly don't want to worry about any issues. The one piece of stone directly behind the flue collar is the one that I said earlier in the post gets hot. Everything else behind the stove is just warm.
MainePellethead
Minister of Fire
woodburn said:Thank you for the compliments. I did not do the cultured stone, just built the hearth. The dealer came and installed the stone/stove.
That is just awesome. Very very nice. Great Job!
Henz
New Member
Very nice looking, one question though, why did you put the stove so high? IE, the hearth being waht, 12" off the floor?
Shane
Minister of Fire
myzamboni
Minister of Fire
Adirondackwoodburner said:Very nice looking, one question though, why did you put the stove so high? IE, the hearth being waht, 12" off the floor?
Easier to load? Easier to watch the secondaries?
I hope all is good, Shane. I have had some good all-day burns, and everthing seems fine temp wise. Just that one stone directly behind the flue that gets real hot- but if you can hold your hand to it for 3 seconds or longer it's not a problem (or so I hear). Plus, Cultured stone lists an r-value of .620 for 1.75" thick piece(this is the average thickness). I think that particular stone is at least that, and with the durarock behind it, I guess I have nothing to worry about.
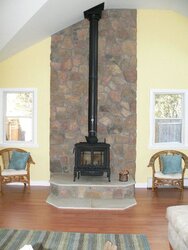
As for the height of the hearth- it is 12". I constructed it this way to make the stove look more Regal (I like that word). It's in a pretty huge room (20' x 30') with 12.5" ceiling. Plus, with all that stone behind it, it would just plain look puny. I also did account for ease of loading. I highly reccomend building it up for this reason alone. When you squat down it is at the perfect height.
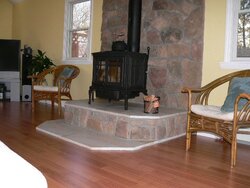
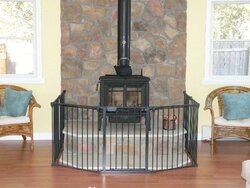
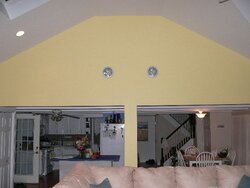
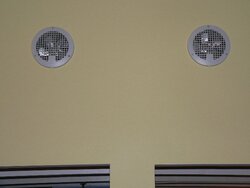
Here are some more pictures. One with safety gate for the kiddies. The others were taken standing right next to the stove facing the opposite wall. You can see how open the room is to the rest of the house. I also installed those to fans you see up high. Those take the hot air that rises into that high ceiling, and pump it to the upstairs of the house. One thing I have to say about that stove is- it heats the whole house VERY well. I am impressed by the output. Strange thing is, can't get the thermometer I have on the top of the stove to get much over 500 at it's hottest. I guess I really don't need it though. I can get that room way over 80, the rest of the downstairs to 74 and upstairs to 72. Old Man Winter doesn't stand a chance! One thing that is complete bull about the stove is those long burn times listed- absolute lies. I load the firebox up and i'm down to coals and reloading within 4 hours.
As for the height of the hearth- it is 12". I constructed it this way to make the stove look more Regal (I like that word). It's in a pretty huge room (20' x 30') with 12.5" ceiling. Plus, with all that stone behind it, it would just plain look puny. I also did account for ease of loading. I highly reccomend building it up for this reason alone. When you squat down it is at the perfect height.
Here are some more pictures. One with safety gate for the kiddies. The others were taken standing right next to the stove facing the opposite wall. You can see how open the room is to the rest of the house. I also installed those to fans you see up high. Those take the hot air that rises into that high ceiling, and pump it to the upstairs of the house. One thing I have to say about that stove is- it heats the whole house VERY well. I am impressed by the output. Strange thing is, can't get the thermometer I have on the top of the stove to get much over 500 at it's hottest. I guess I really don't need it though. I can get that room way over 80, the rest of the downstairs to 74 and upstairs to 72. Old Man Winter doesn't stand a chance! One thing that is complete bull about the stove is those long burn times listed- absolute lies. I load the firebox up and i'm down to coals and reloading within 4 hours.
Attachments
whphel
New Member
[quote author=One thing that is complete bull about the stove is those long burn times listed- absolute lies. I load the firebox up and i'm down to coals and reloading within 4 hours.[/quote]
Give it some time and learn how to run her and you will get more out of her. There is a learning curve.
Give it some time and learn how to run her and you will get more out of her. There is a learning curve.
Chardler
New Member
Nice job! My neighbor just had the Arbor installed. It's a beatiful stove. We both bought our stoves from Dunrite in Centereach. The neighbor has managed to overfire his a few times aleady by leaving the door ajar and vent open and forgetting about it. Had the termometer pinned at 1G, so keep any eye on it, it CAN get over 500 if you're not careful.
I like the fans for pumping the hot air upstairs. I'm working on a separate air duct system in my house that is separate from the central air system to move the hot air around the house during the winter. I'll burn less wood that way. Won't have to crank up the heat in the fireplace room just to get the farthest rooms warm. Good luck.
I like the fans for pumping the hot air upstairs. I'm working on a separate air duct system in my house that is separate from the central air system to move the hot air around the house during the winter. I'll burn less wood that way. Won't have to crank up the heat in the fireplace room just to get the farthest rooms warm. Good luck.
Chez
Member
Very nice installation. I am doing a similar project, and have some questions. I plan on using 2x6s for the hearth, with blue stone over cement board and plywood. On the wall, I plan on using metal studs on the flat with cement board screwed to them, and cultured stone over that. I have ordered the Jotul Firelight. Any thoughts or suggestions would be greatly appreciated. Thanks in advance.
Carl
New Member
Very nice looking stove and installation. This should afford you many years of enjoyable heat. Your whole room looks very nice too.
- Status
- Not open for further replies.
Similar threads
- Replies
- 4
- Views
- 1K
- Replies
- 0
- Views
- 779
- Replies
- 17
- Views
- 2K
- Replies
- 17
- Views
- 2K