Straw bales for exterior insulation?

  • Active since 1995, Hearth.com is THE place on the internet for free information and advice about wood stoves, pellet stoves and other energy saving equipment.

    We strive to provide opinions, articles, discussions and history related to Hearth Products and in a more general sense, energy issues.

    We promote the EFFICIENT, RESPONSIBLE, CLEAN and SAFE use of all fuels, whether renewable or fossil.
Status
Not open for further replies.

precaud

Minister of Fire
Jan 20, 2006
2,307
Sunny New Mexico
www.linearz.com
Context:
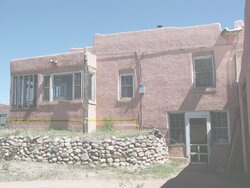
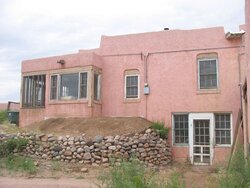
78 YO house, 2 ft thick uninsulated masonry walls, full daylight basement with walkin on north side (bummer), massive concrete foundation with basement stairs, laundry room floor, and two porches all poured along with the foundation. The front of the house faces south, but the south side is bermed and the north side is exposed, exactly backwards from what we want. They don't build 'em like this any more... for good reason.

One of the worst thermal weak spots is the massive concrete pouring on the north side which forms the basement stairs, laundry room floor, adjoining porch, and north side basement wall. 4 or 5 feet high by 20+ feet of this mass is directly exposed to the outside, and in the winter, it is a huge thermal sink. It's the coldest part of the house by far.

The correct thing to do would be to foam insulate the exterior of the whole north side and get that whole mass inside the heated envelope. But it may be a few years before we can budget that in - first priority is some passive solar treatment on the south side. So until then, I'm looking for an inexpensive way to insulate this mass from direct exposure to the cold air.

That's where the straw bales come in. Very cost-effective insulation. But it has to be kept dry. I'm envisioning the bales in some sort of bag or covering (say, polypropylene or similar) that will hold up for a few years. Stack them up to cover this mass. Looks aren't important - this is the back of the house and it can't be seen from any adjacent properties.

Anyone ever seen anything like this? Is this idea crazy? Your thoughts are welcome and appreciated.
 
Insulboard and glue for a 5x20 area would cost less than $70 and alot easier to install than straw. The straw will attract rodents and be a mess to clean up when your ready to do something different.Straw here is $3 bale and it will take 25-30 to cover that area.I think insulboard is the better and cheaper route.
 
Yes, that would be easier. But you're talking, what, R8 vs. R50? Not really comparable. And rodents aren't as much of an issue here in NM as they are out east.
 
Isn't NM Hanta virus territory? The last thing I would do is create a habitat for deer mice around my house. They may not be an issue now, but make a nice safe home for them and they will come.
 
From 1993 through 2007, there were 69 reported cases of hantavirus in New Mexico. Even with our small population, that's statistically buried in the noise floor, and nothing worth worrying about.

Besides - there haven't been any mice around here (or pidgeons, either) since Pico the mouser arrived on the scene :) She's an amazing hunter.
 

Attachments

  • pico2.jpg
    pico2.jpg
    54.5 KB · Views: 953
About 15 years ago I did some work (soffit and and facia) on a new house constructed with straw bales. Post and beam structure with bales filling the spaces between beams. It is still standing today and the last I talked with owners (years ago) they claim it heats very easily and have no rodent problems. It was one of the strangest building sites I had been on. After stacking bales they used a weed-eater to smooth surface a little ,then installed chicken wire and applied stucco.
 
I lived in a straw bale home for 2 years. Best house I ever owned. Warm in the winter and cool in the summer. Super quiet.
Moisture is the killer of straw. Get yourself a moisture meter and take readings every season.
 
Straw bales can work for you with some attention to a few key details. As mentioned moisture is what to avoid. Make sure that you provide a good drainage layer of gravel beneath and set them on two 2x4 sleepers. Pay attention to all sources of moisture (roofs, vents, etc.). You won't get r50 out of them without plastering to seal the outside up as wind can blow right through straw bales. I recommend plain old mud clay straw plaster as it is breathable and will be easy to break up when you re-do.
 
Thanks for the great input, guys. If I end up going this direction I'll follow up with a report.
 
Call me geographically challenged, but . . . what's the insulation for in New Mexico?
 
Here at 7000 ft altitude in the foothills of the mountains, we have real winters...
 
Precaud, I have been looking into straw houses very effective in our climate (I live by Kingman AZ). Just do the wall......will turn out to be the warmest wall in the house.

Doug
 
Doug, tomorrow I'm going to take a pic of the wall in question and post it... I think that will make things clearer. But now - it's off to the mountains, and to do my patriotic duty by burning some Memorial Day weekend gasoline (well, not that much... the Honda is a sipper :)
 
OK, here's a pic of the north side of the house. I've edited the photo to bring detail out of the shadows, and traced the approximate upper surface of the concrete with the yellow line.

From left to right, you see a screened-in porch, laundry room, then the house, with the electrical service entrance to the right of one of the house windows. In the horizontal, the pouring runs from this service entrance to the porch, and in the vertical, from about 2.5 ft. under the windows down to the basement floor, which is a full 8 feet high floor-to-joists. And, it extends a full 8 feet into the house. If you were to look into the window next to the electrical box, you'd see the concrete stairs into the basement.

Not including the porch, I calculate there is over 1300 cubic feet of concrete in this massive pouring. Once this thing starts getting cold in November, there's no way to keep the north side of the house warm. This thing sucks the btus out bigtime.

Any input/ideas are welcomed.
 

Attachments

  • nshouse.jpg
    nshouse.jpg
    83.8 KB · Views: 1,036
Thnak you for the pic, brings alot to light. I would do no more then the foam an recoat of stucco. You have windows, doors and main power running on the wall, to much work on the outside. NOW, you can fur up the inside for studs and put insulation on the inside wall. It would not look bad on doors and windows if thought out correctly.

On the side not....just had news say need to watch for rattlers this year as they are more poisonous this year!


Doug
 
Thanks for the input, Doug. Inside insulation is not feasible on this wall, for many reasons and not worth explaining them all here. It's outside or nothing.
 
Update: I've decided against the straw bales and am going with 1.5" XPS board, one foot under the current grade and 3 feet above, flash the top and then berm it in. I have lots of dirt that was removed from the roof when the TPO was installed last year. This should work fine and be easy to remove when the time comes to foam the wall. I dug the trench today, and should complete the rest next weekend.
 
Good plan, precaud. You should see some nice gains.
 
Anyone know what the R value of dirt is? I read somewhere it was R1 per foot, but that seems low to me.
 
Good link BG, that states things pretty clearly. The jist - a berm needs to be really deep to be effective.
 
Here in Indiana many people use straw bales, not hay bales to put around the outside of their house to prevent cold air from getting in. They wrap it in plastic that comes in rolls at walmart like you would use for a painting drop cloth only this stuff is like 5mil thick, 100' x 20'.

It works, but dont let your insurance agent see it
 
Why not use woodchip just attach a waterproof membrane to the wall attach plastic water pipe to wall for temperature regulation add a temporary chicken wire wall 1 metre away from the wall infill with woodchip. Woodchip insulates house and heats up over the winter come the spring woodchip turned into compost to be applied to the garden.
 
Thought I'd post a progress report and initial impressions. While trenching along the wall, I encountered some hefty root systems about 14" down so I stopped there. So the XPS was put in, flashed and sealed, and the first round of earth is in place. I'll give it some time to settle (recent rains helping there) then restore the level and cover the surface (wood chips/bark or plants?) to stop erosion. Total cost was about $60 until my hammer drill gave in while drilling through 78-year-old concrete. :(

The point of this was to bring a large thermal mass back into the house's envelope and less exposed to outside temps. I can see already that is happening, as summer temps in that corner of the house are 2-3 degrees lower and more stable than last year, and so should be correspondingly warmer this winter. So the concept works. Pretty good payoff for 60 bucks.

While moving the many wheelbarrow loads of dirt in place, the thought struck that maybe the wall was not the best place for the insulation; that maybe the top of the berm should be insulated, putting the mass of the berm inside the envelope, so to speak. Well I'm not going to tear it out and change it now, but I searched around and saw the concept definitely has a following, in the "earth ship" community and others.

Here's an example of a surface-insulated berm:
http://www.sharonbetts.org/photo/thumbnails.php?album=25&page=2

The three photos on the right show the details. 2" XPS on the top of the berm 12 feet out, done on all but the south side. They claim a significant stabilization of ground temperatures around the house. I can see that moving the frost line 12 feet away from the house would be a good idea. I like it.
 

Attachments

  • nshouse4.jpg
    nshouse4.jpg
    52.3 KB · Views: 663
Status
Not open for further replies.