
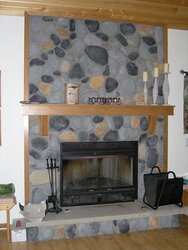
Well it's finally in. After months of contemplating and measuring and researching it's finally done. Now I just need to build a hearth extention and we will be ready to rock. I am a little disappointed on the look of the new chimney cap. Because I went from an 8" to a 6" pipe it looks odd... oh well. As long as it works that's all that matters. I have a pic from behind the stove that shows how the pipe coming out of the stove has a few inches of horizontal before it bends up to a 20ft vertical run. So I am hoping to have a solid draft. Just thought I would share some pics, thanks again for all the help guys... 8
Oslo installed today!!
- Thread starter eightpilot
- Start date
-
Active since 1995, Hearth.com is THE place on the internet for free information and advice about wood stoves, pellet stoves and other energy saving equipment.
We strive to provide opinions, articles, discussions and history related to Hearth Products and in a more general sense, energy issues.
We promote the EFFICIENT, RESPONSIBLE, CLEAN and SAFE use of all fuels, whether renewable or fossil.
You are using an out of date browser. It may not display this or other websites correctly.
You should upgrade or use an alternative browser.
You should upgrade or use an alternative browser.
- Status
- Not open for further replies.
??? ???
As noted in other thread. She looks great in her new home, though the hearth rug is not a proper hearth extension. But we know you are going to do a first class extension to match that fine hearth.
As noted in other thread. She looks great in her new home, though the hearth rug is not a proper hearth extension. But we know you are going to do a first class extension to match that fine hearth.
myzamboni
Minister of Fire
dsil
New Member
Hanko
Minister of Fire
looks nice, youll like the oslo. it does a super job, but one thing. it does not like wet wood, or unseasoned wood, but a load of dry oak will kick out the heat for hours
Dix
Minister of Fire
WOODBUTCHER
Minister of Fire
All I have to say is........the next 3 months are gonna creep buy for you....nice looking install!
WoodButcher
WoodButcher
stanleyjohn
Minister of Fire
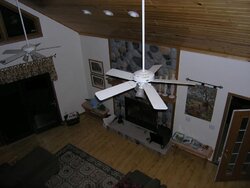
I went with the Blue/black enamel and it looks even better in person. I am going to do up a nice 18" hearth extension later this summer to match the river rock background. Heres another pic from the loft area. As you can see I have alot of volune to heat so I hope the Oslo is up for the task... 8
Attachments
DiscoInferno
Minister of Fire
Wow, your house looks familiar. (See pics.) Since you're in WI, is that by chance a Wisconsin Homes modular, loft model?
I eventually want to do pretty much exactly what you did, but I've been a little stumped on getting a high enough R-value under the stove. Here's my question, which I didn't see in the older threads. Is your hearth real solid stone and mortar down to the floor, or a "cultured" veneer like mine? Because on mine the stone is affixed to what sure looks like wood (particle board or similar), and I'm pretty certain that my 2.5" thick concrete slab is sitting on wood framing, meaning an R-value of about 0.25. Most stoves need a lot more than that below them. Did that come up in your discussions with the installer?
Edit: Do you have a picture of that new chimney cap? We appear to have roughly the same fireplace (mine is a Majestic WMC42) and mine has a 3-wall air-cooled chimney (8", 11" and 14" diameters). My current cap is a beast that connects to all three walls. I'm curious how your installer handled a 4th 6" pipe without exposing the existing chimney to rain.
Edit Edit: I pulled down the Oslo manual. Surprisingly, for non-alcove installations all it appears to require is a noncombustable surface under the stove. No mention of R-value at all. For alcoves it requires both a bottom heat shield and an R-value of 1.6 underneath. I'll be curious to find out how hot your slab and the stone surround get this winter. For my setup I can still see a potential problem with the proximity of the wood behind the stone on either side and above the fireplace.
Attachments
Hey Disco, my home was stick built by a local builder. It was designed after a Wausau Home floor plan though. I have no idea about R value of my 2.5" stone hearth. I do know that the installer did put the bottom heat shield on and the manual like you said doesn't address this issue. The bottom shied comes with the stove and is not listed as an option. Other then the ashpan, the bottom of the stove is 9+ inches above the stone with a full heat shield attached to it. I don't think it will be an issue. The chimney cap had a block off plate that was siliconed and screwed into place. It leave the bottom screen intact to provide airflow, but prevent water from seeping in. It looks like it should work. I just don't like the cheesy cap that I paid $61 for...8
I did have an WMC42 also...
I did have an WMC42 also...
Attachments
DiscoInferno
Minister of Fire
Did you have any problems fitting the elbow/pipe under the WMC42 opening and into the Oslo collar? Going by the manual the top of the pipe in the collar is a little over 28" high, and the top of my WMC opening is slightly lower than that without cutting metal.
Anyway, I'll be looking for a report this winter as to how this setup is working out.")
Anyway, I'll be looking for a report this winter as to how this setup is working out.
Don't worry about the sides. We have the same ZC Majestic fireplace and the Oslo will fit. The installer had the model number of my Majestic and plugged it into the CAD system for fitting issues. He also contacted Jotul about my installation and they said if I use the rear heat shield it will get my corner clearances down to 9". The wood framing behind the stone of our existing fireplaces is at just over 10 from the corners of the Oslo. Your golden. I didn't need the rear heatshield for behind the stove, I needed it for the corners...8
No issues with the pipe. The manual measurements are off a little. The collar when reversed is adjustable up and down about 1". It will fit in there just perfect. We slid my stove in with no cutting or adjusting needed at all. I was shocked. 8
granpajohn
Minister of Fire
I guess you've checked....That wooden mantle OK? (Hard to tell in photos with stone not brick)
I looked hard at the same setup, but would've had to raise (or shield) my mantle, per Jotul spec. (That was not the primary problem for us though.)
I really like the look.
I looked hard at the same setup, but would've had to raise (or shield) my mantle, per Jotul spec. (That was not the primary problem for us though.)
I really like the look.
I am still looking for a copper mantle shield. I might have to fab one up if I cant find one pre-made. I definitely need one though, I missed the clearance by 4 inches. 8
Highbeam
Minister of Fire
I thought about it alot and decided to go with the elbow instead because of draft issues I had previously. I know the T is convenient, but if I burn good wood at the right temp I won't be cleaning the pipe often anyway.
Maybe to get your mantle clearance you could remove the 90 elbow, run some doublewall stovepipe back and into a tee. Dblwall stoepie reduces clearances a lot - I forget how much but it should be in your Oslo manual. I bought an adjustable dblwall stovepipe that goes from like 12 to 18 inches to get it just right.
Highbeam
Minister of Fire
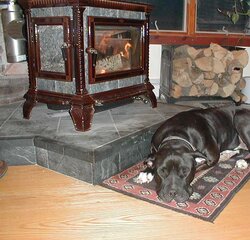
eightpilot said:Beautiful stove....and dog, by the way. 8
Woops, sorry 8, that's not my stove or dog. In fact, I think the dog passed on. I just like the photo and the tee seems handy for cleaning.
- Status
- Not open for further replies.
Similar threads
- Replies
- 14
- Views
- 609
- Replies
- 20
- Views
- 733
- Replies
- 12
- Views
- 2K