I will attempt to attach some pictures of my hearth construction.

Well, I see the pictures aren't lined up in order! I tried!
Steps: I am one of those guys that does a ton of research and then draws a sketch, and then tapes the outline on the floor and then goes for it. I was fortunate that a friend was installing a hearth and wood stove before me; I volunteered to help him for the exchange of knowledge. It was well worth the time, blood and sweat.
1. I did research on clearances on this web site and printed off the wood stove owners manual I was fairly sure I was going to buy (Englander nc30).
2. I drew a sketch.
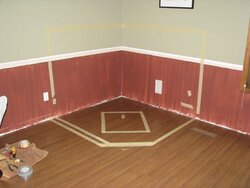
3. I taped out the outline of the hearth and of the stove (I lived with this for a couple of months) I played with different heights of the wall surround until I found what I liked.
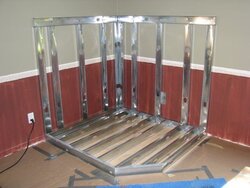
4. I used a rotary saw and cut up the composite wood floor; I removed 1 electrical outlet and covered the hole with drywall and a piece of scrap metal. I layed out and fastened the metal 2x4s on the floor and then the wall. I marked the locations of the metal 2x4's on a pieces of tape.
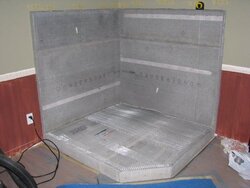
5. I then cut and screwed on the cement board. 3 layers on the base (because I had plenty and I wanted the base that far off the floor), 1 layer on the toe kick, 2 layers on the back surround ( I used 2 layers for add heat protection and so I could use 3/4" staples for affixing the metal lathe), 1 layer on top of the surround.
6. stapled down metal lathe. ( I started by cutting the cement board with a utility knife but quickly changed to my worm drive saw, much more dust but worth it)
7. skim coat of spec mix over the lathe
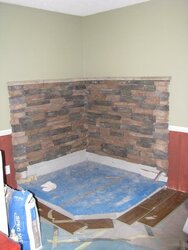
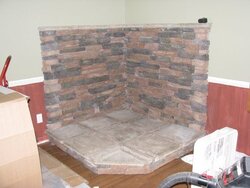
8. started laying fake rock from the top down (so any spec mix that falls doesn't get all over the rock) on the back surround
9. put on the cap stones on top of the back surround (this was a major point of research...free air space vs. enclosed air space...I went trapped air)
10. Layed down the hearth stones (of course, I had to dry fit, make the custom cuts and then put down)
11. put the rock on the toe kick. (this rock is floated above the floor in case a new floor is ever put in)
12. clean up
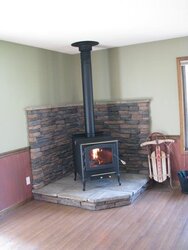
13. set the stove
14. plumb bob from ceiling to center of stove exhaust hole. cut hole. plumb bob from bottom of roof to center of stove exhaust hole. put in all the pieces and parts with custom cutting on the insulation shield due to height restrictions. lots of silicone and black jack on the stove pipe weather shield.
15. So far I have had 2 fires curing the stove. Some smoke of the first, low temp fire, tons of smoke on the second mid-high range fire (drove the wife out of the house!)
Honestly, I probably put in more than 6 months of research on this project. Just about EVERY stone on the hearth is custom cut with an angle grinder but I think the quality and attention to detail is evident.
Again, Hearth.com was a HUGE part of my research and knowledge; I can't thank everyone enough. Having a friend putting in a hearth and stove just before I started my project was also a huge advantage.
Well, I see the pictures aren't lined up in order! I tried!
Steps: I am one of those guys that does a ton of research and then draws a sketch, and then tapes the outline on the floor and then goes for it. I was fortunate that a friend was installing a hearth and wood stove before me; I volunteered to help him for the exchange of knowledge. It was well worth the time, blood and sweat.
1. I did research on clearances on this web site and printed off the wood stove owners manual I was fairly sure I was going to buy (Englander nc30).
2. I drew a sketch.
3. I taped out the outline of the hearth and of the stove (I lived with this for a couple of months) I played with different heights of the wall surround until I found what I liked.
4. I used a rotary saw and cut up the composite wood floor; I removed 1 electrical outlet and covered the hole with drywall and a piece of scrap metal. I layed out and fastened the metal 2x4s on the floor and then the wall. I marked the locations of the metal 2x4's on a pieces of tape.
5. I then cut and screwed on the cement board. 3 layers on the base (because I had plenty and I wanted the base that far off the floor), 1 layer on the toe kick, 2 layers on the back surround ( I used 2 layers for add heat protection and so I could use 3/4" staples for affixing the metal lathe), 1 layer on top of the surround.
6. stapled down metal lathe. ( I started by cutting the cement board with a utility knife but quickly changed to my worm drive saw, much more dust but worth it)
7. skim coat of spec mix over the lathe
8. started laying fake rock from the top down (so any spec mix that falls doesn't get all over the rock) on the back surround
9. put on the cap stones on top of the back surround (this was a major point of research...free air space vs. enclosed air space...I went trapped air)
10. Layed down the hearth stones (of course, I had to dry fit, make the custom cuts and then put down)
11. put the rock on the toe kick. (this rock is floated above the floor in case a new floor is ever put in)
12. clean up
13. set the stove
14. plumb bob from ceiling to center of stove exhaust hole. cut hole. plumb bob from bottom of roof to center of stove exhaust hole. put in all the pieces and parts with custom cutting on the insulation shield due to height restrictions. lots of silicone and black jack on the stove pipe weather shield.
15. So far I have had 2 fires curing the stove. Some smoke of the first, low temp fire, tons of smoke on the second mid-high range fire (drove the wife out of the house!)
Honestly, I probably put in more than 6 months of research on this project. Just about EVERY stone on the hearth is custom cut with an angle grinder but I think the quality and attention to detail is evident.
Again, Hearth.com was a HUGE part of my research and knowledge; I can't thank everyone enough. Having a friend putting in a hearth and stove just before I started my project was also a huge advantage.