WMC42 Replacement with w/Heat&Glo;North Star UPDATE: Finally burning! (post 28)

  • Active since 1995, Hearth.com is THE place on the internet for free information and advice about wood stoves, pellet stoves and other energy saving equipment.

    We strive to provide opinions, articles, discussions and history related to Hearth Products and in a more general sense, energy issues.

    We promote the EFFICIENT, RESPONSIBLE, CLEAN and SAFE use of all fuels, whether renewable or fossil.
Status
Not open for further replies.
Well, I started a thread last spring about replacing my wood sucking WMC42 unit with a Vermont Castings Sequoia. The object being to save the existing chimney pipe, because new fireplaces seems to want their own propreitary chimney pipe, and I need 30' of it, which is another $700-$1000 depending on model.
The Sequoia unit being the same manufacterer, uses the same S8 Chimney pipe, if I can get it off, which I believe is possible, I will destroy the bottom section, but that's it, I'll buy one section of it.
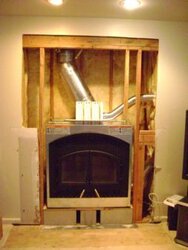
Anyhow, I tore into my chase today after getting some updated quotes on the sequoia.
What I found, I do not like.
I have a laminated glue beam that is the feature of my living room, loft and master bedroom, and more than that, it's a structural member, it supports the roof of the entire home.
The builder put the header that supports that beam right above the fireplace.
The Sequoia unit requires an framed opening 10" taller than the existing WMC42. I thought I had some fudge factor with the little 5" pedestal he built above the floor I could set the unit on the floor and get another 5", but not 10.
That sucks.
The only thing that might save me is it almost looks like the glue-lam beam is dual supported, the back wall of the chase also has 8 2x4's nailed together, the firestop prevents me from seeing all the way to the top to see if that is truely the case or not, but I would still want to support that front side before I knocked the header out though.
I think that's my next step to check if that back wall support goes to the top to support that glue lam beam up there. I wouldn't want to wreck my home in this process. I don't think my wife would like me very much then. :)

IMG_8869.JPG

IMG_8870.JPG

IMG_8871.JPG


And reference pictures to get an idea of the structure of the home:
Fireplace.jpg

IMG_9242.JPG
 
Well, the 'firestop' was just a piece of drywall laying on a little form, I was able to easily push it up to see up to the top.
The back wall of the chase isn't supporting anything, I don't know why they have 8 2x4's nailed together going all the way up to the top on the back wall of the chase, it doesn't support anything. So the header I need to move up is supporting alot, and I don't think there is any non-risky way of moving it up. I for sure don't want to take any chances on that beam up there moving even slightly.
So, the Sequoia is out for me I think, I'm not chancing having that beam move up there.

So, anyone know of any ZC units that will fit a 47 3/4" tall opening? I'll have to start looking....
 
Well, after much deliberation and which units would fit my opening, and calling around to see what's available and how much people are selling stuff for, I ordered up a Heat n' Glo North Star unit this morning.
I wanted a Quadrafire 7100fp unit, but it's expensive ($4400, or $3600+one of the $800 or $900 fronts) and no distributor has one and the factory isn't planning on building any until mid-January (so 1 dealer who actually called the factory told me), so we're talking early spring availability.

THe Heat N' Glo North Star and the Heatilator Constitution (twins) are same manufacturer as the Quad 7100 (Hearth & Home Technologies) and I believe I found one thread here saying they are built on the same line as the Quad 7100. Indeed, looking at the parts lists they share many of the same parts as the Quad, I believe the HeatnGlo and Heatilator brands are just a wee bit smaller. The timer, blower, baffle, blanket, and even one of the tube assemblies was the same part number. Although they all take a 24" log. The COnstitution and the North Star are for sure the same technology as the Quad 7100. Funny, the Constitution is exactly the same unit as the North Star but lists for $250 more.

Several of the dealers (using the same distributor I'm sure) said the distributor had 1 in stock and could be here next week. List price on this seems to be $4092 and many places weren't moving from that. 1 place said 10% off it, putting it at $3682. But one place, and I don't know how he's doing it, said $3410. I said, deal. order up and paid in full. He said he already checked with the distributor and he had 1 in stock, said it would be here next week.

So, this will be a fun retrofit. Hopefully I can get some good documentation for ya'll.

Coming in next week but I'm out of town all next week, so I will be installing probably last week of October. I need to order up the Chimney pipe sections from an online place I found for $61/48" section (list is $115/48"section). Giddy up....I will be soooooooo glad to get rid of the wood sucking Majestic open pig.
 
I responded to your other thread as well. It seems like I may have purchased one of the last 7100's in Michigan. I put the order in at the very beginning of September, and the dealer had only one 7100 and three stores across Michigan (Houghton Lake, Perry, and Owosso). I'm originally from St. Charles/Chesaning, so I'm familiar with all three places. I didn't get much of a deal because of the shortage, but I did alright with 6% off and no increase in the price (I heard that it went up almost $1000 and won't be in until September of 2009). With that, I think you did really well in getting the Northstar for that steep a discount. Must be all that movie money flowing through the area has people feeling good (in regards to my family saying that they shot a movie in the area this summer).
 
Str8781 said:
I responded to your other thread as well. It seems like I may have purchased one of the last 7100's in Michigan. I put the order in at the very beginning of September, and the dealer had only one 7100 and three stores across Michigan (Houghton Lake, Perry, and Owosso). I'm originally from St. Charles/Chesaning, so I'm familiar with all three places. I didn't get much of a deal because of the shortage, but I did alright with 6% off and no increase in the price (I heard that it went up almost $1000 and won't be in until September of 2009). With that, I think you did really well in getting the Northstar for that steep a discount. Must be all that movie money flowing through the area has people feeling good (in regards to my family saying that they shot a movie in the area this summer).

At least you got one, lucky you. The only other reason I wanted the Quad was you can use the Simpson Dura-plus triple wall pipe with it, as opposed to the air-cooled double wall stuff. I think the Dura-plus would be alot safer pipe not to mention draft better. But I'm sure the Sl300 pipe will work just fine.

Yeah, I don't know how the one guy is getting $3410. $3410 is 16.7% off of 2008 list price, not an very even number. He seemed a little confused, (lukily I knew exactly what I wanted), he said he doesn't sell much wood stuff, he had trouble to find any info on it, my best guess is he was looking at last years price list not knowing the wood stuff exploded, and gave me 10% off of last years price.

I called/visited several dealers for the Quadra-Fire 7100fp, probably nearly every one from Flint->Saginaw. One place actually called the factory while I was right there. The factory stated that they would not be building any until Mid-January and availability would be first come first serve, they told the dealer if they put the order now, they would probably have it by Spring. But they weren't making any promises. Price was current 2008 pricing if you order now. I didn't ask how long that's good for. Current pricing is $3600 plus one of the fronts, IIRC they were $800 for the mission hill and $900 something for the valley forge front. I have the 2007 price lists for the entire Quad wood insert and fireplace line, that is over $200 more for the base unit and over $100 more for either of the fronts,
 
My people were pretty confused. I think I got the $3400 price on the stove and $800 on the Valley Forge (so I felt as though I did pretty good there). As for checking out Flint, you are a braver man than I. The only time you can find me in Flint is on I-75 on my way through to a Pistons game. No stopping!
 
Good choice! The Constitution and the NorthStar are identical EXCEPT for the decorative front fascia. I have already fired my Constitution a few times, and it warms the house nicely! In NJ, the five area retail shops I called (just out of curiosity) are looking for FULL list on the Heatilator Constitution at $4612!! You are getting a good DEAL in Michigan even at the $4092 price! My wholesale connection gave me the Constitution fireplace, ~ 30ft of SL300 piping, outside air kit, 3 fire stops, chimney cap, and flashing, fully installed at $4500. I did do the prep-work by doing the demolition work of old fireplace & piping, and making the 8" raised hearth under the unit. I still have to complete my (permanent) extended hearth and the surround.
Kev
 
My first time logging in and visiting this particular forum. Found hearth.com when searching for chainsaws.

I purchased a Northstar back in Fall, '06 to replace a Heatilator fireplace. We went with the Northstar because it was cheaper than the other two models (Quadra & Heatilator) and because it fit the opening and flue that we had. I did the removal/install myself (with help from two other people) and managed to get things hooked up properly (had some long distance info from a shop owner who installs them). Was also able to get our local fire inspector to come in and check things out before I closed it up too.

The Northstar is a nice stove. I only have a 1600 sq. ft. house but it heats it well and efficiently. My father has a Regency fireplace insert which blows them out of their house. I have never been able to get the Northstar to come close to the heat production that his Regency has. However, that being said, I do not want it to produce that much heat either! I wanted something that would still give me that fireplace look and the glass on the stove is quite large so the appearance is similar. One thing I don't like is that even when I stock it full for the night by morning there rarely is anything left to rekindle the fire. Not sure if that's something I'm doing or if it's just the woodstove itself.

Just thought I'd let you know of my experience.
If you have any questions feel free to write!
Keith
 
Thanks for the info Keith & Kev. Interesting stuff.

Well, I picked up our new fireplace today and ripped out that old pig WMC42. Hopefully by the weekend I can get the new one installed and get the rock mason out next week sometime to button it up.

I started the retrofit by laying 2 layers of 6 mil plastic for a good ways all around the carpet in front of the fireplace. Then I started chipping out the cultured stone along the edge of the fireplace. That was the messy part. I placed a cheap furnace filter with a fan blowing out the doorwall to somewhat control the dust. Then it was back into the chase.
The triple wall Majestic S8 chimney is a groan to de-install. It's huge outside diameter and the fact that there are three walls, makes it difficult. I tried for 2 hours to carefully disconnect it from the first section up. No go. No way I would have gotten that held up and saved it to install the Sequioa unit I originally wanted.
I ended up pulling out 28' of the inner section, it pulls right up, as long as you can lift it. I had everone go in the house while I lifted it from the top of the chase, tilt and fall to it's demise. The remaining 2 walls wouldn't separate and are too heavy to lift. So what I ended up doing is using a prybar to lift it from the stovetop, then banging in the side of one section right below another section to get an edge to hold it up, then screwing a board in between the inner and outer chase walls to hold it up from there.
Then I was able to remove the stove, and once 40" of stove height is out of the way I was able to walk it out the side of the chase. Not so fun, but I got it.
Man that chimney also had 2" of dried moths/bees/wasps in one of the walls, kinda looked like a fire hazard to me sitting on top of the stove when I pryed up the chimney. Couple of live dormant wasps too. Bzzzt...bzzzt..not a fun sound to hear when your in a confined space.

Some pics for your enjoyment, sorry for the somewhat blurry pictures, my wife had previously set the camera to manual focus and I didn't notice:
IMG_9788.jpg

IMG_9789.jpg

IMG_9791.jpg

IMG_9792.jpg

IMG_9795.jpg
 
Oh, man. Looking at the picts of your old stove on the deck brings back some horrible memories! Sure, it was fun tearing everything out but getting everything to line up perfectly was the biggest pain. We had an old Nissan truck to deliver the stove from 2 hrs away. Kinda looked like the back of your truck with those flue pieces.

Good luck with your install! Trust me, it'll keep you warm. I'm enjoying the flames in mine as I type this.
Keith
 
Yeah, your words are starting to ring true.

So, umm...I may have a major showstopper issue. It seems, after taking some measurements and doing some research and reading and then finding this post and this post, the North Star seems to be designed only for 2x4 walls. Reading those other posts, it seems to install into a 2x6 wall, the installers notched 2x6 header and/or moved a stud. Well, I cannot do that. My header is load bearing, probably the most load bearing member in the house, it supports 8 nailed together 2x6's which go 28' up to support a giant 50' laminated glue beam at the peak which supports the entire roof of the home. That header cannot be modified.

If I push the unit in more to maintain the 2" of chimney clearance, the iron face will be under the header only 6" above it, which is not within limits according to the manual.
Any suggestions? I can paint the header with that special heat paint to help it resist fire, but that's kinda of hack. I could put the attic insulation piece, just a 12" long piece of 12"diamter sheet metal, around the first section to furthur heat shield it. I will call the dealer tomorrow to see if there is any acceptable 2x6 installation method from HeatnGlo, but it seems the only method I can find right now is to notch the header which is not possible in my case.

You know I did check this before hand, I don't know why I didn't ask more questions then, but I figured I guess I could push it in a little, and plus common sense kept telling me, it cannot be designed for only a 2x4 wall, that just seems silly. I figured I just had to get it here to see where it ends up and what I can do.

Any suggestions or help is appreciated.
 
Well, perhaps I have found a solution. But I'm not sure I like it.

With the CAK4A installed, and assuming (because nothing says anything about it) it is not considered part of the chimney and thus could invade the 2" of required airspace cleaance (actually normaly installed in a 2x4 wall, it already be invading the 2" clearance), and assuming one can put an offset as the first piece.

I can't find it now, but I know I read one models manual that said to not use an offset as the first piece. But the quadrafire, north star and constitution don't say anything about if that's allowed, not allowed, not recommened, nothing about limiting where offsets are used in the system. If that's the case, if you can use an offset as the first piece you could clear right away.
Discussion?
 
73blazer said:
Well, perhaps I have found a solution. But I'm not sure I like it.

With the CAK4A installed, and assuming (because nothing says anything about it) it is not considered part of the chimney and thus could invade the 2" of required airspace cleaance (actually normaly installed in a 2x4 wall, it already be invading the 2" clearance), and assuming one can put an offset as the first piece.

I can't find it now, but I know I read one models manual that said to not use an offset as the first piece. But the quadrafire, north star and constitution don't say anything about if that's allowed, not allowed, not recommened, nothing about limiting where offsets are used in the system. If that's the case, if you can use an offset as the first piece you could clear right away.
Discussion?

The "square box" portion of the air kit at the top of your unit is NOT considered as part of the chimney pipe (Per my inquiry to Heatilator); the 2"measurement is to be taken from the pipe to any combustible. Attached (below) is a photo showing my clearance of pipe from my new header when I had the same concern as you. I think you could also put some 1/2" Micore 300 as insulation if something looks questionable; Then the 2" would not apply anymore to the particular section your are insulating.

The first pipe on the top of my Heatilator Constitution is an offset piece. You should be fine. I attached a photo (below) before I made a new header and added new framing studs. You can just see the the pipe angling left at the top of the unit.

BTW....with regard to your earlier post concerning your metal header clearance. You probably could use the Micore 300 to insulate it from heat-pickup but not sure how you could secure it. However, you could look at Owens Corning Insulation. They make some neat fire/flame/heat proof fiber materials (similar to Micore) but specifically made for insulating metal enclosures like duct work, etc.

kev

P.S. It is going down to 23 deg tonight here in Sussex Co., NJ. My Constitution is cranking out the heat as I type! You'll love your unit once installed. BTW...I raised my hearth under the fireplace by 8 3/4 before install (as shown in photo), and just finished my extended hearth (also raised 8 1/2 inches.) I still have to tile and build a new mantel. BTW....take a look at the Manufacturer's requirements for "K" (heat conductivity) for your extended hearth! I have (reluctantly) fulfilled met their requirements by including two layers of 1/2" Micore 300 and two layers of Durok cement board (so the tiles won't crack!!!). My own experimentation and looking at similar units like the XTRODONAIRE ELITE fireplaces concluded that Heatilator (and Heat N' Glo) Manufacturer specs are way OVER-KILL. In my opinion the two layers of Durok SHOULD have been sufficient. I have a (few) question-posts on here with regard to this.....
 

Attachments

  • DSC00630.JPG
    DSC00630.JPG
    15.3 KB · Views: 1,809
  • DSC00658.JPG
    DSC00658.JPG
    15.9 KB · Views: 1,506
Tanks a million of that response Kev. Those pictures are very helpful to me.

I called Hearth & Home today and the tech indicated if the manual doesn't say you can't use an offset as the first piece, he was fairly confident that if the chimney section of the manual didn't say you couldn't, then it was ok. He was looking at the manual and confirming with someone else near him. He said, we try and cover & document most negative aspects, you know what you can't do, and the manual here doesn't say that you cannot.

I slide the unit in and I think I got some options here, I can make it work. But it does suck this unit is not designed to be framed in with a 2x6 wall. That just seems silly.
Looking at Kev's picture of the offset, I thick if I just reinforce the header with steel and chip away 1/4" of it, I'll have the clearance I need.

I've got some height to play with. I could probably safely slide the unit back furthur and durarock or insulate that header, but I think I'd rather use the offset.
IMG_9796.jpg


From inside the chase, if the offset starts bending right away, I think I can safely chip a small bit of header away.
IMG_9799.jpg
 
First off, there should be a header/frame support across those two triangle supports (refer to your first photo) at the top of the unit.

Secondly, I notice that you are taking the measurement from the edge of the air kit where the pipe initially protrudes to the bottom edge of the header (as shown in your second photo). However, you must maintain that same 2" clearance to combustibles on the entire length of pipe right up to the chimney cap. The photo angle is deceiving, but it looks as though the pipe could be close to touching your existing header (once installed) even if you elect to use an offset pipe. If you drop the header as I indicate in my first comment, then this clearance issue could be a mute point.

BTW....how much clearance do you have at the rear of the unit to the studs? The manufacturer requires 1" minimum at rear and sides of the unit to combustibles. (Apparently, the unit is "Zero Clearance" to the floor ONLY! LOL) If you have a lot of room in your chase, you might consider finishing off the chase. If you are just barely making the 1" requirement, you should A) Make sure your insulation in the chase does NOT have paper siding. B) Push the insulation deep between the studs and buy a pack of of those wire insulation holders to keep it secure as not to fall on the unit after you close that baby up. Assuming you have several inches of clearance on the sides, but have 1 1/2" to 3" at the rear, I would install 1/2" Durok across the studs at the rear of the unit. As my clearance was just BARELY 1", I was toying with the idea of extending out the back of the chase....but said screw it. (Personally, I believe that the 1" clearance is a bunch of BS, and REALLY means "MAKE SURE COMBUSTIBLES DO NOT TOUCH UNIT!!" Keep in mind that if it were remotely possible for something to catch fire within 1/8" of the unit, you could be damned well sure they would specify 2" or more of clearance! (I am sure there are those that would argue with me.)
Kev
 
There is no possibility to modify the existing header, it supports, well, in a manner of speaking, half the weight of the roof.
I can frame in a false 2x4 header above the unit if I need to.
I plan on type X sheetrocking the entire chase as per the instructions in the manual, that's happening this afternoon. The previous unit sitting in the chase just like you see, it had stickers on the side saying 7/16" clearance and the insulation was sticking out and touching it in various places. Your right, that's a margin of safety just to keep anything from touching the thing.
You'd use durarock behind it? I saw the post about the various materials and their ability to transfer heat and contain fire and one of the later posts lists R value for Type X. Type X has a better thermal resistance, but less time before it combusts, than durarock, better for use in 'fire resistint" applications. If it specified non-comustible, then that's another matter and Durarock is better. I thought the object was to keep the heat from transfering to the studs behind. Really, the object is to contain the insulation and buy you some time in the event of a chimney fire. I'm lining the entire chase with it.

Yes, I am measuring from where the pipe protrudes from the air kit. The air kit is actually taller than the height of the starter collar on the stove, and looking at Kev's picture it is already bending when coming out of the air kit. I will have to use an offset for 2 reasons, 1) to get away from that header and 2) to center it back in the chase to keep it away from the 8 nailed together 2x6's that sit atop the header that support the glue-lam beam that supports my roof. It'll be close, closer than I'd like, but I think I got 2". We'll see when the offset comes in. With the height I have to play with, I can shove the unit back 1/4-1/2" or so and still be withing the clearance specs for combustibles protruding out the front and above the unit. Heck, I could buy firebrick and mason them onto the bottom of the header, would that qualify the header than as non-combustible I wonder?
 
73blazer said:
There is no possibility to modify the existing header, it supports, well, in a manner of speaking, half the weight of the roof.
I can frame in a false 2x4 header above the unit if I need to.
I plan on type X sheetrocking the entire chase as per the instructions in the manual, that's happening this afternoon. The previous unit sitting in the chase just like you see, it had stickers on the side saying 7/16" clearance and the insulation was sticking out and touching it in various places. Your right, that's a margin of safety just to keep anything from touching the thing.
You'd use durarock behind it? I saw the post about the various materials and their ability to transfer heat and contain fire and one of the later posts lists R value for Type X. Type X has a better thermal resistance, but less time before it combusts, than durarock, better for use in 'fire resistint" applications. If it specified non-comustible, then that's another matter and Durarock is better. I thought the object was to keep the heat from transfering to the studs behind. Really, the object is to contain the insulation and buy you some time in the event of a chimney fire. I'm lining the entire chase with it.

Yes, I am measuring from where the pipe protrudes from the air kit. The air kit is actually taller than the height of the starter collar on the stove, and looking at Kev's picture it is already bending when coming out of the air kit. I will have to use an offset for 2 reasons, 1) to get away from that header and 2) to center it back in the chase to keep it away from the 8 nailed together 2x6's that sit atop the header that support the glue-lam beam that supports my roof. It'll be close, closer than I'd like, but I think I got 2". We'll see when the offset comes in. With the height I have to play with, I can shove the unit back 1/4-1/2" or so and still be withing the clearance specs for combustibles protruding out the front and above the unit. Heck, I could buy firebrick and mason them onto the bottom of the header, would that qualify the header than as non-combustible I wonder?

I would put in the (false) header across the top of the unit.

I did not finish my chase. Just studs, insulation w/o paper, and those metal "wire" insulation holders to secure the insulation. The insulation is not going anywhere. BTW...The insulation is "glass", and it isn't going to burn. It is more of an issue of the insulation potentially impeding the airflow behind the unit.

You might want to simply secure some 1/2" Micore 300 over the inner face of your existing header (and the new "false" one), and secure it wooden studs off to either side, but NOT on the header itself. Then the 1" to combustible is a non-issue, and you can call it a day. BTW...you can pickup 72" x 20" sheets of Micore 300 (designed for minimum required extended hearth dimensions) at WHOLESALE fireplace/woodstove places for $15/each. Call around.....Don't pay the $35-60 that a lot of retail shops and online stores are asking!! You will need two sheets of this for your extended hearth anyway....so buy three sheets and put it to good use! While shopping...pickup the two sheets of Durok to put over the Micore 300 for proper tile support.

Kev
P.S. I'll upload a more recent pic with my raised 24" X 72" extended hearth (minus the tile and mantel though) I hope to find time to do tile work this weekend..but real hard with 3 boys ages 4, 6, and 7. They want to go pumpkin pickin'............................................
 
Yeah I thought of putting micore on the header, I will do it on the bottom just because I can, but I wonder about the true definition of non-combustible.
The North Star Manual defines "non combustible" as "anything that is made of or surfaced with wood"
So technically, taking a piece of wood, and covering it with 1/2" of micore, doesn't make it noncombustible. Practically, it probably does.

Now that said, will I probably do it, because I think it will be safer in the event of something bad, it will protect that header more even though it will be probably 1.5" from it. Even under normal operation, it will keep that header from seeing any heat at all. I did order the HX4 micore sheet because I didn't see it for sale anywhere else. I only got 1, I can get more later for the hearth extension if I can't meet the k and r values with some other material, I want to bring it up closer to the firebox floor level anyway...
 
73blazer said:
Yeah I thought of putting micore on the header, I will do it on the bottom just because I can, but I wonder about the true definition of non-combustible.
The North Star Manual defines "non combustible" as "anything that is made of or surfaced with wood"
So technically, taking a piece of wood, and covering it with 1/2" of micore, doesn't make it noncombustible. Practically, it probably does.

Now that said, will I probably do it, because I think it will be safer in the event of something bad, it will protect that header more even though it will be probably 1.5" from it. Even under normal operation, it will keep that header from seeing any heat at all. I did order the HX4 micore sheet because I didn't see it for sale anywhere else. I only got 1, I can get more later for the hearth extension if I can't meet the k and r values with some other material, I want to bring it up closer to the firebox floor level anyway...

Like I've said earlier in your post, I think the Manufacturer's specification of K=0.43 is ridiculous! I only met the value because CODE requires meeting THOSE specs! You can either add another 1/2" of Micore, or optionally stack four or five 1/2" Durok sheets over the one sheet of Micore you already have. You need two for tile regardless (if you don't want them to crack)....so you would just be adding another 2 to 3 sheets of the Durok.
Kev
 
Yeah, it does seem overkill doesn't it. But, alas, one must comply.

Going back to the material behind it, what do you think is best? Durarock, Type X drywall, micore? I think micore is way overkill for that, but they do specify Type X inside the chase walls. I think if your afraid the unit itself will burst into flames back there, then durarock would be better, But just to resist heat, I'm inclined to go with type X drywall. I've got the upper portions of the chase done already.
 
Been following a bit but can't keep up with your posts. Damn job gets in the way.
I can't help as far as the best material behind the stove but I can give some insight as to problems that I had... which are similar to yours, though not as tight.

I was able to cut the front above the stove and install a header since it is a load bearing wall but it does not have the load that yours has. I actually reinforced it with twice the strength of the previous header. But anyway, for a while (the first winter) I had the chase open to the house. I could reach in above the stove at any point and feel the metal box. I did this a couple of times to see just how hot the thing got (you have no idea how well it is insulated)! Anyway, it was definitely hot to touch and not something I would want to keep my hand on but it was not nearly as hot as I thought it would be. Actually the sides were only warm to touch and I could keep my hand on it as long as I wanted. The hottest part that I could feel was the front, right in the middle. There was no way for me to touch the back of the stove but my guess is that it would be similar to the sides.

I had to build up the bottom to raise the stove an inch. I used two pieces of durarock. The stove sits right on them. I also used an offset directly off of the CAK4 kit without an issue (except when it comes to cleaning). Oh, I did also place durarock on the back and bottom of the header just as an extra precaution.

As I mentioned earlier, I got the fire inspector to come out and look just to be on the safe side, before I closed it up. He spent close to 20 minutes looking at the stove and inside the chase. He didn't have any concerns after looking through the manual and checking things out. I guess my point is that once you get things set up it wouldn't hurt to ask someone to check it out. It may put your mind at ease... and at least my inspector wasn't out to get me. Just a thought.

Keith
 
Thanks for the info. It is appreciated! Yeah, those damn jobs always gettin' in the way. But in todays world, one is lucky just to be employed. At least around here where the auto companies keep firing hundreds every month for the last 2 years..

I guess I would have preferred to hear the top was cool to the touch, but I'll get her in safely. When did you make these observations, during a newly kindled fire, a rager, shortly after secondary kicked in, bed of coals after a long burn?

I plan to cover the header with micore as much as possible. My other question I had earlier today, was being that I'm putting an offset right at the base, does one need the SL3 stabilzer to support the chimney above? I have 24-25' of it up there, that's a lot of weight on an offset. I did order an SL3 today along with the SL315's, but wondering if I really need it. The offsets have straps as well that look like they can be strapped in somewhere to support it. The manual doesn't state anything about max chimney height above a return without a stabilizer.
 
73blazer said:
Yeah, those damn jobs always gettin' in the way. But in todays world, one is lucky just to be employed.

Yes, you are correct, at least I have a job. But as long as society keeps producing kids I am safe!

I guess I would have preferred to hear the top was cool to the touch, but I'll get her in safely. When did you make these observations, during a newly kindled fire, a rager, shortly after secondary kicked in, bed of coals after a long burn?

As far as the top being too hot to touch I'd say that was when I had a bed of coals established. The point of the stove is to heat the house, not inside the chase so I'm sure they attempted to reduce the amount of heat loss around the firebox. I know what you mean though, it would have made my life a heck of a lot easier of the top was the cool part!

I plan to cover the header with micore as much as possible. My other question I had earlier today, was being that I'm putting an offset right at the base, does one need the SL3 stabilzer to support the chimney above? I have 24-25' of it up there, that's a lot of weight on an offset. I did order an SL3 today along with the SL315's, but wondering if I really need it. The offsets have straps as well that look like they can be strapped in somewhere to support it. The manual doesn't state anything about max chimney height above a return without a stabilizer.

I did not use a stabilizer on my offset. I do have about 20' of straight pipe above it. I haven't had a problem yet (knock on a piece of oak). The offset has two elbows, correct? I think I remember the instructions stating that you shouldn't have a bend in the flue more than 30 degrees. It wouldn't hurt to call the company just for reassurance.
The straps for the offset could be attached to your header if you don't mind drilling a couple of screws in it. Are they long enough? The outside flue on my stove never got too hot to touch... which means the CAK is doing it's job.

Keith
 
The manual clearly states do not go more than 30. They sell 15 and 30 degree offsets. You have to buy 2 (offset and return), but they are the same piece.
I bought 2 15 degree ones. They have straps to secure to whatever's around, I did also get a stabilzer, so I might use it just for good measure right above the offset return just to ensure that chimney stays put as the brush runs up and down it and hits that offset.
 
Yea, that sounds about right now. Thanks for jogging my memory. I went with 2 15 degree offsets as well. And again, I did not use the straps. Given the few extra feet I would try my hardest to use the straps. As I recall the weight of the flue I had (we had to lift it & hold it up while putting in the new stove) was pretty heavy.... and damn awkward to keep up while moving that lead weight of a Northstar! Man that thing was heavy.

From the looks of our weather right now I'll be firing it up soon. Man, what a miserable weekend so far. Hard to get work done outside when it's pouring. :(

I'd like to know if a metal flue stays cleaner than a tile flue. I clean mine each year as usual but what a difference between my father's tile and my metal! The crap that comes out of his fills a few bags and weighs about 5 lbs. Mine is just dust and weighs about 1 lb. I know he burns a longer and hotter fire than I do but shouldn't that mean that his is burning cleaner?

Oh well, off to watch it rain.
Keith
 
Status
Not open for further replies.