Brickwork!! More than I bargained for prepping for insert install - Advice needed!

  • Active since 1995, Hearth.com is THE place on the internet for free information and advice about wood stoves, pellet stoves and other energy saving equipment.

    We strive to provide opinions, articles, discussions and history related to Hearth Products and in a more general sense, energy issues.

    We promote the EFFICIENT, RESPONSIBLE, CLEAN and SAFE use of all fuels, whether renewable or fossil.
Status
Not open for further replies.

Northeaster1

New Member
Oct 10, 2008
119
Nova Scotia
Thanks in advance for any advice. This forum has been great in educating myself for new install of a PE pacific (medium) wood insert.

To begin, I should have known better (and although I won't admit to her - hwne she sees the destruction!! - my girlfriend was right!!) The house was built or modified by a cheapskate owner, who "micky-moused" alot of stuff.

I will be having a Sweep install the solid stainless liner, and helping with the insert install, as our insurance requires a inspection by a WETT certified person, here in Canada.

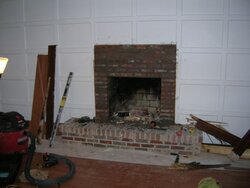
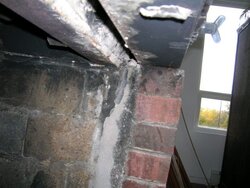
Before the install, I would have to pull off some wood trim, and mantel, that surrounds the 1 thin layer of brick border, on the existing fireplace. After removing this wood trim, which I figured, would pull right off, leaving the brick, I was going to lay another layer of brick around the exiting one, to get the clearances needed!!

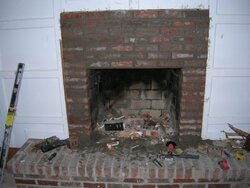
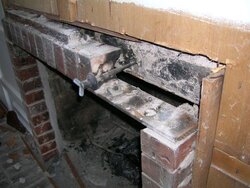
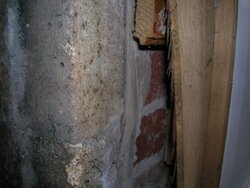
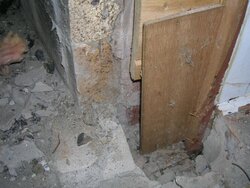
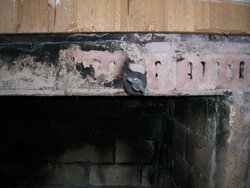
Well, while prying off the wood trim, The whole front brick trim / facing came loose. I doubt that it was properly constructed in the 1st place, as I don't think a mason would have done it like this! The brick "border" is only 1/2 brick wide/deep, and just mortared against the firebox. It doesn't seemed to be tied into / rebarred to it at all!!

Now, where to go from here??

I can pull off the brick, and add a new brick front that is larger, trying somehow to tie it in with the firebox for strength!

I would like to know what the code implications are, if any, in doing this.

Should I just remove the damper plate and damper handle, as it will be useless - why brick in a functionless handle?


Since I am really just concerned with having the existing fireplace secure enough to install the insert and surround, and meeting the codes re: distances form combustibles, am I OK to repair this myself. I am used to handywork - have done basic brick and mortar, and tile work before.
 

Attachments

  • DSCN0885.JPG
    DSCN0885.JPG
    52.8 KB · Views: 627
  • DSCN0886.JPG
    DSCN0886.JPG
    61.4 KB · Views: 636
  • DSCN0887.JPG
    DSCN0887.JPG
    46.8 KB · Views: 605
I did a quick google search for Heatform. So they are a steel liner for the firebox, with brick on the inside? I will be able to tell, if / when I rip off the brick border and adjacent wood strip (that holds the brick vertical). I could likely then see past the edges of the brick firebox, to see if it is just masonary, or masonary / steel.

Would the firebox contruction matter, in trying to ad a new font / sides to the firebox? One thing I can do, when laying new brick, along the sides, and top of the firebox - is to tie the brick to the wood backing by using large screws, or something similar, within the mortar layers. Anything owuld be more stury than what's there now!!

Since the brick border is loose / not really tied to the firebox, should I just pull it off till I get something solid?? Hopefully the firebox!!

The outside chimney is cinder block contruction, with 12" x 12" clay liner, in good condition!! We just replaced the top 6' of it a few months ago, as there were loose bricks!

Further comments / advice??
 
From the pics, it looks like the top course of the masonry border has degraded because of heat and use. The fireplace has clearly seen use, and the top row of brick rests on a metal plate. It is appears to be a single row of bricks that had no adjacent masonry surfaces to dissipate heat, so they just cooked on top of that steel plate while the fireplace was in use. If you are capable of doing masonry and want a durable installation, I think the answer is to remove and properly install the brick facing.

It might be easier to get a length of stone (or cast stone) to go across the top of the opening. I do not know how much your liner will conceal, so it is hard for me to guess what would look best.

In any case, you have to plan for the masonry to dissipate heat. If the liner allows your re-installed masonry to cook in the same way, you will soon have the same problem.
 
Well - patience is NOT one of my attributes!! Curiousity is!! So, I pulled off the brick border!! Seemed like a no-brainer, as nothing was really holding it in place anyway.

LMB- Not sure how much use it had. As they are so inefficient, fireplaces are not used that much here, when it is really cold. There is virtually no creosote in the chimney, but of course it may have been cleaned at some point!

I agree with you about the deteriorization of the brick / mortar over time / heat exposure.

So, now that the brickwork boder is off, I guess my girlfriend can have her choice of brick/ color, if she doesn't want to go with what's on the hearth.

I would like to hear any comments / advice of how to connect the new brick front/ firebox border with the existing firebox, which is solid by the way!! The outside of the brick firebox is mortared directly to more brick, as seen behind the wood paneling. in one of the pics! I can see some older drywall over to each side and a steel " heat plate" behind where the mantel was, all of it covered up with the wood panelling you see in the pics. Looks like the previous owner finshed over the original drywall, and likely made a new brick front for the fireplace!!
 

Attachments

  • DSCN0888.JPG
    DSCN0888.JPG
    48.7 KB · Views: 603
  • DSCN0890.JPG
    DSCN0890.JPG
    46.5 KB · Views: 579
  • DSCN0891.JPG
    DSCN0891.JPG
    60.9 KB · Views: 588
Obviously, there was smoke / creosote getting up behind the top of the brick border - notice the creosote in the pics!

I chipped off some of the cresoted motar on top of the firebox, and luckily found brick!! I should be able to tie into that with some rebar, when redoing the front with brick! There was nothing but mortar tying it together before!!

I plan on cutting away the wood paneling on each side, and the top, so that the new brick is tied into the old!
 

Attachments

  • DSCN0892.JPG
    DSCN0892.JPG
    51.4 KB · Views: 565
Northeaster1 said:
I would like to hear any comments / advice of how to connect the new brick front/ firebox border with the existing firebox, which is solid by the way!!
Do you mean cosmetically or physically? Physical connection can be metal bar and mortar. Cosmetically, a mortar joint between the firebox and the brick facing is normal.

WHat kind of cowling will your insert have, and do its dimensions correspond to your fireplace proportions? WHen the insert is installed, it is always nice to have equal widths of fireplace facing visible aroundhe border of the insert. Since you are remodeling the facing, you have control over all of this.

You can also have a stone/granite fabricator create 3 pieces: two stiles and a top rail for your facing. You can then attach it with metal clips and mortar. You can also do ceramic tile facing. (Just suggestions in case you want a smoother look and don't want to mess with masonry.)
 
LMB - great feedback! I was looking for both structural, and cosmetic - just forgot to ask the right questions! Yes, I will definitely center the insert in the new facing!! I have the specs for the surround, and I plan on having a few inches of tile / brick on each side, and a foot or so on top, to pass the clearance to non-combustible specs!

As I have to extend the hearth out about 12", I have pulled up a couple rows of the laminate flooring. I planned on tiling this. It had not occurred to me to tile the front of the firebox (sides and top). I just assumed it had to be brick, or some type of stone.

Trying to keep the budget dowm so I will likely finish it myself!!

I have a tile hearth (just regular ceramic 12" x 12" floor tiles) at my camp, which has cracked quite a bit, at my camp. Is there a ceratin type of tile that I should use, rather than standard ceramic (or knock-off) flooring tiles??
 
Changing the hearth is not neccessarilly a simple matter. You have to be dead serious about making sure there is nothing combustible underneath of it. A non-combustible facing (like tile) is not enough unless your appliance is SPECIFICALLY heat shielded.

If you have any doubts about this stuff, consult an expert. I say this because there are so many variables involved depending on your house construction and the type of stove you will purchase. Stoves and inserts can get 500+ degrees hot, so they are a very real fire risk. Saving money by doing it yourself doesn't help you if you end having a house fire. No one who had a fire thought that it would happen to them...

There are great how-to articles here:
https://www.hearth.com/what/specific.php

You will definitely need to read these:

INSTALLING A WOODSTOVE - THE BASICS ON HOW TO INSTALL A WOOD BURNING STOVE
https://www.hearth.com/econtent/index.php/articles/installing_a_woodstove

ARTICLES - WOOD - WOOD STOVE CLEARANCES - INSTALLING IT SAFELY
https://www.hearth.com/econtent/index.php/articles/wood_stove_clearances_installing_it_safely

MAKING A SHEET METAL BLOCK-OFF PLATE FOR A MASONRY FIREPLACE
https://www.hearth.com/econtent/index.php/articles/making_a_block_off_plate/

ARTICLES - - WOODSTOVE HEARTH CONSTRUCTION
https://www.hearth.com/econtent/index.php/articles/stove_hearth_construction

You can certainly do this, but make sure you have carefully planned out EVERYTHING according to specifications: material type, temperature ratings, and clearance requirements.
 
I do appreciate the advice, and valid concern for safety!!

Thanks for taking the time to provide all of the links / additional info!!
I have read all of the articles, as well as the insert manual, and do understand the need to meet or exceed all clearances.

For the record, a certifed sweep will be installing the liner, and stove. I am just doing all of the prework to make sure that we have non-combustible materials to the specs.

I will be installing new brick to extend out to the sides, and top, beyond what is required for clearances. Then, I may tile over the vertical brick, and horizontal brick hearth, to make it look better.

Does anyone know what kinds of tile are OK to install over brick around the insert (ie that won't crack). I know common flooring tiles are ceramic and marble. I don't mind paying a bit more for the tile, as I won't need that may sq ft.
 
I thought you were doing the whole install yourself! Well, I guess extra knowledge doesn't hurt...

For facing, I am partial to marble/granite. You can get 3 pieces fabricated wherever you can buy kitchen countertops. Marble is the traditional material for formal fireplace surrounds, and it is pretty strong when well attached.

For tiling, you have ceramic, porcelain, and natural stone. The underlying surface preparation is more important in this case than the type of tile. The key: the tile bed needs to have some independence from the expansion/contraction of the brick substrate. You can use fiberglass mesh (used on cement board joints) within your mortar bed to give it shearing strength. Even better would be to use metal lathe attached to the bricks-- you can use masonry screws to attach it. The tile can then adhere to a mortar bed on top of the lathe. The whole assembly should have enough independent movement and strength that the tile will not crack.

By the way, the wood paneling in your photos looks nice-- ironically, I have the fireplace and the insert, but I want to install paneling...

I am interested in hearing others' suggestions about your facing options also.
 
LMB - Great suggestions on the fiberglass mesh and metal lathes. For the moment, I am going to redo the brick and see how we like the look of it. If we would then rather have tile overtop, I will look into that! I assume that I could then drill / use masonary screws to attach the metal lathes, before doing the tile.

There will only be about 3-4" of brick showing on each side of the surround, and about 15" above the surround.

The damper opening is only 5", and the sweep will be using a few feet of 6" flex liner, to attach to the solid liner above. I am not sure if he intended to cut out the damper plate, to allow the 6" liner, or if he was going to sueeze / oval it a bot, to fit in the 5" wide hole.
Since I am gloing to remove the damper control (no sense passing it through / between the new bricks), I am just wondering if I should use the grinder / cutting wheel to remove the damper plate, and enlarge the hole now!

Is there anything to watch for in cutting out/ widening the damper hole? I have used grinders / cutting wheels, and am competent at that.
 

Attachments

  • DSCN0880.JPG
    DSCN0880.JPG
    53.2 KB · Views: 473
  • DSCN0882.JPG
    DSCN0882.JPG
    40 KB · Views: 486
Any other advice / tips on brickwork or tiling would be appreciated!!
 
I've got a wall-to-wall fieldstone fireplace. My mantle is a fir beam 14"w x 4" thick. It sits on the fieldstone 22" above the fireplace opening. I've had an old Russo smoke dragon installed in there for the last 15 years. It was hooked up by direct connect through a simple block off plate. Now I recently installed an Englander 13. I used the insulated Simpson oval Duraliner. I also insulated the flex through the damper area. Using an IR gun, I monitored temps all over. Found that the fieldstone that was up beneath the mantle was getting up to 200 degrees. I fabricated a heat shield/funnel on the top of the stove to direct the heat from the installed blower out the front. This shield also comes out & is curled to direct the heat away from the mantle. Added a layer of 2" kaowool to the 30 degree stove pipe adapter. That brought down the stone temp about 25 degrees.

Now that all that info is out of the way, looking at your set up(& thinking of my temps) I would be really concerned about the wood on the side & top being so close. I'm talking about the framing being only one brick away. A stove is going to put a lot more heat into those bricks than the fireplace burning ever did. The brick will just transfer the heat right through to the wood. I may be all wrong on this, if so, hopefully the pros can jump in & correct me.
Al
 
Lobsta - I appreciate the input re: temps, and the need to protect the wood. The old brick border was only 1/2 a brick wide. The new brick border (that I am half way through laying) is one full brick wide. To your point - that may still not be enough!! I hadn't though so much about temp, as I did specifically about the clearances!!

The new border will give mew a couple inches more on each side, than the stove manual specs for minimum clearances to combustibles. Also, the new brick border sticks out 2" more than the wood trim that runs vertically next to it - so that should shield it form the direct heat.

I would have made the border wider than 1 brick, on each side - however I woudl have then had to cut into the full squares of the wood panels, and it would have looked like sh#t!! So, since I met the clearance specs in the manual, I thought I would be fine.
I will have more than 24" of brick above the insert, per the manual.

Still open to more thoughts and advice!!
 
Well - finished the brickwork!! And the damper plate came out with just a cotter pin!!! 
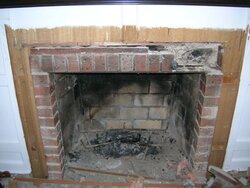
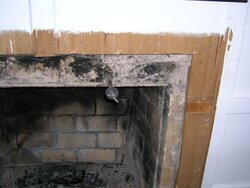
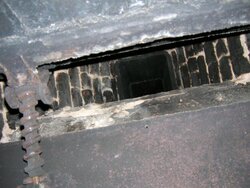
I did not cut the damper yet, as I will wait until the sweep arrives for the liner install.

The brickwork now complies with the distances form combustibles, as outlined in the PE Pacific insert manual. The previous house owner had obviously pulled off part of the brick facing, when he added the wood paneling and decorative mantle, years ago. He ponly left one layer of brick facing, above the firebox, even though there where metal tabs that had been used to tie in the older facing bricks, before his reno.

I would still appreciate any comments / concerns!!
 

Attachments

  • DSCN0893.JPG
    DSCN0893.JPG
    35.1 KB · Views: 375
  • DSCN0894.JPG
    DSCN0894.JPG
    47.5 KB · Views: 383
Got to you kind of late, but - instead of brick you can use concrete coloured and tooled. Check out my install here https://www.hearth.com/econtent/index.php/forums/viewthread/25151/ and you will see that I feel your pain.

My only suggestion would have been to work in a mantle, but thats being picky. Do you have enough non combustible in front of the insert after it is installed? I can't tell what the floor beyond the raised hearth is made from.

As for the 5" passage, I'd cut it to allow the 6" to pass through w/o oval, and measure it now to make a damper plate to seal it off.
 
Brent - Thanks for the reply. I definitely like the look of your new fireplace and hearth. With ours, we have the hearth that sticks out in front, and is made of the colonial brick. I though about removing it, down to floor level, but really did not want to tackle a job that large, right now! I only did the brick work, as what was ther was insufficient for clearances, and not well done to start! Total cost was less than $100 for the brick and mortar!

If I had removed the raised hearth, in order to do one at floor level like yours, the firebox (and new insert) would have been about a foot above the floor, and I wasn't sure how that would look! Now that the stucture is solid, I can always look at refinishing it later!

RE: the mantle, I have left the top layer of brick unfinished, and will likely add some type of mantle in the near future, after seeing what the options are!
 
I hope you cleaned that brick off well when you were finished??
 
Yes, I did clean it off before it dried!!
 
Thank goodness - you had me worried. Would not be the first time someone did that with mortar or grout...
 
I hear you!! The 1st time someone (not a professional) showed me how to do ceramic tile floors, years ago, he let the grout dry, and then we (I) sanded it off the next day. I din't know the difference!!

A couple years later, I did someone with another guy, who told me the importance of using a sponge and pale(s) of water, to wipe off the grout as it dried to a light white film. MUCH EASIER / less messy than sanding!!
 
Status
Not open for further replies.