As many of our longer term posters may remember, about a year ago I purchased a used VC Encore 2550 CAT stove from Elk, who had purchased it from a 3rd party, but not burned it himself. My understanding was that he had checked the stove over pretty well, and didn't see any need for major repairs, but thought the cat might be near end of life...
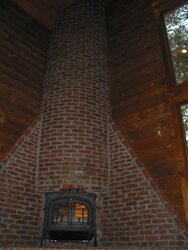
I installed it into the same 6" liner (cleaned) that I'd been running my old smoke dragon on. This is in one side of a double flue masonry chimney w/ 8" clay tiles, and the non-insulated stainless liner dropped down it. The chimney is interior, but next to an outside wall, and extends about 7' above the 12/12 pitch roof, total chimney height is about 25'.
The stove seemed to run fine all last year, although not always as smoke free as I thought it should have been. Even though it was a colder winter overall, we burned less wood, and stayed warmer, and I thought life was good... I knew that I'd need to replace some gaskets after the season ended, but they weren't that bad.
The other known major problem was that I had used a 2 peice stainless "Tee" from Magnaflex to connect the stove to the liner, and the two parts had spread such that there was a 1/4" to 1/2" gap between the snout and body most of the way around. I have purchased a new stainless Metalfab one peice welded Tee to replace it (a MUCH higher quality part)
I will admit to procrastinating and not doing a mid-season cleanout, and then not getting around to cleaning things to get ready for this season until the last few weeks :red:
1. I found the chimney was even dirtier than when I was running the smoke dragon - I'm guessing close to 4-5 GALLONS of crunchy black creosote, especially up near the top - I couldn't get my 6" poly brush through initially, I finally ended up getting a 6" wire brush and cutting it down to a cone roughly 2" at the top and 5.5" at the bottom, and working that through with great effort, then repeating with the 6" brush. I still have a bunch of buildup on the cap screen, not sure how to get that off (I clean from the bottom as the top of our chimney is basically non-reachable...)
2. When I started pulling the fireback out of the stove for the first time, I found the refractory around the cat plug was in pretty rough shape and the while the cat "honeycomb" was mostly intact (Note that it looks like a square gridwork, not a true hexagonal grid like real honeycomb) the metal sides on the cat were severely buckled and distorted. Is there a visual way to tell if the cat is any good or not?
3. The front of the refractory doghouse came off, it appeared to be held together just by ONE sheetrock screw on the bottom edge, although when the fireback is in place it will also be held together pretty well - Is this a problem? The seams where the front would meet up with the back do look OK
4. The ledge where the cat appears to sit is pretty rough, it's hard to tell how much of it is crumbled refractory, and how much of it is compressed ash - and I don't want to get rough with it trying to find out...
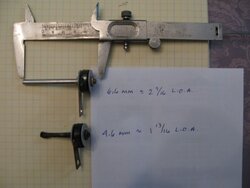
5. I purchased a replacement cat a while back from Stovecombustor (on Elk's reccomendation) and while it's metal shell is the same length and width as the one that was in it, the thickness (i.e. the holes the smoke goes through) is only about 1" on the Stove Combustor cat, vs. 2" on the original. - Does this matter? How do I put the new one in?
6. On each side of the refractory there is a bent stainless sheet metal plate. There was a lot of creosote built up between that plate and the outside wall of the stove - Is this normal? I've pulled the plates out and removed the creosote, but I'm not sure when I put the plates back in if they should go up against the wall of the stove or if there should be a gap in between them and the wall for an air passage.
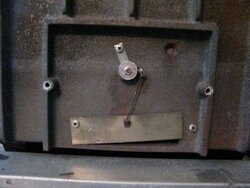
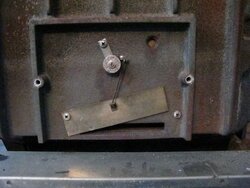
7. It appears the probe for the secondary air thermostat is mostly burned off (part #1601489?) - obviously I'm going to need to replace that, any gotchas or special instructions on how?
8. Are there any pictures available that show where all the air passages are and how they are connected? I'd like to be certain that they are all cleaned out before I start trying to put the stove back together...
Thanks,
Gooserider
I installed it into the same 6" liner (cleaned) that I'd been running my old smoke dragon on. This is in one side of a double flue masonry chimney w/ 8" clay tiles, and the non-insulated stainless liner dropped down it. The chimney is interior, but next to an outside wall, and extends about 7' above the 12/12 pitch roof, total chimney height is about 25'.
The stove seemed to run fine all last year, although not always as smoke free as I thought it should have been. Even though it was a colder winter overall, we burned less wood, and stayed warmer, and I thought life was good... I knew that I'd need to replace some gaskets after the season ended, but they weren't that bad.
The other known major problem was that I had used a 2 peice stainless "Tee" from Magnaflex to connect the stove to the liner, and the two parts had spread such that there was a 1/4" to 1/2" gap between the snout and body most of the way around. I have purchased a new stainless Metalfab one peice welded Tee to replace it (a MUCH higher quality part)
I will admit to procrastinating and not doing a mid-season cleanout, and then not getting around to cleaning things to get ready for this season until the last few weeks :red:
1. I found the chimney was even dirtier than when I was running the smoke dragon - I'm guessing close to 4-5 GALLONS of crunchy black creosote, especially up near the top - I couldn't get my 6" poly brush through initially, I finally ended up getting a 6" wire brush and cutting it down to a cone roughly 2" at the top and 5.5" at the bottom, and working that through with great effort, then repeating with the 6" brush. I still have a bunch of buildup on the cap screen, not sure how to get that off (I clean from the bottom as the top of our chimney is basically non-reachable...)
2. When I started pulling the fireback out of the stove for the first time, I found the refractory around the cat plug was in pretty rough shape and the while the cat "honeycomb" was mostly intact (Note that it looks like a square gridwork, not a true hexagonal grid like real honeycomb) the metal sides on the cat were severely buckled and distorted. Is there a visual way to tell if the cat is any good or not?
3. The front of the refractory doghouse came off, it appeared to be held together just by ONE sheetrock screw on the bottom edge, although when the fireback is in place it will also be held together pretty well - Is this a problem? The seams where the front would meet up with the back do look OK
4. The ledge where the cat appears to sit is pretty rough, it's hard to tell how much of it is crumbled refractory, and how much of it is compressed ash - and I don't want to get rough with it trying to find out...
5. I purchased a replacement cat a while back from Stovecombustor (on Elk's reccomendation) and while it's metal shell is the same length and width as the one that was in it, the thickness (i.e. the holes the smoke goes through) is only about 1" on the Stove Combustor cat, vs. 2" on the original. - Does this matter? How do I put the new one in?
6. On each side of the refractory there is a bent stainless sheet metal plate. There was a lot of creosote built up between that plate and the outside wall of the stove - Is this normal? I've pulled the plates out and removed the creosote, but I'm not sure when I put the plates back in if they should go up against the wall of the stove or if there should be a gap in between them and the wall for an air passage.
7. It appears the probe for the secondary air thermostat is mostly burned off (part #1601489?) - obviously I'm going to need to replace that, any gotchas or special instructions on how?
8. Are there any pictures available that show where all the air passages are and how they are connected? I'd like to be certain that they are all cleaned out before I start trying to put the stove back together...
Thanks,
Gooserider
 so the sweep gets $100 to do the cap - of course to do the chimney as well would have been $160, so I'm still saving a good bit...