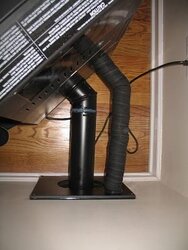
I am about to install my new Harman Accenture pellet stove. I purchased all of the things I need, including the wall shield/thimble. See http://www.zoobler.com/product.php?sku=3PVP-WTI&m=PelletVentPro&b=Simpson&c=Chimney+Systems
I am extremely handy and do most work myself (electrical, plumbing, carpentry, etc.) and don't want to spend $700 to have someone else install it. I am perfectly confident I can do it myself.
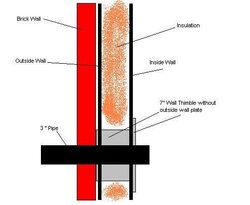
My question is this. Since my outside wall is brick, is it still necessary that I cut the 7" diameter hole in the brick for the exhaust pipe? Or could I just do that for the wall, creating the protection barrier for the 3" exhaust pipe and then once I get to the brick (from the inside) just cut a 3" hole for the pipe to fit through. It is hard to explain. Try and picture this. The shield found in the link above is installed on the inside of the house with the appropriate plate. Inside of the wall is the 7" pipe which keeps all insulation and studs away from the 3" exhaust pipe running through it. Now walk ouside and you see only the 3" pipe sticking out from the brick (no plate or protection).
There are several reasons I would like to do this. Aesthetics, cost & damage. The place the exhaust pipe exits the outside wall is the front of the house, very close to the front door. I want to keep it as low profile as possible (not having the 12" square metal plate). Cost - to bore a 7" hole through the brick requires a core bit and tool that costs $250 to rent. That's ridiculous! Finally, the damage to the bricks by drilling a 7" hole will be much more difficult to fix if I ever decide to pull the stove.
My concern obviously is the heat put out by the pipe being dangerous by heating up the brick. My dad did it several years ago similar to this (through cinder block and not brick). However, he tends to do things like this without worrying about consequences. Thought I would get a bit of feedback from others. Has anyone else done this successfully?
Thanks.
I am extremely handy and do most work myself (electrical, plumbing, carpentry, etc.) and don't want to spend $700 to have someone else install it. I am perfectly confident I can do it myself.
My question is this. Since my outside wall is brick, is it still necessary that I cut the 7" diameter hole in the brick for the exhaust pipe? Or could I just do that for the wall, creating the protection barrier for the 3" exhaust pipe and then once I get to the brick (from the inside) just cut a 3" hole for the pipe to fit through. It is hard to explain. Try and picture this. The shield found in the link above is installed on the inside of the house with the appropriate plate. Inside of the wall is the 7" pipe which keeps all insulation and studs away from the 3" exhaust pipe running through it. Now walk ouside and you see only the 3" pipe sticking out from the brick (no plate or protection).
There are several reasons I would like to do this. Aesthetics, cost & damage. The place the exhaust pipe exits the outside wall is the front of the house, very close to the front door. I want to keep it as low profile as possible (not having the 12" square metal plate). Cost - to bore a 7" hole through the brick requires a core bit and tool that costs $250 to rent. That's ridiculous! Finally, the damage to the bricks by drilling a 7" hole will be much more difficult to fix if I ever decide to pull the stove.
My concern obviously is the heat put out by the pipe being dangerous by heating up the brick. My dad did it several years ago similar to this (through cinder block and not brick). However, he tends to do things like this without worrying about consequences. Thought I would get a bit of feedback from others. Has anyone else done this successfully?
Thanks.

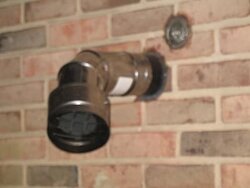
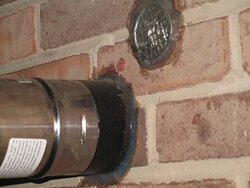
") I think using the thimble like you said to make it a "clean appearance" is a good idea but I'm leaning towards just cutting out one brick or 3" hole myself... but like you and not your dad I'm considering the consequences of my actions before doing it...
I think using the thimble like you said to make it a "clean appearance" is a good idea but I'm leaning towards just cutting out one brick or 3" hole myself... but like you and not your dad I'm considering the consequences of my actions before doing it...