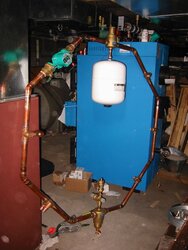
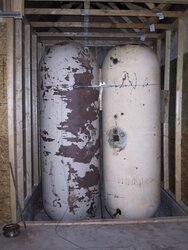
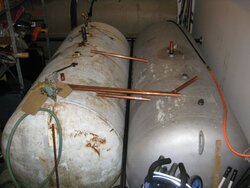
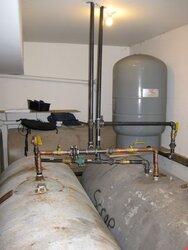
I am in the middle of setting up my Biomax 40 wood boiler. I just need to finish connecting the storage tanks (waiting for the expansion tank). I have 2 500 gallon propane tanks that will be connected in parallel to the system.
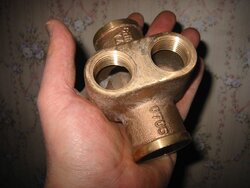
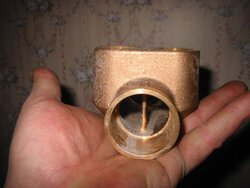
I am using a primary/secondary loop. I have a wood boiler and a vegi/dino oil boiler as heat sources with solar heat to come in the near future. I have a separate hot water secondary loop and a multi-valve zoned heating secondary loop. I am using the Taco twin tees for the primary loop connections.
This system works very well. I am impressed with the ease of it. No ghost flows, no need for flow control valves or IFC circulators and ability to expand the system. The twin tees I am using are 1 1/4" with 3/4" tappings. Someone on this forum suggested that going from 1 1/4" to 3/4" and back again would have only a very small effect on restricting the flow of water if the 3/4" section was very short and that has borne out to be true in my system.
I am planning on using the idea of back to back reversed circulators to transfer to and from the storage tanks. The Taco twin tee makes this possible. I'll post how well it works when I get it running.
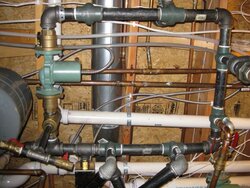
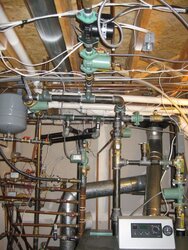
The photo is of my primary loop on the ceiling of the boiler room. The flow is clockwise with-WB and DHW on right;
low water, OB and heat on bottom with water fill on far left;
circulator and spirovent with expantion on left;
future solar and storage on top.
I have been on this forum for a little over a year and most of my posts have been to ask questions. The people on this forum are amazing. Thanks to all who contribute.
Dean
I am using a primary/secondary loop. I have a wood boiler and a vegi/dino oil boiler as heat sources with solar heat to come in the near future. I have a separate hot water secondary loop and a multi-valve zoned heating secondary loop. I am using the Taco twin tees for the primary loop connections.
This system works very well. I am impressed with the ease of it. No ghost flows, no need for flow control valves or IFC circulators and ability to expand the system. The twin tees I am using are 1 1/4" with 3/4" tappings. Someone on this forum suggested that going from 1 1/4" to 3/4" and back again would have only a very small effect on restricting the flow of water if the 3/4" section was very short and that has borne out to be true in my system.
I am planning on using the idea of back to back reversed circulators to transfer to and from the storage tanks. The Taco twin tee makes this possible. I'll post how well it works when I get it running.
The photo is of my primary loop on the ceiling of the boiler room. The flow is clockwise with-WB and DHW on right;
low water, OB and heat on bottom with water fill on far left;
circulator and spirovent with expantion on left;
future solar and storage on top.
I have been on this forum for a little over a year and most of my posts have been to ask questions. The people on this forum are amazing. Thanks to all who contribute.
Dean