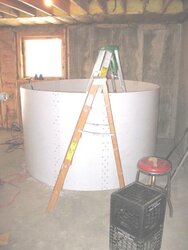
Below is an attempt to show in pictures the constuction of a 1000-gallon unpreassureized storage tank.
This tank is made with Fiber-Reinforced Plastic panals, IsoPollySomething-or-Other Insulation boards, and EPDM pond liner. Cost (ex heat exchanger, circ's and plumbing) was about 600 dollars.
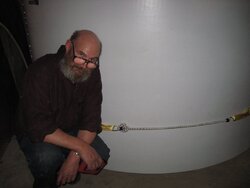
Tank shell consistes of 3 8x4 ft FRP panals, riveted with 4 inch overlaps. Makes about a 7 foot diameter cylinder, 4 feet high.
FRP panals cost 40 bucks apiece -- 120 total
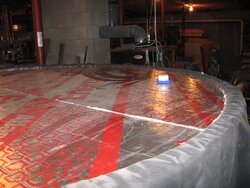
Insulation consists of 14 4x8 sheets of IsoPolly????, foil on both sides. Insulation goes inside the shell.
20 bucks a sheet -- 280 total.
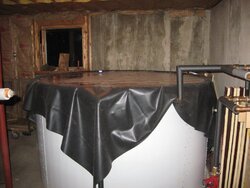
Pond Liner -- 25x25(?) tank liner; 10x10 lid membrane
165 bucks
Total so far 565
Other items -- 35 +-
Rivets (I probably used more than necessary)
Copper lid support
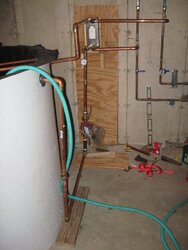
Plastic condit threaded nipples (7 -- 4 for lid support; 2 for input and output pipes; 1 for lid vent)
How do you get rigid 4x8 sheets of IsoPolly??? to conform to the curve of the cylinder? I could not figure this out till the trick was explained to me. (Carefully) slice throught the board down through everything except the last foil facing. Do this about every 4 or 5 inches. (Turns out the sheets have some kind of manufacturing line every 5 inches that you can use as a guide). When you are done, you will see that the formerly rigid 4x8 sheet will now conform to just about any curve, something like an old-time roll-top desk.
The tank has 2 layers (2 inches) of insulation all around, and top and bottom. Wish I could remember what the R value is...
Another question is how you get a 25 ft square sheet of pond liner to conform to a cylinder. Answer is to make diagonal plaits in the fabric so it sits right in the tank.
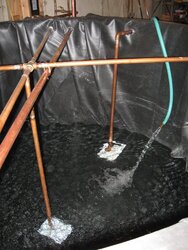
How do you support the lid? I don't have a good picture for this, but the lid support consists of an X of 3/4 inch copper pipe across the top of the tank, with a vertical leg near the center to provide support.
Now we will see if I can actually attach selected pictures to this post. You can see more pictures at www.picasaweb.google.com/cpguida Look for the 'Think Tank' album.
(additional pics coming shortly...)
This tank is made with Fiber-Reinforced Plastic panals, IsoPollySomething-or-Other Insulation boards, and EPDM pond liner. Cost (ex heat exchanger, circ's and plumbing) was about 600 dollars.
Tank shell consistes of 3 8x4 ft FRP panals, riveted with 4 inch overlaps. Makes about a 7 foot diameter cylinder, 4 feet high.
FRP panals cost 40 bucks apiece -- 120 total
Insulation consists of 14 4x8 sheets of IsoPolly????, foil on both sides. Insulation goes inside the shell.
20 bucks a sheet -- 280 total.
Pond Liner -- 25x25(?) tank liner; 10x10 lid membrane
165 bucks
Total so far 565
Other items -- 35 +-
Rivets (I probably used more than necessary)
Copper lid support
Plastic condit threaded nipples (7 -- 4 for lid support; 2 for input and output pipes; 1 for lid vent)
How do you get rigid 4x8 sheets of IsoPolly??? to conform to the curve of the cylinder? I could not figure this out till the trick was explained to me. (Carefully) slice throught the board down through everything except the last foil facing. Do this about every 4 or 5 inches. (Turns out the sheets have some kind of manufacturing line every 5 inches that you can use as a guide). When you are done, you will see that the formerly rigid 4x8 sheet will now conform to just about any curve, something like an old-time roll-top desk.
The tank has 2 layers (2 inches) of insulation all around, and top and bottom. Wish I could remember what the R value is...
Another question is how you get a 25 ft square sheet of pond liner to conform to a cylinder. Answer is to make diagonal plaits in the fabric so it sits right in the tank.
How do you support the lid? I don't have a good picture for this, but the lid support consists of an X of 3/4 inch copper pipe across the top of the tank, with a vertical leg near the center to provide support.
Now we will see if I can actually attach selected pictures to this post. You can see more pictures at www.picasaweb.google.com/cpguida Look for the 'Think Tank' album.
(additional pics coming shortly...)