EKO External Primary Air Controller

  • Active since 1995, Hearth.com is THE place on the internet for free information and advice about wood stoves, pellet stoves and other energy saving equipment.

    We strive to provide opinions, articles, discussions and history related to Hearth Products and in a more general sense, energy issues.

    We promote the EFFICIENT, RESPONSIBLE, CLEAN and SAFE use of all fuels, whether renewable or fossil.
Status
Not open for further replies.

Duetech

Minister of Fire
Sep 15, 2008
1,436
S/W MI
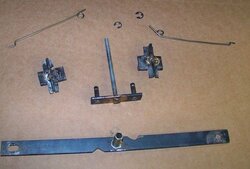
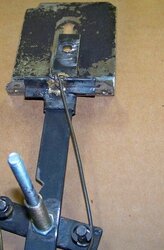
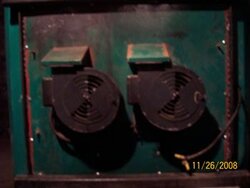
Here are some pic's for you of the EKO External Primary Air Controller I made. For some reason the pics did not display in order. The first pic you see is of the pieces/parts that are hidden under the blower sheet metal except for the part of the control shaft.

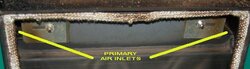
The second pic is the outside of the boiler with the control handle/indicator (minus the primary air slider mm position indicator).

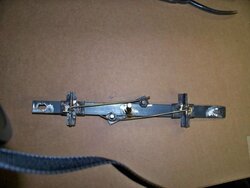
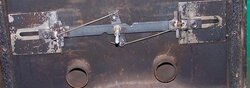
The third and fourth are pics of the internal control assembly in the fully open and fully closed positions.

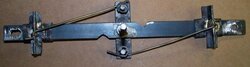
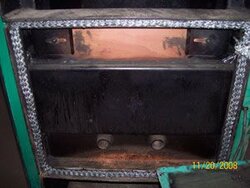
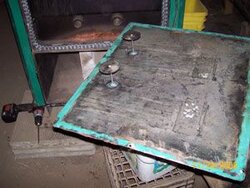
The fifth is of the control bar and control bar slider clip with the boiler primary air slider plate on the side with the cut out tab for the slider clip control bar bent down & out of the way.

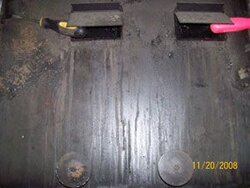
The sixth is of the control bar and control bar slider clip as connected to the boiler primary air slider plate.

the seventh and last pic is of the assembly under the boiler blower sheet metal cover.
 

Attachments

  • 100_0257.JPG
    100_0257.JPG
    22 KB · Views: 735
  • 100_0260.JPG
    100_0260.JPG
    23.7 KB · Views: 723
  • 100_0261.JPG
    100_0261.JPG
    19.9 KB · Views: 720
  • 100_0263.JPG
    100_0263.JPG
    12.2 KB · Views: 713
  • 100_0264.JPG
    100_0264.JPG
    30.2 KB · Views: 718
  • 100_0265.JPG
    100_0265.JPG
    28.5 KB · Views: 763
  • 100_0259.JPG
    100_0259.JPG
    18.7 KB · Views: 728
CAVE2,
The pics came out very clear, I was not aware that the EKO 40s primary inlet ports were below the fan not at the top like the EKO 60s (or is it an upgrade from the standard to the super?) it looks effective did you say that you have mm incriments so you can tell where your primarys are from the outside as you adjust? Looks like a good,accurate, long term solution..Funny Orlan can produce a gassifying boiler and put tons of thought into their product but could not figure a way to make the primary inlets adjustable from the outside even though they dictate the way the boiler burns..Next time I am messing around ripping the fan panel off I'LL BE THINKING OF YOU and how easy you've made the adjustments on yourself keep the good ideas commin Cave..Dave
 
I was not aware the 60's primary air was up so high on the boiler. But now I do and I really don't know about the older 40's as I never saw an EKO boiler until 06.
Any how.........

The mm increments are easy to figure because the opening for the primary air inlets are 7/8" or about 21 mm. The only glitch is the primary sliders open 1/8" beyond fully open so add another 2 mm +/-.5mm. Place a 2" piece of masking tape on the face of the boiler sheet metal where the control/indicator is to track the full sweep of the control/indicator arm and you have a mm incremental indicator. Sorry for the carbon deposits in the pic's it's just the evidence of poor air/fuel mix and 2 years + of no storage burning. And you are right for 6.5k you would think the important parts would be there. Thanks for the input...Merry Christmas
 
THANKS for sharing CAVE I threw up a couple pics of behind the blower panel on my 60, you wanna talk about crud check out behind my panel although this was all before I started burning it, note primarys at the top, do your ports into the loading chamber also enter low?? Mine go about 1 1/2" from the top ..Dave
 

Attachments

  • boiler-behind-blower-panel.jpg
    boiler-behind-blower-panel.jpg
    14.6 KB · Views: 621
  • blower-panel-2.jpg
    blower-panel-2.jpg
    13 KB · Views: 617
Yes mine also enters low and goes up the inside and stops about an inch below the ceiling of the gassification/loading chamber. One of my future projects is to mount a slatted fence that hooks into the outlets to act as a smoke shield for loading as I intend to put the boiler into a shed with the storage tank which is in the planning stages. I never had this many projects burning oil. What do you suppose is the reason for that?

How far above the blowers are your primary air adjusters at? Do you think a controller would work on it?
 
Yup I would say there is room for a similar contraption here is a pic of my blower panel..Dave
 

Attachments

  • blower-panel-face.jpg
    blower-panel-face.jpg
    11.5 KB · Views: 587
  • blower-panel-3.jpg
    blower-panel-3.jpg
    17 KB · Views: 571
Cave, Nice looking solution when do you go into production ? Looks like making adjustments just became a whole lot easier and faster.
 
Hi Tony,
Adjustments are quick. Until I put the controller in I was having trouble with my boiler keeping up with demand (single digits above and below zero and 30-40 mph winds) because (I thought) I was set up for summer/cooler time. There was a blue flame and I was getting a decent length burn but the hard cold conditions forced me to radically change my settings. Being able to set my primaries open to close in seconds alerted me to a problem I had been unaware of. My blower had been giving me problems by over producing air and my blower setting was very low but even so I did not know my secondary setting was too high putting too much air into the mix. They were too many turns out and with primaries set low I could see the secondary air blowing holes in my flame resulting in cold air going into the secondary combustion chamber and not igniting the primary gasses. To make up for too cool of an output from the boiler I had had to turn up the blower out put to maximum (which put more unburned fuel into the mix that was able to ignite before exiting the secondary chamber) to get the boiler to heat up. The boiler heated up nicely but I started consuming wood much faster going from a 9 1/2 to 10 hour burn to 6 1/2 to 7 hour burn in high cold winds. It's breezy and cold again with a new storm but now my blower settings are closer to where they were before that last bad one came through and my boiler is heating nicely. Once I realized my secondaries were out of whack and adjusted them I was able to cut back on my blower settings and get back closer to the more economical higher output settings I had been seeing just two weeks ago. Basically any adjustment I have to make is in the blower setting to adjust output now. My mix ratio is the last thing I have to tinker with even though I am now able to adjust to things in seconds that used to take hours of try this and try that. I can't disregard moisture in wood but adjust to it a lot faster and more accurately now. I could make kits, better looking than mine, but I would need to know some measurements and each kit will have to be tweaked to each persons boiler as there is a modification that needs to be done to the primary air sliders on their boiler and they will have to drill the hole in the right place where the control/indicator lever protrudes through the boiler blower mounted sheet metal (face plate).
 
Very nice design indeed, Cave. It's interesting how much higher up the primary controls are on the 60. Not that it would change your design at all.
 
Thanks Eric. Yes I think you are right. The design could/should work on the 60 and if the 18, 25 and 80 designs are exemplary of the EKO line design then it is possible that this primary air control could be adapted to them as well. My only concern is where the blowers are placed and if they would force an awkward positioning of the control. From the pictures I have seen of the 60 it would be an easy fit.
 
Curious, I am not following what some are saying that the primaries are higher. Mine are all the way at the top.

Looks like a nice job Cave. How long did it take you to put it all together? Time well spent im sure....
 
Barnartist look closer at CAVE2's last pic you see the secondary inlet pipes and his primarys are just above them , his fan mounts overtop of the primary inlets..Dave
 
barnartist said:
Curious, I am not following what some are saying that the primaries are higher. Mine are all the way at the top.

Looks like a nice job Cave. How long did it take you to put it all together? Time well spent im sure....

Part of two days in frigid cold weather but that includes some time at the hardware store but I think that it was time well spent as I found some things at the hardware store I didn't expect to find (lol).
 
Has anyone considered trying to baffle the back of the front cover such that one fan provides primary air and the other provides secondary air?

It seems like that would allow the manual adjustements to be left wide open and simply use the fan covers to control air flow. I've got the old controller, so I can't control fan speed. Just seems like if we could reduce the number of adjustments by one, things might get a little more simple. Maybe?

Is there a reason this would cause me problems I'm not able to forsee? I might just have to buy some thick door gasket material and see if I can give this a shot.
 
Do a search on posts by Dean Zook. He has done some mods on this.

I have the older controller as well and have had some issues with the blower output on my boiler (I know you have been to the "Hyper active blower" post). I can shut my blower shutter completely closed and still have enough forced air to cause my boiler to work though not very well. Whether the blower is drawing air from the cabinetry where it is mounted I do not know but to have that much air flow with the shutter completely closed leads me to believe the fan housing and cabinetry and mount all need to be sealed in order to expect any real viability towards air supply and air pressure control. The new controller with speed variability seems the best approach and it seems EKO thought it an issue worth addressing. Theoretically your approach should work and will work but it requires strict control of air flow. Let us know how things work out if you pursue it>>>
 
I'm a little confused as usual. I took my blower mount plate off today to set the primary air adjusters, and the MINIMUM setting is about 20 mm. The 60 (mine at least) has two big vents to the right and left of the respective air control sliders. They don't go any farther than 20 mm when fully "closed." I notice that Cave's 40 seems to be quite a bit different. I mean, I have about a 1.5 x 1" opening on each side. Is yours like that, Cave?

I guess my question is: what the heck are you measuring to get a "primary setting" of 9 or 10 mm?
 
Eric Johnson said:
I'm a little confused as usual. I took my blower mount plate off today to set the primary air adjusters, and the MINIMUM setting is about 20 mm. The 60 (mine at least) has two big vents to the right and left of the respective air control sliders. They don't go any farther than 20 mm when fully "closed." I notice that Cave's 40 seems to be quite a bit different. I mean, I have about a 1.5 x 1" opening on each side. Is yours like that, Cave?

I guess my question is: what the heck are you measuring to get a "primary setting" of 9 or 10 mm?

Mine looks a lot like TacoSteelerMan's picture. I set mine to about 10mm (guestimate using an open end wrench as a guide) and had much more room to close mine. I think it would go almost completely closed. I wonder if yours came with the wrong plates? Or if the slot isn't long enough? Seems really odd?
 
Eric Johnson said:
I'm a little confused as usual. I took my blower mount plate off today to set the primary air adjusters, and the MINIMUM setting is about 20 mm. The 60 (mine at least) has two big vents to the right and left of the respective air control sliders. They don't go any farther than 20 mm when fully "closed." I notice that Cave's 40 seems to be quite a bit different. I mean, I have about a 1.5 x 1" opening on each side. Is yours like that, Cave?

I guess my question is: what the heck are you measuring to get a "primary setting" of 9 or 10 mm?

Hi Eric,
Hopefully I understand you and will explain with my interpretation of your question. The 40 I have and the 60 TacoSteelerMan varies in placement of the primary air sliders but the construction basics are the same. If you are getting such wide settings I believe it is because your plates are either turned around or the slot that the retaining bolt goes through does not extend far enough. On the sliding plate there is an ear (a 90 degree bend) that sticks up about 3/16-5/16". This part of the slider should be towards the center of the boiler. The flat part goes to the outside. If your slider plate will not close to factory spec's with this orientation then you either have wrong or defective parts or EKO needs to write a new manual.

The slot was punched in the wrong spot or was just too short on the left slider plate on my 40. I had to extend the slot so it would fully close the slider plate and I could get equilibrium with the adjuster I was trying to build. As it was it would only close to about 8mm on the left side and about 5mm on the right side. There was a weld bead at the top of both slider plates that prevented the plates from closing completely. I adjusted the slider plate rather than trimming the weld bead. Hopefull your plates have just been turned around. Not having parts for comparison I believe the slider plates for the 40 and 60 are identical but that is a long distance guestimate without hard data. The opening to the primary air channel on my 40 is 7/8" wide (about 21mm) and the height is about 1.5". Photo 7 in my opening post shows the controller mounted to the front of my boiler with the slider plates fully closed and except for an intended design limitation your sliders should be able to move that far.

My tuned settings are: fan shutter 1/2" open. Primary air 6mm and secondary air at an average 1 3/4 turns.
 
After thinking some more about it, the split fan idea may have an additional downside - if a fan fails, the boiler is down. Right now, I am pretty sure I could run with only one fan.

Which has me wondering - would it make sense to disconnect one fan electrically and seal it off? Especially with no speed control, running one fan may give better control with the fan cover when only using one fan.

Just thinking out loud here, and open to ideas/suggestions.
 
In my case I only have one blower but if I had two I would try that in a heart beat. It is quite probable that you would have to reset your mix but I think you would probably get a more efficient burn. For test purposes just unplug the second blower at the controller and see how that works. There is a back draft damper on all of the blower setups I have seen on EKO's (but I have not seen very many).

My 40 settings are: blower shutter @ 1/2" open, primary @6mm and secondary @ 2 turns (lt) and 1 1/2 turns (rt) or 1 3/4 turns avg. My flame is very blue toned and I now adjust boiler output by blower settings alone. That said I still cannot open my blower all the way up with out cooling down my boiler temps.
 
Hmmmm.... maybe just one fan is a decent thing to try. There is a flap at the back of the fan, so it's shouldn't allow too much air to escape.

Right now I'm at about 10mm primary, somewhere around 2 to 3 turns secondary, and about 1/2 inch open on each fan.

Just out of curiosity, why would you expect better efficiency from one fan versus two?

My thought was that I'd have better modulation control with the cover if using only one fan, and maybe a little more foregiveness in the setting of the cover. I wasn't expecting to need to make any ratio adjustments, but there is a lot about this burn process that I still have to learn.
 
Here's what mine look like. As you can see, my slot is close to being maxed out and I've still got around an inch of opening left. I sent this pic and question to Zenon. I'm guessing they put sliders from another model into my 60.

Guess I'll extend the grooves and try for something a little closer.
 

Attachments

  • airadjust3.jpg
    airadjust3.jpg
    16.2 KB · Views: 279
Eric
We just got done modifing Shannons with the rod adj on his primarys. The slots extend almost to the bent angle on the sliders on his so it looks like you need to elongate the slots on yours. I had to flatten the angle to weld the rods on so it didn't interfer with the locking nut but it went well. We also made a plate and moved the secondary adj up 3/4 in as his were not lined up with the pipes. There was alot of large burrs inside the secondary tubes and I knocked them off while we were in there. We put the small plates back on the secondary adj. In measureing things the nuts on the secondary was hitting the tubes so when he thought he had bottemed out he was open the width of the nut. I used a 1inx1/4 flat stock and taped it for the adj screws and then screwed that to the cover. I tapped the flat stock to 10-32 as the screws will work if you wiggle the tap and make it loose. I didn't have a metric tap but 10-32 is very close. buttoned every thing up and things are burning well. He's going to play with the adj now and see if he can fine tune it even more.
The next thing we might try is to unhook one of the fans and see what that does. It makes no sence to run two fans and have them choked off and then you will have a spare. We want to run the way we are first and not change two many things at a time.
leaddog
 
Eric, I noticed my bolts that hold that plate are very loose and move with my plates. Maybe there is a bolt inside the upper chamber, I cant remember, but I don't even tighten mine after I put it where I want it.
 
It seems the air controls are a bit of a "quality deficient" area for Orlan EKO. I had my front panel off for the first time this week (the day before my first fire) and noticed my "washers" for the secondary air controls were too big for the space provided. They both made contact with the wall of the boiler making it impossible to turn the bolts when the front panel was screwed on. It was an easy fix, 20 minutes on my grinder, but for $7000 I would think Orlan would check to see if the secondary controls work before shipping them off. Other than that, can't complain. Apparently I need to choke down my controls. My first fire burned great after the first two hours of break-in. I managed temps over 170 for mostly the whole burn and 190 for about an hour. But I ran her at 90% open on the fan, 1/2" open on the primary's and 6 turns out on the secondaries. Time to start tuning now....I was just happy to get hot water and gassification!
 
Status
Not open for further replies.