I am in my 2nd month of heating with my EKO40 system and yesterday had the best burn I've head yet (with several inches of nice red coals towards the end of the 7 hour burn that I have never seen before).
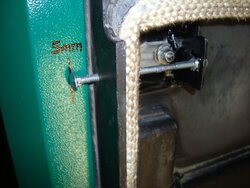
The settings I used were: 60% on fan controller, 50% on air intake louver on fan itself, 4 turns on secondary adjusters and 6mm gap on primary adjusters (I actually opened these wide open to get the intital fire going and then throttled them back to 6mm).
A few days ago I spent an hour and was able to add simple, externally adjustable primary controls on my EKO40 and thus have been experimenting extensively since then in order to get the burn described above.
Here's what I did:
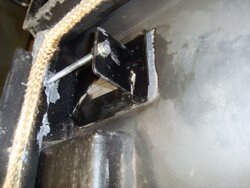
1.) Cut 2" x 1/8" steel flat stock into 2" lengths (2 pcs).
2.) Drill a 3/8" hole on the centerline (1" in from edge) and at a distance of 1-3/4" from the edge of the 2" x 2" plates.
3.) Weld the 2" plates to the exisiting primary slide plates at a distance of approx. 1/4" from the end of the slot in the exisitng primary slide pates.
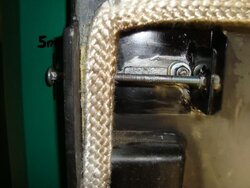
4.) Install these new primary plates to the EKO using a washer/spring/washer combo and 8mm x1.25" locknut (I replaced the exisitng nuts with a locknut as I did not want these coming loose). I applied high temp anti-sieze between the back side of the slide plates and boiler surface to ensure long term, smooth movement. Tighten the 8mm locknuts until the slide plate is tight but will still slide.
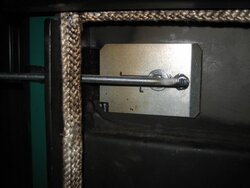
5.) Drill a 1/4" hole thru the EKO side plate (L & R) at approx. 1-3/4" off of the primary adjuster plates (I made a center punch mark on the c-channel that is used to support the gasket material and drilled these holes from the inside out).
6.) Install a 1/4" stovebolt through the 1/4" drilled hole (from the outside) and screw a nut onto the end of the stovebolt. Screw the nut far enough so that the stovebolt sticks out past the nut approx. 1/2".
7.) Align the end of the stovebolt with the hole in the 2" plate and insert bolt into hole in plate. Making sure that
the stove bolt is horizontal/aligned properly, tack weld the nut to the 2" plate.
8.) Install a second nut onto the 1/4" stove bolt (on the other side of the plate) and tighten the nut so that the stove bolt is securely fastened to the plate.
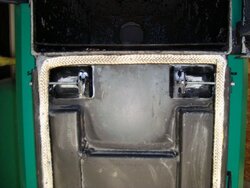
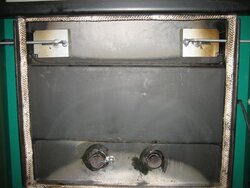
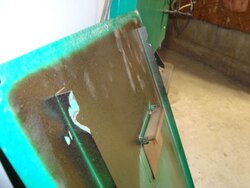
Obviously you must take the blower plate with the 12 screws out to get to these primary slide adjusters.
Now you can sit back and reap the rewards of a much more efficient system ! Good luck with your experimenting !
BC
The settings I used were: 60% on fan controller, 50% on air intake louver on fan itself, 4 turns on secondary adjusters and 6mm gap on primary adjusters (I actually opened these wide open to get the intital fire going and then throttled them back to 6mm).
A few days ago I spent an hour and was able to add simple, externally adjustable primary controls on my EKO40 and thus have been experimenting extensively since then in order to get the burn described above.
Here's what I did:
1.) Cut 2" x 1/8" steel flat stock into 2" lengths (2 pcs).
2.) Drill a 3/8" hole on the centerline (1" in from edge) and at a distance of 1-3/4" from the edge of the 2" x 2" plates.
3.) Weld the 2" plates to the exisiting primary slide plates at a distance of approx. 1/4" from the end of the slot in the exisitng primary slide pates.
4.) Install these new primary plates to the EKO using a washer/spring/washer combo and 8mm x1.25" locknut (I replaced the exisitng nuts with a locknut as I did not want these coming loose). I applied high temp anti-sieze between the back side of the slide plates and boiler surface to ensure long term, smooth movement. Tighten the 8mm locknuts until the slide plate is tight but will still slide.
5.) Drill a 1/4" hole thru the EKO side plate (L & R) at approx. 1-3/4" off of the primary adjuster plates (I made a center punch mark on the c-channel that is used to support the gasket material and drilled these holes from the inside out).
6.) Install a 1/4" stovebolt through the 1/4" drilled hole (from the outside) and screw a nut onto the end of the stovebolt. Screw the nut far enough so that the stovebolt sticks out past the nut approx. 1/2".
7.) Align the end of the stovebolt with the hole in the 2" plate and insert bolt into hole in plate. Making sure that
the stove bolt is horizontal/aligned properly, tack weld the nut to the 2" plate.
8.) Install a second nut onto the 1/4" stove bolt (on the other side of the plate) and tighten the nut so that the stove bolt is securely fastened to the plate.
Obviously you must take the blower plate with the 12 screws out to get to these primary slide adjusters.
Now you can sit back and reap the rewards of a much more efficient system
! Good luck with your experimenting ! BC