
Does anybody, or has anyone installed real stone around a fireplace ? Right now I have a new fireplace x installed w/ cement board surround, I have enough very thin fieldstone on my property to complete, but not sure of the best way to do so (weight not a problem) Do I need to install wire lath? Can I use straight cement or thin set? Do I need a scrathh coat first? These are some of Questions I'm not sure of. Any advise would be helpfull (no, I can't afford a mason) but I am sure I am capable of installing, just not sure of procedure. Thanks.
stone Installation around new wood burning fireplace
- Thread starter sambo
- Start date
-
Active since 1995, Hearth.com is THE place on the internet for free information and advice about wood stoves, pellet stoves and other energy saving equipment.
We strive to provide opinions, articles, discussions and history related to Hearth Products and in a more general sense, energy issues.
We promote the EFFICIENT, RESPONSIBLE, CLEAN and SAFE use of all fuels, whether renewable or fossil.
You are using an out of date browser. It may not display this or other websites correctly.
You should upgrade or use an alternative browser.
You should upgrade or use an alternative browser.
- Status
- Not open for further replies.
Interesting question, not sure I know the answer, but I'm planning to do something similar when the fire goes out in the spring. I've got a brick fireplace which I want to update with a dry stacked stone look. We'll see what the masons have to say!
sambo said:Does anybody, or has anyone installed real stone around a fireplace ? Right now I have a new fireplace x installed w/ cement board surround, I have enough very thin fieldstone on my property to complete, but not sure of the best way to do so (weight not a problem) Do I need to install wire lath? Can I use straight cement or thin set? Do I need a scrathh coat first? These are some of Questions I'm not sure of. Any advise would be helpfull (no, I can't afford a mason) but I am sure I am capable of installing, just not sure of procedure. Thanks.
How thin is the fieldstone? Are you planning on stacking it or were you thinking of adhering it like fake stone, ie it's bond to the wall being it's only support.
If you're stacking it you can use brick ties screwed into the cement board and protruding into the joints. lath is unecessary in this application. Use a mortar mix. At the homecenters they sometimes call it brickmix. A good mason supply will have a good quality premixed mortar mix. Don't put on a scratch coat to cure before you build. Instead scratch on the mortar as you go to form a good bond to the cement board. For stone work the mortar should not be wet. mix it on the dry side and so it just sticks to your trowel.
If you're "sticking" it on you would use diamond lath. Use mortar mix again but add a latex adhesive if the stones are thin and won't be resting on each other as much as being "stuck" to the wall. Don't use a scratch coat like the artificial stone manufacturers say to do - instead scratch a nice thick coat over as much area as you can lay in an hour. Scratch the mortar hard onto the stone to get a good bond, and butter the stone with enough so that when you push the stone onto the wall you can cause excess to fill in the joints so you don't have to spend much time pointing which runs the risk of dirtying the stones with mortar. Adhering the stone in this manner is stronger than putting on a scratch coat, letting it cure a day or so and continuing. You have a solid line of mortar from stone to cement board uninterrupted by a break where you expect another point of adhesion. This is a bit trickier than the fake stone because real stone is much heavier. With fake stone the bond to the wall keeps them in place and you can build from the top down to keep your work clean. With real stone you'll more than likely have to build from the bottom up and the stones will need the support of the work beneath. (odd idea huh?)
In both applications you only need 1/2 to 1" mortar line between the stone and the cement board. The thicker the line the weaker it is.
Work clean, don't get mortar on the face of the stones and cure it slowly keeping the work damp. Mist it with a plant spray bottle. Rake the joints back when they've cured enough that they don't smear and dry enough so you can tool them nice and smooth if that's the look you're after. Rake them to an even depth for a nice professional appearance. Don't clean the stone with muriatic acid, even diluted it wreaks havoc with joint strength.
Go for it. You'll do a great job especially since you're choosing to do stone work with real stone.
madison
Minister of Fire
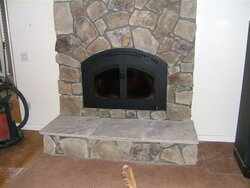
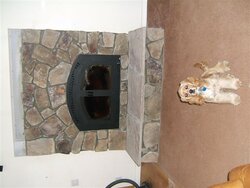
Link to pictures of stone installation in signature below.
Not done by myself, but I did take notes and pictures... Metal "ties" nailed into wall were used intermittantly to help secure stone (granite, dolimitic limestone) to wall.
Not done by myself, but I did take notes and pictures... Metal "ties" nailed into wall were used intermittantly to help secure stone (granite, dolimitic limestone) to wall.
rfrazier
New Member
Hi Sambo,
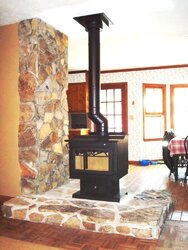
I recently had a Elite 44 installed and installed "cutlured stone" around the unit. I did the cement board then a skim coat over the wire mesh. Turned out strong as nails, you could hang on the cultured stone now and I'm sure it won't come off.
I think I also read another of your posts that you are in RI - I also am in RI and had my fireplace installed in late Novemeber. I love the unit, it keeps the house warm provided it doesn't go below 25, after that it is tough to keep it warm. What has been your experience? How big is your house? Mine is about 2700 sq ft, Wakefield Fireplace did my install.
I also have a problem keeping the glass clean, but I've come to realize that I didn't buy the unit to watch a fire 24x7. About once a week I let it cool down and scrap the glass and clean the soot out.
Attachments
Thanks Guy's, Very,very helpfull advice. Sorry for late reply, been working a lot. I plan on sticking on W/ diamond lath, now that I have a clue,Thanks again. Rfrazier, fireplace looks great, I also had Wakefield fireplace install mine, I live in Wakefield, I drove Josh nuts w/ questions, he hates me.
JMF1
New Member
I used natural fieldstone around mine but i was installing it on a block wall. I remember the mason who helped me said to use a specific mortar because of the heat, "type C" or something like that. I found that "throwing" a trowel of mud at the spot for the next stone worked better than "buttering the stone" and setting it, but I was looking for a more rustic look than neat even joints. You'll find that depending on the size of the stones, you will only be able to do a few courses a day because of weight. Also, try pressure washing the stones before you install, I was surprised how different they looked when clean! Have fun, its a great project.
Got Wood
Minister of Fire
I just installed fieldstone for my new FPX Elite 44 install (see avatar). I was lucky to have a good friend who is experienced at this and he helped me alot. I am a novice but willing to share my experience and what I learned:
Pick a width off the wall that you want to use and work the stones so that the face is within that width plus or minus maybe a 1/2". I used 4". If a stone is smaller pack mortar behind it.
Being a cheap bastard I scrounged all my stone which was a big effort but worth it... plan on getting 2x the amount you will need
look for stones the have straight edges and are of a uniform width (for me 2-4").
Planning the placement of stones is 1/2 the work
Build from the bottom up - 1 row at a time. Working about 2 hr/day it took me 3 weeks to finish.
Try and have the stone be able to sit by itself where you place it.
Consider how the next row will sit on the one you are placing now. Watch our for stones that taper down and away (hard for the next stone to sit on)
Large stones are the eye catchers and they take up space (which you will grow to appreciate).
If you have an arch look for a large center piece stone that has a smaller length bottom than top (more of a wedge shape) - this will help with wieght distribution
We build right on sheet rock and plywood.
We put in "L" angle sheet metal (not sure of proper name) screwed/nailed to beems with the small part of the "L" in the mortar joint to help provide support/safety for keeping the face standing. Might be overkill but easy to do. Set the stone then put this in where the joint will be.
The less mortar joint the better it will look - recess the mortar joint - about 1/2 hour after (again depending on how wet your mortar is) clean out the joint so it is recessed and clean looking
For mortar I mixed mason sand cement to a 3:1 ratio, not to wet....gotta work with it to get a feel for the right balance
Plan your mantel - consider required clearance, how you will attach it, do you want it full length or not. I used a piece of walnut 4" thick, over killed the mounting using angled brackets on top and bottom bolted/screwed into beams and walnut. The stone on top and bottom will also help support it. For mine - I could hang from it.
I apologise, I'm rambling on.... If you want to discuss this feel free to contact me through the PM here. AGAIN, I am a NOVICE but really enjoyed learning/doing this. Real happy with result too!
Good luck
Attachments

Mike F said:We just had our fireplace put in about a month ago. We are having trouble with the mortar crumbling between the rock and the fireplace. Did you guys run into that issue?
Mike
Sounds to me like they mixed the mud too wet or used the wrong type. Clean out the loose stuff with a screw driver and wire brush. Get anything that feels loose our is cracked badly. Portland masonry cement mixed 3:1 with sand is usually what I use but they do sell premixed brick mix as someone else already said. Don't mix it wet! The dryer the better for pointing/grouting. Mix it to the consitancy of peanut butter, then let it sit for 15 or 20 minutes. Get a grout bag from your local masonry supply place. Looks like a big cake icing bag. Fill it with the mortar. Then fill your joints back in with the mortar. Give it some time to dry more. When its almost dry but still workable "knock down " your joints and then brush them with a counter brush.
I would agree with everything dvellone said. I would consider using a polymer fortified thin set to adhere the stone if you don't have that much too lay. Then use brick mix to fill the joints. It costs a little more than brick mix but in the end its stronger and easier for someone that's not had experience in laying stone IMO. Use the same method he layed out in his post. Dry stack is a little easier but takes more time.
Sorry for the double post but didn't want to confuse the two jobs.
Sorry for the double post but didn't want to confuse the two jobs.
Got Wood
Minister of Fire
Mike F - Nice looking install. I like the corner look. What did you use for your hearth top and for your mantel?
I agree w/advice from GKG-MO and likely cause. I also used the 3:1 mix he suggested and keep it on the dry side.
I agree w/advice from GKG-MO and likely cause. I also used the 3:1 mix he suggested and keep it on the dry side.
Got Wood
Minister of Fire
I highly doubt the stone/mortar would be affected by temp change like that. In my FXP 44 when I ran it before closing it in the outside of the box was cool to the touch (other than the front doors). The stone does warm slowly and a little (really not that much at all) but I cant imagine to any degree that would caused movement/shape changes.
cannonballcobb
Member
I used a polymer-fortified thinset mortar, over loosely nailed wire lath, over dura-rock. Starting from the bottom, trowel it up (thicker consistency is better) and position your preselected stone 1 or 2 rows per day, fill in the gaps using a grout bag filled with thinset mix. The thinset should hold the stones in place until it dries.
Attachments
Mike F said:We just had our fireplace put in about a month ago. We are having trouble with the mortar crumbling between the rock and the fireplace. Did you guys run into that issue?
Mike
If the work was done around a month ago you might want to pursue having the contractor make amends by doing the repair work gratis for having done shoddy work that you had to pay for.
- Status
- Not open for further replies.
Similar threads
- Replies
- 0
- Views
- 345
- Replies
- 1
- Views
- 324
- Replies
- 5
- Views
- 690
- Replies
- 11
- Views
- 479