Building a hearth extension

  • Active since 1995, Hearth.com is THE place on the internet for free information and advice about wood stoves, pellet stoves and other energy saving equipment.

    We strive to provide opinions, articles, discussions and history related to Hearth Products and in a more general sense, energy issues.

    We promote the EFFICIENT, RESPONSIBLE, CLEAN and SAFE use of all fuels, whether renewable or fossil.
Status
Not open for further replies.

edwardkelly

New Member
Jan 13, 2009
43
upstate NY
Howdy folks, thanks in large part to the tips in an earlier thread I'm now all organized to have a new Lopi revere insert installed on Thursday.

Reading the docs for the stove I need a hearth extension to get the 16" clearance from the front of the stove. The wiki here tells me that it should actually be 18" so I'll go with that.

I want to have a crack at building a hearth extension, but I've never dealt with cement board, tiling, and lots of the other related stuff. Never too early to start right?

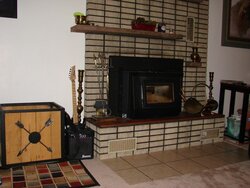
I have a few questions before I get going though. Here's a pic of the existing fireplace & hearth:
1232898363.jpg


The existing hearth extends 18", but the revere insert will stick out 10" from the front of the existing fireplace. That'll mean I'll only have 8" of clearance, so will need to create an additional 10". I want to create something semi removable (fixed in place for winter, but put away in Summer). My thought at this stage is something that would sit on top of the carpet. Is that a reasonable idea? I've seen you can buy hearth extension pads for a few hundred bucks that basically do just that, so I figured I should be able to create something myself...

On my existing hearth though I noticed the trim on the tiles looks like it's plastic:

trim.jpg


Does that negate the whole 'clearance to combustibles'? Would that have to be replaced?

On the design of the actual extension itself, if I did something like: plywood, enough cement board for the approp R value, then tile in a big rectangular pad would that be sufficient? I assume I can wood trim it so long as the trim is beyond the 18"?

Any advice or tips appreciated.
 
I had the same problem as you do.
I did the tile work myself and had the carpet tucked by a pro.
The whole job cost me about $200.00 including the carpet work.
I too thought about a removable type pad, but decided against it.
I would find some tile to match your hearth, it would look really sharp.

That does look like plastic covering the tile seam, you might need to remove it and
grout the seam instead.

Brad
 

Attachments

  • DSC03006.JPG
    DSC03006.JPG
    60.4 KB · Views: 2,339
How do they measure the critical dimensions? Is it strictly horizontal, or do you get credit for being off the floor? I ask because I wouldn't mind finding a small inexpensive insert for the basement fireplace, which has a raised hearth like the two above. If I have to extend the hearth, its probably more trouble than its worth.
 
All of your measurements will come from the manual - they can vary from stove to stove. Some do get credit for the fact they are raised up - fireplaces do as well, and most manuals give you some stove specs, and then give you a line like " or as approved by NFPA 211", which is tough to get your fingers on online, but this link has some similar code related discussions - http://www.rumford.com/training/codeissues2006.html#hearth.

Hope they help

As for removable extensions - most will need to be fixed in place - so screwed down would be minimum, and pay attention to the seam between whatever you lay down and the existing hearth - that is where the first spark will fall, I guarantee it.
 
go to the local library or buy Fine homebuilding's guide to Tile its a Taunton press book. It will give you enough info to get your project finished. Taunton press books are the best for getting "best practice" diy or pro advice.

It's going to look great.
 
oconner speaks words of wisdom. the manufacturers clearences specs are what they are. make it look nice and you will not need to take it out in the off season. safety first!! you also might want to look into a hearth pad to protect your nice carpet from burns.
 
bfunk13 said:
I had the same problem as you do.
I did the tile work myself and had the carpet tucked by a pro.
The whole job cost me about $200.00 including the carpet work.
I too thought about a removable type pad, but decided against it.
I would find some tile to match your hearth, it would look really sharp.

That does look like plastic covering the tile seam, you might need to remove it and
grout the seam instead.

Brad

Is there much involved in what you did? Something similar here would look just fine I'd think... Did you just cut the carpet, lay some cement board then tile it? How did you do it?
 
rob bennett said:
go to the local library or buy Fine homebuilding's guide to Tile its a Taunton press book. It will give you enough info to get your project finished. Taunton press books are the best for getting "best practice" diy or pro advice.

It's going to look great.

Thanks, I'll check it out.

Installation is tomorrow, the inspector is coming Friday. Right now I just want to pass inspection Fri so that I can start using the thing right away...
 
Just looking at your fireplace, aside from the hearth are all the other areas OK? The interior walls, chimney, etc.? If that's a fireplace in there then maybe, but if it's a gas fireplace then the specs may not be sufficient for a wood burning insert. The plastic strip was what got me wondering, I've seen several of these pseudo-fireplaces in newer homes that are more show than substance - suitable for a gas insert which is largely self-contained, and in a direct vent format requires little clearance from the chimney; but not necessarily built, nor intended, for a wood burning application.

Good luck and we just finished our hearth construction too, it was almost my first time tiling and it came out not too shabby, you can do it!
 
moosetrek said:
Just looking at your fireplace, aside from the hearth are all the other areas OK? The interior walls, chimney, etc.? If that's a fireplace in there then maybe, but if it's a gas fireplace then the specs may not be sufficient for a wood burning insert. The plastic strip was what got me wondering, I've seen several of these pseudo-fireplaces in newer homes that are more show than substance - suitable for a gas insert which is largely self-contained, and in a direct vent format requires little clearance from the chimney; but not necessarily built, nor intended, for a wood burning application.

Good luck and we just finished our hearth construction too, it was almost my first time tiling and it came out not too shabby, you can do it!

What's currently there is a ZC wood fireplace. Apparently all the other clearances are ok. The only thing that was close was the bottom of the mantle (basically the board below where the mantle sticks out) but the installer told me that they'll add a mantle shield (basically a bent piece of metal) across the top which reduces the clearance required to a combustible mantle.

The existing fireplace is definitely more for show than substance (which I'll never understand...) which is why we're sticking the stove insert in it.

The plastic strip is beyond the 18" required clearance (just) from the existing fireplace, but because teh stove will stick out 10" its' too close.

My current plan is to basically build a box that will run along the front of the existing hearth. I'm going ot build it with 3/4 ply, cover it with cement board, then tile on top. The front section will overlap the existing hearth a small amount both to cover the plastic strip and to eliminate any gaps between the existing hearth and the temporary extension. That'll give me 18" front clearance, plus about 8" on each side.

That should hopefully get me past inspection, then while I'm sitting in front of my warm new stove I can think about a permanent solution and whether or not I want to just redo the base of the hearth (most likely what will happen at this stage).
 
edwardkelly

The first thing you should do is choose a stove, as most stoves have specific R values for floor coverings, and some are really tough to meet. You may need nothing more than to screw a hearth rug down in front, or you may need to rig up large amounts of thermal resistance to meet a high R value spec.

But until you know what stove, you will have no idea - even the 18 inch rule is different in some inserts - I have seen 16 inches from the blower on one, that was about 19.5 inches from the door.
 
oconnor said:
edwardkelly

The first thing you should do is choose a stove, as most stoves have specific R values for floor coverings, and some are really tough to meet. You may need nothing more than to screw a hearth rug down in front, or you may need to rig up large amounts of thermal resistance to meet a high R value spec.

But until you know what stove, you will have no idea - even the 18 inch rule is different in some inserts - I have seen 16 inches from the blower on one, that was about 19.5 inches from the door.

See my first post :)

A lopi Revere is being installed tomorrow.

From my calcs my plan (wood, cement board, tile) should meet the reqd r value, until we decide how we want to do it permanently.
 
edwardkelly said:
bfunk13 said:
I had the same problem as you do.
I did the tile work myself and had the carpet tucked by a pro.
The whole job cost me about $200.00 including the carpet work.
I too thought about a removable type pad, but decided against it.
I would find some tile to match your hearth, it would look really sharp.

That does look like plastic covering the tile seam, you might need to remove it and
grout the seam instead.

Brad

Is there much involved in what you did? Something similar here would look just fine I'd think... Did you just cut the carpet, lay some cement board then tile it? How did you do it?

Its really pretty straight forward and took only a couple hours total.
I found this tile, 13"x13". I cut a 1/2" cement backer board 26" x whatever length it was. Cut the carpet LONG. I left about 1" long on all sides.
Screwed the board down and tiled it. Grouted the next day, and called the carpet guy. I only needed ember protection. Not sure what you will need, looks like a little less
drop than i have. It would really look good with your setup. When not using the fireplace pull that rug tight to the fireplace if you dont want to see the tile.

Personally i would stay away from anything removable.
 
bfunk13 said:
Its really pretty straight forward and took only a couple hours total.
I found this tile, 13"x13". I cut a 1/2" cement backer board 26" x whatever length it was. Cut the carpet LONG. I left about 1" long on all sides.
Screwed the board down and tiled it. Grouted the next day, and called the carpet guy. I only needed ember protection. Not sure what you will need, looks like a little less
drop than i have. It would really look good with your setup. When not using the fireplace pull that rug tight to the fireplace if you dont want to see the tile.

Personally i would stay away from anything removable.

When you say cut the carpet 'long' do you mean cut it 1" less than the area you needed to cut? So basically once you'd laid your board and tiled it prior to the carpet being tucked it would lay on top of the tile by 1"?

I'm assuming that's what you mean, otherwise you'd have a big 1" gap between the tile and the carpet... Just wanted to check as I'd call that cutting it short.
 
Here's a pic of what I constructed in the end...

lopirevere.jpg


It's basically a box built with 3/4" ply, with cement board on top, then tile on top of that. A bit of aluminium trim around the sides.

It needs another coat of pain still, but it was enough to get me through inspection.
 
I think you're gonna wish you built the corners out, but that looks cool anyways. And if it passed inspection, all the better. I just wouldn't want sharp corners like that w/ my kids or ankles knocking into it, but that's just me. Simple mod you could do in the future if you wanted...

I see your rug-cleaning thread regarding ash stains... i gotta ask - where are you storing your wood next to the fire?? How are you transporting your wood from the pile to whatever spot you pick (presumably to the left of your insert here)?

I think your ash stains will be the least of your worries in the next few weeks - wood = dirty.
 
Edthedawg said:
I think you're gonna wish you built the corners out, but that looks cool anyways. And if it passed inspection, all the better. I just wouldn't want sharp corners like that w/ my kids or ankles knocking into it, but that's just me. Simple mod you could do in the future if you wanted...

I see your rug-cleaning thread regarding ash stains... i gotta ask - where are you storing your wood next to the fire?? How are you transporting your wood from the pile to whatever spot you pick (presumably to the left of your insert here)?

I think your ash stains will be the least of your worries in the next few weeks - wood = dirty.

The current extension is just temporary. We wanted to see how the stove looked in there for now while we decided if we wanted to build the hearth up to its base, or leave the hearth at the existing height and just build it out. Point taken on the corners though, I basically just made two more spots to stub a toe etc.

There's normally a huge rug on the carpet here that'll give some relief from the dirt etc associated with the wood. I had been using the fireplace a bit and had managed so far not to make a mess. The current ash patches from installation are in the carpet that is under the rug goes. Sure you wont see it, but if I wanted the guys to 'decorate' my carpet for me while they were here I would have asked for it in the quote.
 
Status
Not open for further replies.