
I reconfigured my double wall at the begining of the year when I added a pipe damper. I have a big telescopic piece (maybe 68") that I installed right above the damper. Do you guys secure it with screws at the telescopic joint? I did cause it had 3 little holes there but I'm thinking it would be better if i didn't - kind of like an expansion joint. It makes all kinds of racket when it's warming up and I though if I let it slide at that joint it would relieve a lot of stress on the pipe.
Telescopic Double-wall, let it slide or secure???
- Thread starter DrivenByDemons
- Start date
-
Active since 1995, Hearth.com is THE place on the internet for free information and advice about wood stoves, pellet stoves and other energy saving equipment.
We strive to provide opinions, articles, discussions and history related to Hearth Products and in a more general sense, energy issues.
We promote the EFFICIENT, RESPONSIBLE, CLEAN and SAFE use of all fuels, whether renewable or fossil.
You are using an out of date browser. It may not display this or other websites correctly.
You should upgrade or use an alternative browser.
You should upgrade or use an alternative browser.
- Status
- Not open for further replies.
stoveguy13
Minister of Fire
Put the screws in at the top, at the flue extension of your Class A - not at the slip joint
- and the bottom where it goes into the flue collar on your stove...
- and the bottom where it goes into the flue collar on your stove...
Highbeam
Minister of Fire
This is a good thread. I have a single vertical piece of telescopic slip joint between the ceiling box and my stove collar. It is ONLY screwed in the middle to keep the pipe expanded. I specifically grilled the pro installer and the inspector about this and they told me that this is the way it is done. It is very difficult and rare to attach the double wall to the stove collar because you can't tighten those screws without crushing the outer wall and do you think you are going to be llucky enough to be able to find the holes on the stove collar? I thought that the top should have been screwed to the ceiling box but the inspector made a point, if the pipe is locked into the expanded length it can't come out.
My pipe makes all kinds of racket as it heats and cools too. I have even thought that it might be creating a force trying to lift the ceiling or crush the stove. I wonder how much it would expand if the screws weren't there.
My pipe makes all kinds of racket as it heats and cools too. I have even thought that it might be creating a force trying to lift the ceiling or crush the stove. I wonder how much it would expand if the screws weren't there.
That's interesting info, I'm thinking the exact opposite of what you said should be done. I do know what you mean about finding those holes in the stove collar. I had to measure very carefully while doing it.
hookspacken
Member
I have mine screwed at the top, bottom and in the middle, but then again, I tend to be more paranoid than most.....
John_M
Minister of Fire
Driven,I am using the Simpson DVL double wall stove pipe. Its double wall construction prohibits it from being screwed to the ceiling support box at bottom of Simpson Dura Tech chimney. The small stainless snap-in chimney adapter is supposed to hold stove pipe and chimney from falling apart. That seems to work okay.
The DVL telescoping piece is designed to have three of the supplied 3/8" screws securing the telescoping pieces so they cannot collapse. That is why the factory pre-drills three oval holes in the outside piece of pipe. The secret to getting this right is to have one of your buddies pushing up hard on the DVL pipe so it is tight against the ceiling support box. You hold it in that position. He then pulls down on the inside piece of pipe so it is inserted as far as possible into the top of the stove or the stove adapter, whichever way your stove is configured. With you still pushing the outer telescoping piece against the chimney support box, your buddy can then place the three screws into the three oval holes as Simpson intended. If you use 3/8" screws you will not penetrate or otherwise compromise the inner-most wall of pipe. Using this method will make the entire length of DVL stove pipe very rigid. Installing the DVL stove pipe this way has the stove supporting the stove pipe and the ceiling support box supporting the chimney.
According to a trusted and certified stove installer and the Simpson technical department, you do not have to screw their DVL stove pipe to the flue on a top exit stove because the top of the stove can easily handle supporting that weight. Use three screws to secure the stove pipe to the adapter on rear exit flues because of the weight bearing at the bend.
My stovepipe was installed using the above procedures and the results are very satisfactory. The above recommendations came from a certified stove installer and the Simpson Company and are not intended to contradict recommendations made by others
I do not know if any of the above procedures apply to single wall stove pipe from Simpson or othe manufacturers.
Good luck
John_M
hibeam
New Member
For sure screw the middle to "set" the telescoping section. It's all you got. You can't secure anything to the ceiling since the ridiculous snap connector up there easily pulls back out and is not screwable with double wall. If you are very lucky you can get it screwed to the stove collar but it isn't likely and not common to have double wall screwed to the stove on a top exit.

RustyShackleford
Minister of Fire
John_M said:The DVL telescoping piece is designed to have three of the supplied 3/8" screws securing the telescoping pieces so they cannot collapse. That is why the factory pre-drills three oval holes in the outside piece of pipe. The secret to getting this right is to have one of your buddies pushing up hard on the DVL pipe so it is tight against the ceiling support box. You hold it in that position. He then pulls down on the inside piece of pipe so it is inserted as far as possible into the top of the stove or the stove adapter, whichever way your stove is configured. With you still pushing the outer telescoping piece against the chimney support box, your buddy can then place the three screws into the three oval holes as Simpson intended. If you use 3/8" screws you will not penetrate or otherwise compromise the inner-most wall of pipe.
If the 3/8" screws do not penetrate the inner wall of pipe, then how are they keeping the thing locked in the telescoping
position ?? Are they just like a set screw pushing against the inner wall ?
According to a trusted and certified stove installer and the Simpson technical department, you do not have to screw their DVL stove pipe to the flue on a top exit stove because the top of the stove can easily handle supporting that weight.
I thought the point of screwing pipe to stove was that it could come loose during a chimney fire, due
to excessive vibration. But I guess if the pipe is pushed up tight against the chimney support, and
the telescoping piece is locked to length as you describe, then it's got no where to go (as it tries
to shake up out of the stove's exit collar).
So how do you guys handle chimney cleaning with these setups ? I've always just removed the
pipe (between stove and chimney) and taken it outdoors and cleaned it separately. That also
allows inserting the cleaning brush into the chimney from below, although for some reason I
climb up onto the roof anyhow, I guess to clean off the chimney cap. Is this how most people
do it ? Anyhow, I guess this telescoping piece makes removing the connector easy - you just
remove the 3/8" screws and let it shorten.
Highbeam
Minister of Fire
At the point where the screws, the 3/8" screws, are threaded in there is actually 4 layers of pipe due to the overlap of the telescoping double wall. The screws pierce the outer wall of both the upper and lower sections to make a rigid connection and prevent the slide from collapsing. The inner wall of both sections remains untouched.
Two ways to clean the pipe. Either run the brush all the way through it and into the stove. Or remove the screws and take the double wall outside for cleaning. I highly prefer leaving the telescoping section alone since by sliding it together and then apart you will scratch the paint, also you will make an unnecessary mess since sweeping into the stove contains all the chimney junk in the firebox. No dust.
Two ways to clean the pipe. Either run the brush all the way through it and into the stove. Or remove the screws and take the double wall outside for cleaning. I highly prefer leaving the telescoping section alone since by sliding it together and then apart you will scratch the paint, also you will make an unnecessary mess since sweeping into the stove contains all the chimney junk in the firebox. No dust.
hibeam said:For sure screw the middle to "set" the telescoping section. It's all you got. You can't secure anything to the ceiling since the ridiculous snap connector up there easily pulls back out and is not screwable with double wall. If you are very lucky you can get it screwed to the stove collar but it isn't likely and not common to have double wall screwed to the stove on a top exit.
Oh, no, Highbeam's evil twin is back!
RustyShackleford
Minister of Fire
Highbeam said:At the point where the screws, the 3/8" screws, are threaded in there is actually 4 layers of pipe due to the overlap of the telescoping double wall. The screws pierce the outer wall of both the upper and lower sections to make a rigid connection and prevent the slide from collapsing. The inner wall of both sections remains untouched.
Gotcha, thanks for 'splaining.
Two ways to clean the pipe. Either run the brush all the way through it and into the stove. Or remove the screws and take the double wall outside for cleaning. I highly prefer leaving the telescoping section alone since by sliding it together and then apart you will scratch the paint, also you will make an unnecessary mess since sweeping into the stove contains all the chimney junk in the firebox. No dust.
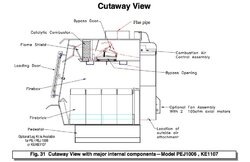
Except the debris doesn't really end up in the firebox, at least on a catalytic stove, does it ?
For example, looking at the cutaway pf the BK Princess, it ends up in the chamber behind the
catalyst and bypass door. So you've got kind of an issue getting the debris out of there,
no ? It might be pretty easy to vacuum out from the flue collar, but of course if you're
using this method, the flue collar is not open. And I missing something here ?
Attachments
Wood Heat Stoves
Minister of Fire
Highbeam
Minister of Fire
On that BK, reach up there with the vac and suck it out. The situation is very much like a smoke shelf on a fireplace where the debris from sweeping will accumulate somewhere other than the firebox floor. No sweat, my heritage has a similar pocket that traps debris. After sweeping, you just suck out every bit of junk that you can. I would pay particular attention to the mating surface between the little bypass door and the bypass opening. When you look at the cutaway, it seems that most of the junk will fall into the firebox and only a small bit will stay up on the shelf.
John_M
Minister of Fire
Rusty, Highbeam is right-on.
I should have mentioned in my post that when you are ready to place the three screws into th telescoping piece you must drill 1/8" holes in line with the oval holes provided by Simpson. Drill them carefully and you will not touch the innermost piece of stainless pipe.
I hope this clarifies.
John_M
I should have mentioned in my post that when you are ready to place the three screws into th telescoping piece you must drill 1/8" holes in line with the oval holes provided by Simpson. Drill them carefully and you will not touch the innermost piece of stainless pipe.
I hope this clarifies.
John_M
Highbeam
Minister of Fire
I believe that the most folks, including the pros, just use self tapping screws. Mine were the really points kind vs. the drill bit head kind and they easily self tapped. Definitely aim for the center of the ovel since as you tighten the screws you will want to be able to let the pipes move a bit. The outermost top pipe is obviously bigger than outermost pipe of the lower section so when you screw them together they will pucker a slight bit. You'll want to make this pucker even to be pleasing to the eye. Oh and make sure the seams line up in the back.
RustyShackleford
Minister of Fire
RustyShackleford said:So how do you guys handle chimney cleaning with these setups ? I've always just removed the
pipe (between stove and chimney) and taken it outdoors and cleaned it separately. That also
allows inserting the cleaning brush into the chimney from below, although for some reason I
climb up onto the roof anyhow, I guess to clean off the chimney cap. Is this how most people
do it ? Anyhow, I guess this telescoping piece makes removing the connector easy - you just
remove the 3/8" screws and let it shorten.
Duh, I forgot one key bit of info, when posing this question ...
The new BK installation that I'm pondering, will have a 4" offset in the chimney
connector, which I will likely accomplish with a pair of Simpson DVL 45-degree
elbows. I'd like to use Selkirk double-wall, but apparently 6" is the minimum offset
that can be achieved with their elbows, and I don't want the stove sticking 2" farther
out into the room, than it would be; I gather it's ok to use Simpson DVL to a
Selkirk chimney. (Actually, I will probably hook it up first with plain ole' single
wall and see how it works). But I digress ...
I doubt it's possible push the brushes through this offset - although I've never
tried - so I'll probably have to take the connector-removal route.
P.S. Sorry for the thread hi-jack.
- Status
- Not open for further replies.
Similar threads
- Replies
- 4
- Views
- 460
- Replies
- 12
- Views
- 2K
- Replies
- 24
- Views
- 1K
- Replies
- 0
- Views
- 1K