Air purger leak

  • Active since 1995, Hearth.com is THE place on the internet for free information and advice about wood stoves, pellet stoves and other energy saving equipment.

    We strive to provide opinions, articles, discussions and history related to Hearth Products and in a more general sense, energy issues.

    We promote the EFFICIENT, RESPONSIBLE, CLEAN and SAFE use of all fuels, whether renewable or fossil.
Status
Not open for further replies.

reaperman

Member
Nov 1, 2006
169
Central Minn
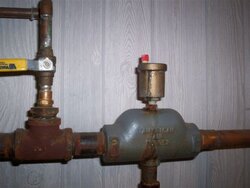
The photo below shows some kind of contraption the screws into the air purger. The gold colored piece is dripping water slowly from under what looks like some kind of top cap. It appears the "cap" is screwed onto the main gold piece, and maybe just needs to be tightened up some. I just want to make sure that this part does have a cap that can be tightened. As much as I'd love to take a couple of pipe wrenches to the problem, I want to make sure first, so I dont open a can of worms. This is off a electric boiler I have on our kennel, providing infloor heat. There is 10psi of pressure on the system at idle and a few more when its in the heating mode.

If you look at the photo close you can see where the water is dripping from.
 

Attachments

  • air_purger_003.jpg
    air_purger_003.jpg
    38.6 KB · Views: 7,949
That gold contraption is your air purger. There is a float inside that drops down to open the valve on top to release any air captured by the scoop below. They fail periodically for various reasons. It could be because the float developed a leak or most often some debris is fouling it up. I removed one a few years back that I was able to disassemble and repair. What had happened was the hot boiler water scavenged all the soldering flux that had been used in assembling the system and deposited it in the purger where it solidified. (I've improved my soldering skills since)

I suggest you wait 'till you can shut the boiler down and REPLACE it. I now, never install a purger without first installing a ball valve between the system and the purger. Those 1/8" ball valves are usually available at your local plumbing supply outlet.
 
I've had this problem before but my air purger was 30 years old and assembled with hems not threads..So I recentally had to buy more automatic air vents (they go for about 5 dollars each) the new ones appear to be threaded BUT the instruction sheet states that they need to be replaced when they start to leak,and they are not serviceable..Maybe you can nurse it through this year then replace it, if you are going to try to tighten it, do it on a cold system and have a new vent in hand just incase it gets ugly..Dave
 
Oh, I see now where the leak is after reading Taco's post. Don't touch it 'till Spring, when you can shut the system down. Remember to install a ball valve so you can replace it anytime.
I'm surprised Taco's lasted 30 years.
 
Hi Reaperman,
Some of the newer can vents come with a valve built in so that you don't have to buy a shutoff valve. It just threads in between your air purge and the can vent. When the can vent is screwed into the fitting, it then opens the valve.
 
Thanks guys, I'm glad I didnt try and tighten it up with a couple of pipe wrenches like I wanted to do. I'm sure I can make it through the heating season, before replacing it. I can definately see the advantage of having some kind of shut off mechanism in place. Because I'm sure the water is going to fly when I screw the old one off.
 
reaperman said:
Because I'm sure the water is going to fly when I screw the old one off.

Shut off the inlet water, let the whole system cool, and then de-pressurize the system by opening a drain, and then close the drain- once you do that, relatively little water should come through the 1/8" opening for the air vent, because there won't be any pressure pushing it, and nothing should really drain or siphon out a hole that small, at least not very fast.
 
Status
Not open for further replies.