Hearth Remodel

  • Active since 1995, Hearth.com is THE place on the internet for free information and advice about wood stoves, pellet stoves and other energy saving equipment.

    We strive to provide opinions, articles, discussions and history related to Hearth Products and in a more general sense, energy issues.

    We promote the EFFICIENT, RESPONSIBLE, CLEAN and SAFE use of all fuels, whether renewable or fossil.
Status
Not open for further replies.

mmopt

Member
Oct 19, 2008
55
PA
First I want to thank everyone for the tons of info I've learned on here. Without much of the info my hearth would have looked much different, probably raised up, and the wealth of info on stoves really helped my decision on the Buck 74 and other info on clearances and chimney lining.

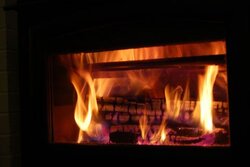
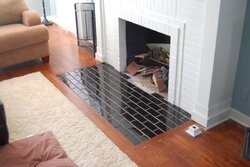
Here is a breakdown of the nearly complete remodel of our hearth and I thought I'd share. We will be putting the liner in later in spring when I can get on our steep roof, but I wanted to slide the Buck in, and maybe the bigger factor was my wife wanting it out of her laundry room.

(edit: reverse order from upload)
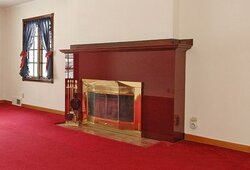
1) The Start, AWFUL red and gas fireplace)
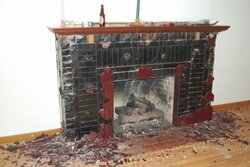
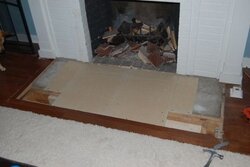
2) Tearing it apart. Lots of beers spent on this and I hate construction adhesive...
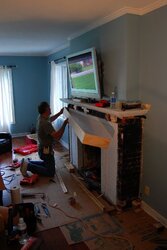
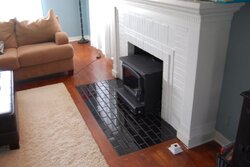
3) I can't take all the credit for the mantle wood trim, my father in law was a HUGE help on this
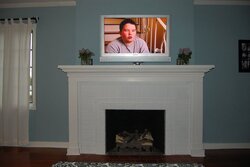
4) Overall mantle trim done, break for a few months...
 

Attachments

  • living small post.jpg
    living small post.jpg
    18.7 KB · Views: 476
  • getting there small.jpg
    getting there small.jpg
    31.6 KB · Views: 475
  • web mantle pro.JPG
    web mantle pro.JPG
    59.6 KB · Views: 463
  • 4.jpg
    4.jpg
    58.2 KB · Views: 490
5) Heath is remodeled and extended. Here is with the layer of Micore going down first.
6) Cement board is overlaid and tiling is in without grout.
 

Attachments

  • web2.JPG
    web2.JPG
    61.8 KB · Views: 445
  • web1.JPG
    web1.JPG
    17.6 KB · Views: 462
7) Grout is added, wood stove is put in. The trim panels will be mounted after final install of the liner. Wood mantle base wood trim was taken out of new tile and will be reinstalled shortly, also a new layer of paint where the new grout met the brick.
 

Attachments

  • web3.JPG
    web3.JPG
    48 KB · Views: 465
One question maybe someone can help out with: Do I have to install the trim kit for the stove? I like the way it looks currently and once we trial fitted the black metal on the mantle it looked OK, but we preferred the look of just the stove. In both cases I'll be using a top block off plate and full liner, but without the kit I also think I'd have more surface area of the stove exposed to the room.

The unit can be used as freestanding also with the leg kit, but in the instructions when describing the unit as an insert it only list the surrounds as an option.
 
You can leave it like that without the panels, I think it looks good the way it is, probably because the fireplace is smaller and its white, not sure but it looks good.
 
I took the panels off my Olympic this year. Just make sure your block off plate is tight so your energy does not get sucked up the chimney.
 
Thanks for the replies. That's what I was thinking also, it looks much better without the panels and as long as the top block off plate is sealed really well, I think I'd actually get more surface area in the house.

I also called Buck Stove directly and they said the same thing. They added to make sure the top of the chimney was sealed well around the rain cap (which I planned on doing also) but I'm not sure how that would affect anything down below. Either way, glad they agreed too.

Now to figure out what to do with the trim panels... I don't have the box and there is a VERY small scratch on one... I guess Ebay maybe.
 
That's a really nice improvement on the room and fireplace. It looks great. And soon it's going to feel great too! Congratulations on a job well done.
 
tenax said:
that's a beautiful thing..from someone who has just done a fireplace reno, i can appreciate the work that goes into it..well done!

Thansk Texax and BeGreen. I'm afraid to calculate how many hours went into it totally, but it's definately worth it in the end. My wife jokes about one of my friends comments on the work, he came in and basically just said "You did that... How?" I started to explain but since he wasn't going to do one himself I stopped myself and just said it was a ton of work and gave him the short version.

I wish the picture of the demo was larger but it was from a camera phone. It's amazing the difference from when the construction adhesive and chunks of tile were still attached to where it is now.

It's also hard to notice, but there was a 1.5"x11"x7' piece of hardwood added to the top for more depth and adds to the overall size of the mantle.
 
I noticed the thicker mantel top and agree, it looks much better. What's the white box in the floor in front of the right side of the fireplace?
 
tenax said:
BeGreen said:
I noticed the thicker mantel top and agree, it looks much better. What's the white box in the floor in front of the right side of the fireplace?

the white box looks like a fancy cover for an in floor natural gas turnoff valve!:)

Correct, it was a huge hazard for my 2 year old son. It has quite sharp edges and sticks up about 2 inches. I kept cringing thinking of him having it go through his cheek/eye and originally we had something covering it, but my wife wasn't a huge fan of the tennis ball :) (nor was I)

I put that box together in about 20 minutes but everyone seems to really like it.


Last thing I'll mention was the PITA the plasma install was. Behind the plaster (not drywall...) was brick for the chimneys. The down stairs runs left, the one here runs slightly to the right. In the middle? I have no idea. Nonetheless it's concrete and that's what I had to anchor the TV on. I ran 5 anchors that could support 150lbs each... (run each about 6 inches into the concrete/brick.) I could have probably done 2, but it's just the idea of a 80lb plasma on the wall with kids running around that scared me. Before hanging the TV I climbed on the wall from the bracket and it didn't budge a millimeter. The wires for the TV were also run through the side of the mantle behind the wood and to a cable box downstairs with remote eye. That's the black box on the top of the mantle. I lucked out on power, there happened to be a plug on the top, talk about lucky in a house built in 1949.
 
First burn for the 74 and for the year, I'm smiling ear to ear although the room is a bit stinky.
 

Attachments

  • burn.JPG
    burn.JPG
    15.7 KB · Views: 217
Status
Not open for further replies.