First Timer 201 Turbo....install help and questions. Lots of Pics.

  • Active since 1995, Hearth.com is THE place on the internet for free information and advice about wood stoves, pellet stoves and other energy saving equipment.

    We strive to provide opinions, articles, discussions and history related to Hearth Products and in a more general sense, energy issues.

    We promote the EFFICIENT, RESPONSIBLE, CLEAN and SAFE use of all fuels, whether renewable or fossil.
Status
Not open for further replies.
Hello again I-rover.

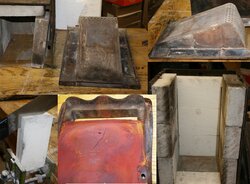
I'll see what I can do about taking some photos.. . The secondary combustion chamber is pretty neat looking when taken apart. Fortunatly, it's getting warmer here in Seattle, and I have lots of time to rebuild this stove properly.
 
Hello Everyone:

Here are some photos from my 201 take-apart. The Photo on the top left is of the dissassembled secondary combustion chamber. The steel "ramp" on the right slides into the lightweight refractory on the left, and supposedly is kept from bending / melting from the constant flow of cooler combustion air. As the air travels through this box, the heat from the lower baffle pre-heats the air, and flows out the many small holes in the back, igniting the exhaust gasses.

Several of the lightweight refractory bricks in the top of this chamber were broken. In addition, many of the thinner bricks were missing from the main combustion chamber. I bought some replacement refractory bricks at my local pottery supply store. This type of brick is superior at insulating in comparison to regular hard firebrick. It's also easily cut with a dull old pull-saw. I don't know if the better insulating properties make that much of a difference in this stove - but I'm willing to bet it assists the stove in reaching it's clean burning cumbustion temperature sooner than the regular firebrick.

The photo on the bottom right is the secondary chamber with some newly cut bricks added. I saw no reason to replace the bricks which weren't broken.

As you can see from the photo of the reddish baffle plate - I have a few small cracks forming ( I can see through it ). This was not obvious then the stove was still together. I'm concerned about this - as a larger hole would probably deform the upper steel box, which would not be too easy to fabricate. It looks like this may have happened to Rafeal's stove.

I contacted a reputable Iron Foundry in the Seattle area. They quoted me $150 for a good copy of my original baffle plate. (minus the cracks, of course). They also said that if I was to have several or more made, the price would be lower. I would be willing to get more made for other owners of this stove, but only if you contact me immediatly - otherwise I'll just have one made for myself. You all know that Jotul no longer makes this part.

you can email me at [email protected]

Thanks,

- David
 

Attachments

  • 201 apart.jpg
    201 apart.jpg
    82.7 KB · Views: 308
great pics!! Was it hard to take apart after all? Seized screws? Is the top box just bolted to the bottom one ?
 
The stove was very easy to take apart. No seized bolts at all. A 10mm socket and 10mm wrench does almost everything. With the exception of two 14mm nuts on the inside bottom of the door. Some of the joints I had to know apart with a block of wood. Somebody did a great job with the original gasketing. I just hope I did a good one too. . . never rebuilt a stove before.

Be careful to put your bowls and nuts in baggies and mark where they came from. There are 16 bolts, all around 3/4", which hold most of the plates together.

Don't take your stove apart unless you have a lot of time and patience. Took me a take to take apart (carefully) and clean creosote, ect off. Another day to carefully chisel all the old gasketing off and buy supplies. (a 2000 degree farenheight tube of gasketing stuff that can be squirted with a caulking gun). Also some 1/4" fiberglass rope gaskets. I hope they were small enough. The originals seemed like 1/8th inch in some places. I could be wrong about that though.

Spent all morning reassembling the stove. Kinda tricky. I reccomend putting the whole thing together dry, and making up a procedure to guide you through it. Otherwise you'll spend a lot of time undo-ing seams that have been glued already. Something I tried to avoid, but still did anyhow. I kinda forgot how the secondary air flap went on, so I messed around with that a bit. But it's all back together now. I'll let you guys know how it turns out when I fire it up.
 
Hello all who are interested. I posted last year about my Jotul turbo 201, and the baffle that had basically melted away (see earlier post on this thread). I made it through last winter by patching up the hole with fire brick and mortar, but it did not last long. This summer I decided to take it all apart and try to fix it the right way. I was able to take the old baffle out and make a template (out of wood) to cast a new one. I found a local stove foundry and had him make me a new part out of cast iron. Today I put the stove back together and fired it up. IT WORKS LIKE A CHARM!
Just a warning to those who own a turbo 201... I believe the reason my baffle melted was because, the little hook that opens the secondary air inlet had broken off. therefore the air was not getting into the stove when the door was completely closed, making the air above the baffle way too hot!
I just thought I would let you all know. Thanks for the help!
 
Status
Not open for further replies.