Resolute Acclaim

  • Active since 1995, Hearth.com is THE place on the internet for free information and advice about wood stoves, pellet stoves and other energy saving equipment.

    We strive to provide opinions, articles, discussions and history related to Hearth Products and in a more general sense, energy issues.

    We promote the EFFICIENT, RESPONSIBLE, CLEAN and SAFE use of all fuels, whether renewable or fossil.
Status
Not open for further replies.

Donna

Member
Nov 20, 2005
44
www.otterburnpark.com
Hi All,

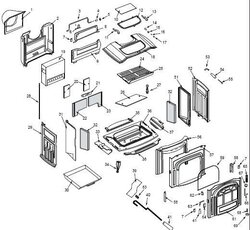
This summers project, replacing the secondary combustion package (part #19 on the diagram).
I am very unconfident approaching this job. Anybody ever done it? Hints? Warnings?
Going to take the firebrick out to have a good look at the package, but I know I am going to find
a severely worn out piece of refractory material. Over the winter, chunks of "toasted" material
began to fall down, about the size of a 50cent piece, maybe 2 or 3 times.
What would happen if I didn't replace this piece.....don't panic....this is just curiosity.
The stove burnt like a champ all winter, not a single problem.

Cheers,
Donna
 

Attachments

  • resolute acclaim parts.jpg
    resolute acclaim parts.jpg
    48.9 KB · Views: 1,271
Boy, do I have experience replacing that part! I have done it many times.

First of all, get some rubber gloves for this project. It's dirty. Also, lay out some newspaper under and around the stove to catch the soot.

Some hints...

Start the whole process by sliding the small metal retainer clip (part no. 21, on the diagram) to the left or right. Use a screwdriver to slide it. Don't be afraid to push hard, as it will be stuck. After that, the whole firebrick assembly comes out in 4 pieces, unless one or more are broken. If they are broken, you should probably replace them too. Just lay it out on newspaper in a jigsaw puzzle the way it came out. All firebrick must be removed (4 pieces) You'll also want to remove the grate parts from inside the firebox (parts 24,25- they just lift out).

The small ash receptacles (not sure of name, but they're part no. 32 on the exploded view) have to be removed. A bolt holds each to the rear of the stove.

The cast iron damper assembly must be removed (part no. 9). There are two bolts holding it in place. When they're removed, the whole damper assemly wants to fall down. That's OK, but it's heavy. Look close at it and make sure nothing is warped. I had to replace this part one time. ($50-60, as I recall)

Now you've exposed the combustor package (the part you're replacing). Vacuum all of the ash out of the stove and put it back together. Be gentle with the combustor package, as it's somewhat delicate. You might want to replace the damper gasket now too. It's easy to get at since you have the whole thing disassembled. The gaskets for part no. 32 should also be replaced, but I only replaced them 1 time in 12 years of use with my stove. They were flattened out, but seemed to be in OK shape for me.

The two bolts that hold the damper in place are the hardest part of this whole process to put back together. It's really trial and error. I would start one bolt in about a turn, and then swing the damper assembly up in place. (This is where you need octopus arms!) The other bolt should line up and can be snugged in place. Socket wrenches work well for this task. I would also consider using anti-seize lubricant on the 4 bolts you'll be removing. It will make the future maintenance easier. (and you will be doing this process every 2-3 years, depending on how much you use the stove)

I found that this is a good way to learn how my stove works and why certain areas have to be treated with care (don't slam wood into the firebrick!) or they'll break.

That's all. Good luck!

p.s. for anyone who wonders why VC stoves (particularly the Resolute Acclaim) get universally bashed, my scenario above is why. The part that is being replaced cost $210, or thereabouts, and has to be replaced very frequently. I've moved on to greener pastures and am hoping to not replace any parts for quite a while.
 
Ok, my worst fears are confirmed, Laughing.
Its a huge job but do-able.
I have gone as far as taking out the ash receptacles, removing the bolts and cleaning them out.
Its the damper assembly which is the most freaky part for me.
It will take me some nerve to get into this project, I will order the parts first, have to replace some fire brick as well.
This isn't going to be a cheap job, but you know, it has been a great stove, burns well despite a short chimney and keeps us warm
in an old drafty house.

Thanks for the advice.
I shall print out your reply and use it to scare myself awake before I go for a long drive to Maine.

Anybody else want to add their two cents worth?
Love to hear it.

Donna
 
I went through the process of removing mine to patch it because I vacuumed a hole in the top of it.
I removed it, and it was somewhat brittle and crumbling, but patched it and reused it this past winter. It worked fine.
I'll add a bit to JD's post:
-Remove the left and right firebricks 1st. Gently lift them, you might use a screwdriver, and swing the front out. If it is broken neatly you can glue it back together with refractory cement. I used some that came in a squeeze tube. Worked great.
-The rear 2 bricks are now free to fall forward so keep an eye, or hand, on them so they don't fall and break. A metal clip joins them at the top but doesn't keep them in place.
-When the 2 rear bricks are removed you'll see a plate left and right that are each held by a bolt. Remove these.
From there on JD has it covered.
If you decide that your refractory is still usable just dust it off gently and make sure the secondary intake holes at the bottom/rear are clear.
Be gentle when removing bolts. If they're seized there's a chance you'll snap the head off. If one doesn't seem to want to come out easily you might hit it with some penetrating oil and/or heat first. This is why JD recommends puting anti-seize when reassembling so they all come out easily next time.

We are newbies and we bought this stove used last summer to give woodburning a shot. We were tempted to grab a new Woodstock deal this year but the Resolute has been pretty good to us so we're gonna bank the money we thought about spending on a replacement.
I hope yours keeps you happy this winter and many more.

Here's a trick I use to keep better control over the burn.
The back of this stove has a thin metal plate with writing (UL, etc.) which covers the secondary intake holes but is open at the bottom.
The gap at the bottom is @ 3/8” between the plate and the stove. I folded some thin aluminum flashing into a U shape and then cut an angle on it.
I slide it between the plate and the stove and it fits snug enough that I can slide it up and down to vary how much of the intake is covered.
It gives me more control over the burn and could be a safety device if I need to starve a fire of air.
 
jdinspector and Brian VT A+ on your effort for detail to help someone out. That would sure of given me the confidence to go ahead. Cheers,... OH and good luck Donna.
N of 60
 
I shall keep you posted on how this project is going. I am sure there are some others out there who will be facing the same re-fit sooner or later.

First, I will take the thing apart to appraise the actual condition of the package, when I am sure we have had our last fire of the season. Another week or two
should do it. When you say you "patched" it after vacuming a hole in it....with what did you do this? R cement? Kayowool or some other refractory substance?
Hummmm...

If I think I can get another year out of it...so be it...if not...I shall get to it...maybe with my brother's help....long, strong arms.

Thanks to your excellent advice, I don't feel so alone in this.

Cheers,
Donna
 
Donna said:
When you say you "patched" it after vacuming a hole in it....with what did you do this?
I stole a small piece of ceramic blanket from our sugaring arch(firebox).
On that note...I plan to make a replacement refractory box from 1/2" Kaowool board and try it this summer.
I'll post the results.
 
Status
Not open for further replies.