Questions on connecting stove to existing masonry chimney(Update 6-10)

  • Active since 1995, Hearth.com is THE place on the internet for free information and advice about wood stoves, pellet stoves and other energy saving equipment.

    We strive to provide opinions, articles, discussions and history related to Hearth Products and in a more general sense, energy issues.

    We promote the EFFICIENT, RESPONSIBLE, CLEAN and SAFE use of all fuels, whether renewable or fossil.
Status
Not open for further replies.

rdust

Minister of Fire
Feb 9, 2009
4,604
Michigan
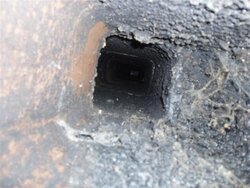
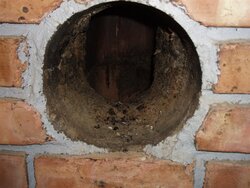
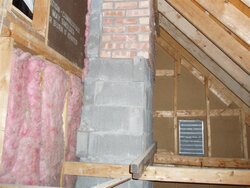
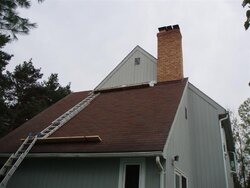
I'll be connecting my stove to an existing masonry chimney that hasn't been used in years and have some questions. I figure I'll need a masonry adapter to connect into the chimney? It looks like the masonry adapter will be a 6 inch diameter and the current hole in the chimney is 7 1/2 inches. My question is what is the best way to fill the gap and seal this properly? Will regular mortar work or do they make a high temp mortar?

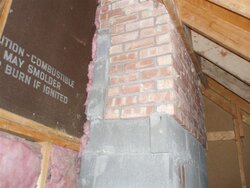
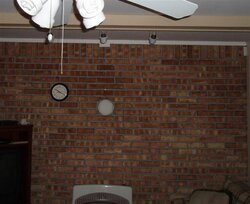
I'm just in the gathering info. stage so I'm open to any suggestions at this point. I still need to have a sweep come out and inspect the chimney to make sure a liner isn't needed.
 
Im not sure you want to cement it in there. You no doubt may have to remove it at a later date due to rot or something else. I would think rock/mineral/k wool (all the same) stuffed in around it might work better and then you can have the option of removal more easily if needed.
 
Why not try an adapter that goes from 6 inches to 8 inches. Then just take a pair of pliers and reduce the 8 inches to your 71/2.
 
BandSawyer said:
Why not try an adapter that goes from 6 inches to 8 inches. Then just take a pair of pliers and reduce the 8 inches to your 71/2.

Even if I did that I would still have to seal it, what type of sealer do I need to use? I'd really like to keep all the piping the same diameter if possible.
 
There's a very good chance you're going to need a liner if it's an older chimney that hasn't been used in years. In fact, for peace of mind I would suggest lining it regardless. The liners are cheap and generally easy to install, so it's almost silly not to throw one in rather than take any chances. Once you stick the liner down it, you can hook the pipe right up to the Tee and stuff rock wool around the remainder of the opening.
 
Just OOC - why wouldn't a liner be acceptable / desired?

And is the stove going to connect thru an existing fireplace? or a wall thimble? I'm guessing the latter based on "the current hole in the chimney is 7 1/2 inches..."

Like i said - just curious...
 
Wet1 said:
There's a very good chance you're going to need a liner if it's an older chimney that hasn't been used in years. In fact, for peace of mind I would suggest lining it regardless. The liners are cheap and generally easy to install, so it's almost silly not to throw one in rather than take any chances. Once you stick the liner down it, you can hook the pipe right up to the Tee and stuff rock wool around the remainder of the opening.

The chimney is 30' tall if I had to guess and I don't want to pay for a liner if I don't need it. The house was built in 80 and the stove was removed in 84 so it doesn't have much use on it. Would I be taking any chance if the inspection of the chimney turns out ok?
 
Edthedawg said:
Just OOC - why wouldn't a liner be acceptable / desired?

And is the stove going to connect thru an existing fireplace? or a wall thimble? I'm guessing the latter based on "the current hole in the chimney is 7 1/2 inches..."

Like i said - just curious...

Not opposed to the liner, just don't want to spend the money if I don't have to. It's going thru a wall thimble, picture attached...
 

Attachments

  • Family Room.JPG
    Family Room.JPG
    64.9 KB · Views: 369
Would I be taking any chance...?

You're lighting a fire inside a metal box inside your house. You're always taking a chance :)

I'd want stainless pipe of some sort running down the stack, even if the ~30 yr old brickwork looked pristine. Esp on an Endeavor putting out 70k+ btu.
 
So the chimney was built about 30 years ago and hasn't been used in 25 years. Unless it has been capped off well all this time, I would guess it has been exposed to water/moisture over the years. The moisture gets in there and freezes which can cause cracking that may be very difficult to see. You also have no idea how much clearance the builders left to combustibles, if any. If I didn't build it, I have a hard time trusting other people's work. Like I said, I wouldn't take a chance to save $400 or $500 dollars, not while my family and I are routinely sleeping under that roof every night... but that's just me.
 
Ok, back to my original question. Can anyone answer how I would properly seal the masonry adapter to the existing masonry chimney?
 
OK ok - we get it... :) If I understand your query, you're just trying to find a thimble / crock to make the transition from 6" stovepipe to the flue chase? It's all covered right here on Hearth.com:

https://www.hearth.com/econtent/index.php/articles/passing_a_chimney

Shows the 8" OD / 6" ID terra cotta crock that I think you're looking for... Or am I totally misunderstanding your situation?
 
The chimney needs to be inspected & cleaned/repaired if necessary. Is the chimney lined with clay tile? What are the inside dimensions of the existing chimney flue? Assuming your appliance has a 6" diameter flue collar, then the largest inside cross-sectional chimney flue area you want to dump that into is 56 in² (~7 ½" x 7 ½" or equivalent) if it's a chimney exposed to the outside; or 85 in² (~9" x 9" or equivalent) if it's an interior chimney. The appliance manufacturer most likely recommends a flue system from the stove all the way to daylight of the same inside diameter as the flue collar, for most efficient operation. An insulated SS liner is the way to do it right. If you're not concerned about any of that, and all you want to do is seal up around the 6" pipe penetration through the thimble, then I guess you could replace the thimble or just stuff the gap with anything that'll withstand about 2100°F. Rick
 
You can keep your 6" pipe going through your crock and seal the gaps with rock wool insulation or mortar and put a stove pipe collar ring up against the hole to cover it. I would just fill the gaps with rock wool and if you decide to reline later you won't have to knock out mortar.
 
fossil said:
The chimney needs to be inspected & cleaned/repaired if necessary. Is the chimney lined with clay tile? What are the inside dimensions of the existing chimney flue? Assuming your appliance has a 6" diameter flue collar, then the largest inside cross-sectional chimney flue area you want to dump that into is 56 in² (~7 ½" x 7 ½" or equivalent) if it's a chimney exposed to the outside; or 85 in² (~9" x 9" or equivalent) if it's an interior chimney. The appliance manufacturer most likely recommends a flue system from the stove all the way to daylight of the same inside diameter as the flue collar, for most efficient operation. An insulated SS liner is the way to do it right. If you're not concerned about any of that, and all you want to do is seal up around the 6" pipe penetration through the thimble, then I guess you could replace the thimble or just stuff the gap with anything that'll withstand about 2100°F. Rick

The chimney will be cleaned/inspected before I do anything. The chimney is lined with clay tile. I can't remember the dimensions right now but I did the math before and IIRC the cross section area was ok. I'll try to take pictures of the set up tonight and post them up. I've attached the only one I have right now.
 

Attachments

  • Chimney Up.jpg
    Chimney Up.jpg
    67.8 KB · Views: 328
Edthedawg said:
OK ok - we get it... :) If I understand your query, you're just trying to find a thimble / crock to make the transition from 6" stovepipe to the flue chase? It's all covered right here on Hearth.com:

https://www.hearth.com/econtent/index.php/articles/passing_a_chimney

Shows the 8" OD / 6" ID terra cotta crock that I think you're looking for... Or am I totally misunderstanding your situation?

Thanks for the link, that helps. It's not about spending the money for a liner, I just don't want to spend it if I don't have to. It's looking like I probably will though.
 
Took some pictures of what I can see. The distance from the outside brick in the room to the edge of the flue is 9 inches, the flue seems to have a 9x7 cross section. The other pictures show how the chimney goes thru the attic and exits the roof.
 

Attachments

  • P5130006.JPG
    P5130006.JPG
    113.1 KB · Views: 294
  • P5130010.JPG
    P5130010.JPG
    102.5 KB · Views: 290
  • P5130009.JPG
    P5130009.JPG
    88.5 KB · Views: 260
  • P5130008.JPG
    P5130008.JPG
    109.4 KB · Views: 291
Outside picture...
 

Attachments

  • P9040097.JPG
    P9040097.JPG
    54.8 KB · Views: 256
I just wanted to update this thread.

Had a sweep come out today and inspect the chimney. It looks like at minimum we'll be having the clay tiles knocked out of it and an insulated liner installed. We think we figured out why the original owners stopped using a stove. It appears they had a chimney fire at one time and it destroyed a bunch of the tiles. We'll either have this chimney fixed with a liner or we may install the stove in the corner of the family room. Putting it in the corner will allows us to go straight up with the chimney through the family room and the corner of an upstairs bedroom. Doing this will keep the pipe inside till it hits the roof.

We're having an estimate worked up for both ways.
 
Glad you had the existing chimney checked out first! Sucks that it's in such bad shape, but at least you'll have the comfort of knowing you're burning safely which ever way you decide to go.
 
Status
Not open for further replies.