
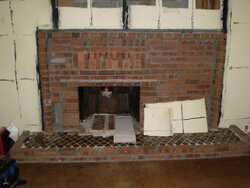
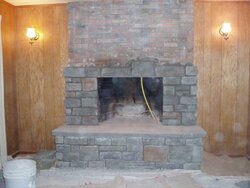
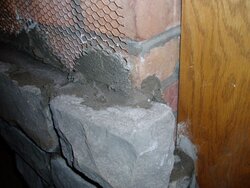
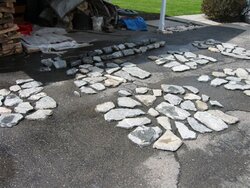
I am planning to re-do our fireplace interior brick facing to stone and am trying to decide which is better: Tearing out the brick and re-building with stone or using a faux stone veneer and covering the brick. The existing brick work was poorly done by the previous owner. It has a metal heatolater firebox. I installed an Osburn 1800 wood stove last winter and it worked fine. I just took the stove out to re-do the brick and not knowing much about veneer choices, I am concerned that if I cover the brick, it will be too much added weight to the floor, etc. Since I am sheetrocking the walls I opened up the wall above the fireplace to check the chimney and it looks fine.The basement is finished and I cannot see below the hearth. The hearth is concrete and is raised off the floor 5 inches. I do not know what thickness the fake veneer comes. Is it like tile? I have seen some very thick pieces on the Internet and they look heavy. I have attached a picture. I'm not sure if by removing all the brick, if anything can be damaged behind it. I can see behind it in some spots and it looks like it is just stacked up. I plan on using blue stone on the hearth. To be hinest I really don't feel like tearing all the brick out unless I have to. I thought about knocl off the bricks that are sticking out and making it as flat as possible, then using a veneer.......If anyone has any thoughts or experience, your suggestions will be much appreciated!
Help-Need Suggestions- Stone Veneer Over Brick Fireplace?
- Thread starter brink
- Start date
-
Active since 1995, Hearth.com is THE place on the internet for free information and advice about wood stoves, pellet stoves and other energy saving equipment.
We strive to provide opinions, articles, discussions and history related to Hearth Products and in a more general sense, energy issues.
We promote the EFFICIENT, RESPONSIBLE, CLEAN and SAFE use of all fuels, whether renewable or fossil.
You are using an out of date browser. It may not display this or other websites correctly.
You should upgrade or use an alternative browser.
You should upgrade or use an alternative browser.
- Status
- Not open for further replies.
summit
Minister of Fire
get cultured stone, its about 1" to 2" thick, lightweight, non combustible, and easy and fun to install over an old brickwork.. you should knock out the outside edge of the whole thing to make it all a flat surface across, instead of brick work jutting out at a 90 deg angle like you have, now.http://www.culturedstone.com/
madison
Minister of Fire
ditto summit's advice. if it is of value, when i get home i can post some pictures of a similar project done with bluestone hearth and cultured stone.
I would stongly suggest you pick out your bluestone piece at the stoneyard, as there can be quite a striking difference in colors in the bluestone. And discuss with them the options for edging etc. We have done three hearth constructions in two houses, all with bluestone hearths. Be extremely careful when installing the insert as the bluestone can scratch and chip.
Reply if you want the pics added to this thread, the most recent is available from my signature below. It was not a refacing job, but new from scratch with bluestone and granite rock walls.
RocketMan
New Member
onesojourner
Member
Thanks to all of you! Great advice.
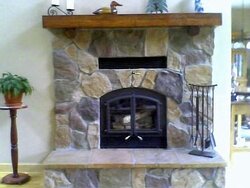
Rocketman, your fireplace looks fantastic. The stone appearance is what I had in mind. I am looking at something called cobblestone. Do I need backerboard attached to the brick or can I just cement the stone directly on to the brick?
I will be knocking off all the bricks that stick out and making it as flat as possible.
Madison, thanks for the tips on the bluestone. I am debating getting on large piece or using sections. Any thoughts on that?
madison
Minister of Fire
One piece, if you have the manpower to move it and place it. Looks nicer, and the seams would be prone to accumilation of dust etc. Plus my wife mandated it. And I am glad she did.
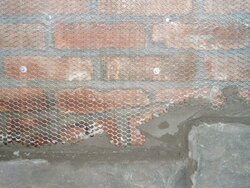
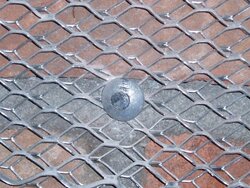
Wire mesh can be attached/fixed directly to the brick, and cultured stone applied to the mesh.
Another suggestion; quadruple check your dimensions of your bluestone hearthstone and leave at least a few inches extra to spare for the hearth extension in front of the insert. Your current brick hearth may be shy of the code requirements for the hearth extension in front of the insert door -- once the insert is installed and how it fits into your existing fireplace.
Also, the bluestone will/may reduce your available fireplace height dimension. So it may be wise to purchase the insert after reconstructing the hearth. Or if you have already purchased the insert, that may determine if the hearth modifications are an option.
Wire mesh can be attached/fixed directly to the brick, and cultured stone applied to the mesh.
Another suggestion; quadruple check your dimensions of your bluestone hearthstone and leave at least a few inches extra to spare for the hearth extension in front of the insert. Your current brick hearth may be shy of the code requirements for the hearth extension in front of the insert door --
once the insert is installed and how it fits into your existing fireplace.Also, the bluestone will/may reduce your available fireplace height dimension. So it may be wise to purchase the insert after reconstructing the hearth. Or if you have already purchased the insert, that may determine if the hearth modifications are an option.
Hello all! I am new to stoves and wood burning. I've learned so much from this site. Thanks so much. ")
We just finished refacing our fireplace with a real stone veneer. The veneer itself varies from 3/4" to 1-1/2" thick. We then had a Jotul C550 installed with 15' SS liner, interior flue. Haven't done the break-in fires yet. I made the mantel shelf; first time using crown moulding. New to forums also. Not sure if the pictures will post.
We just finished refacing our fireplace with a real stone veneer. The veneer itself varies from 3/4" to 1-1/2" thick. We then had a Jotul C550 installed with 15' SS liner, interior flue. Haven't done the break-in fires yet. I made the mantel shelf; first time using crown moulding. New to forums also. Not sure if the pictures will post.
Attachments
daveswoodhauler
Minister of Fire
Wife's idea for candle. I subsequently 'upgraded' the theme to a real log into which I drilled 3 holes with a Forstner bit and inserted tealights. Looks great at night. It's amazing the 'fireglow' that emanates. Looking forward to the real thing, but want to enjoy the summer (albeit cooler and wetter than normal) first.
madison
Minister of Fire
madison
Minister of Fire
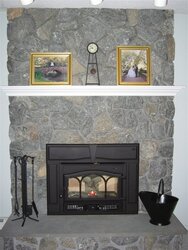
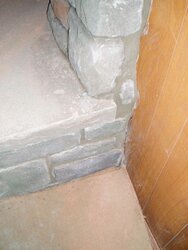
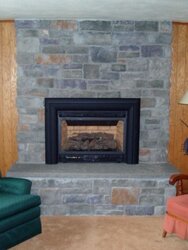
Part 2, Cultured stone, blue stone hearth over brick. And a Gasp (pun intended) insert.
Final picture color is not true, the colors of the cultured stone were not that ugly purple. I believe that real stone may actually be less costly, but requires more skill to apply.
Final picture color is not true, the colors of the cultured stone were not that ugly purple. I believe that real stone may actually be less costly, but requires more skill to apply.
Attachments
summit
Minister of Fire
madison said:Part 2, Cultured stone, blue stone hearth over brick. And a Gasp (pun intended) insert.
Final picture color is not true, the colors of the cultured stone were not that ugly purple. I believe that real stone may actually be less costly, but requires more skill to apply.
IS THAT THE EUROPEON CASTLE STONE?
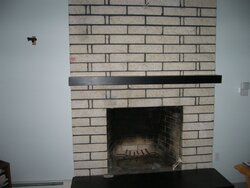
Madison, your pics are a big help. The stone looks as thick as the brick it is covering. Why didn't you remove the brick? Or is the veneer very light weight?
Vmandi, beautiful job. Where did you get the veneer and what is it called? It is close to what I am looking for.
You guys are great, and a really big help!
Vmandi, beautiful job. Where did you get the veneer and what is it called? It is close to what I am looking for.
You guys are great, and a really big help!
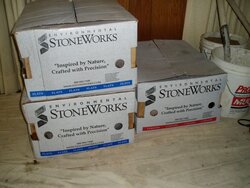
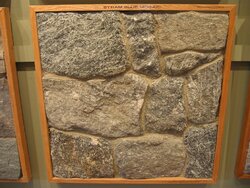
brink, the stone veneer we chose is called 'Byram Blue Mosaic'. We went to http://www.bedfordstone.com/. While not shown on the website, it was in their brochure and on display in the showroom. Another option for us was http://www.montfortgroup.com/masonry.htm. The stone weighs approximately 14 pounds per square foot. Do a Google search for 'thin stone veneer' and you'll probably find something closer to you. Hope this helps.
Attachments
madison
Minister of Fire
summit said:madison said:Part 2, Cultured stone, blue stone hearth over brick. And a Gasp (pun intended) insert.
Final picture color is not true, the colors of the cultured stone were not that ugly purple. I believe that real stone may actually be less costly, but requires more skill to apply.
IS THAT THE EUROPEON CASTLE STONE?
It is called San Francisco Cut Stone : http://www.estoneworks.com/product/colorguide/cutstone2_NE.htm
It is about the thickness of a brick, by adding/applying the culture stone to the existing brick, it added to the depth dimension which allowed us to insert the next size up gas insert. It also aided in running the electric behind the new cultured stone. As well as making the job a lot less work. It was NOT done by myself, but an old Italian guy from upstate NY.
daveswoodhauler
Minister of Fire
vmandi said:Wife's idea for candle. I subsequently 'upgraded' the theme to a real log into which I drilled 3 holes with a Forstner bit and inserted tealights. Looks great at night. It's amazing the 'fireglow' that emanates. Looking forward to the real thing, but want to enjoy the summer (albeit cooler and wetter than normal) first.
Was only teasin you and I have been there myself. Looks great..nice install.....you'll love it this winter.
Now get crackin, and go get yourself some wood
- Status
- Not open for further replies.
Similar threads
- Replies
- 13
- Views
- 748
- Replies
- 0
- Views
- 781
- Replies
- 2
- Views
- 192
- Replies
- 11
- Views
- 486