Duo-Therm Oil Stove

  • Active since 1995, Hearth.com is THE place on the internet for free information and advice about wood stoves, pellet stoves and other energy saving equipment.

    We strive to provide opinions, articles, discussions and history related to Hearth Products and in a more general sense, energy issues.

    We promote the EFFICIENT, RESPONSIBLE, CLEAN and SAFE use of all fuels, whether renewable or fossil.
Status
Not open for further replies.

BrileyR

New Member
Oct 10, 2009
4
Columbus, Ohio
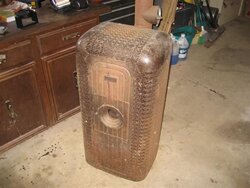
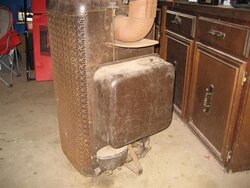
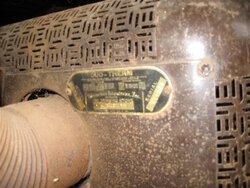
I was given this stove, but no one can tell me how to use it or instructions for it. I've searched the web for info, but no luck. I can't find out what year it was made, but the model# is 575-9

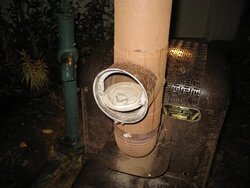
I've never used a stove like this, but would like to install it in my garage for this winter. I want to make sure I'm using it safely.

Thanks in advance for any help, Briley.
 

Attachments

  • stove 001 (Small).jpg
    stove 001 (Small).jpg
    48.7 KB · Views: 9,503
  • stove 002 (Small).jpg
    stove 002 (Small).jpg
    51.3 KB · Views: 10,213
  • stove 003 (Small).jpg
    stove 003 (Small).jpg
    48.5 KB · Views: 5,092
So I put some K1 in it last night, cleaned the filter, and tried to light it. Am I correct in assuming you just drop a match into the bottom of the burner? Anyway, it would not light, so I felt the bottom of the burner and it's full of soot, so I need to remove the burner from the outer case and clean it out. It looks like the carb is working fine, but the pipe from the carb to the burner may be clogged, it may need cleaned also.
 
BrileyR;
We've used one of these for the last 25 years to heat our hunting tent, although ours never had the outer shroud (we bought it 2nd hand) It really works well. Some things to keep in mind:
The little lever directly above the filter is an emergency high-level shutoff. When you push this down, you should feel it "latch" in the down position. This sets a 2nd float inside the carb which, when the fuel level gets too high, raises this float, unlatches the mechanism and shuts off the fuel supply. If this isn't set, you won't get any fuel. If you take off the top plate of the carb and then set/trip this lever, you'll see how this works. Make sure this works!
If you look inside the firepot, you'll see that it has holes all around its perimeter. make sure these are open. Usually a light wire brushing will clean it. If you need, the firepot will come out through the bottom of the unit, giving better inside access instead of working through the front door.
Look inside to the rear of the firepot and you'll see a small well about 2"square and 3/8" deep. make sure this is clean. You should see fuel accumulate there after you open the carb adjustment. I usually use a piece of paper towel wadded up, light it, and drop into the firepot. Keep the flow on a lower setting until the firepot gets hot, then open gradually until you get to the desired temp. You'll know it's working when you open the front door and see blue wisps of flame coming out of the little holes in the sides; now it's "generating", as Dad used to say. Also, keep in mind you need a good exhaust into a chimney or some other means to the outside; this heater isn't like the 99.9% clean ones you can get now.
 
Thanks for the info!

I'll double check that lever on the carb to make sure it works. I haven't had a chance to get the burner cleaned out, but I hope to this weekend.

My garage is not insulated and has thin walls, I want to run an exhaust thru the wall, what materials will I need for the exhaust?

Thanks.
 
All we ever used was 6" black stovepipe, and that was vertical through a special sleeve sewn into the tent roof. I never had to pipe one through a building wall. Someone that deals with wood stoves, etc. would be better suited than me to answer that.
 
BrileyR said:
Thanks for the info!

I'll double check that lever on the carb to make sure it works. I haven't had a chance to get the burner cleaned out, but I hope to this weekend.

My garage is not insulated and has thin walls, I want to run an exhaust thru the wall, what materials will I need for the exhaust?

Thanks.

You would be better to go up rather than out if your setup allows it. However if you must go out, the big thing is to have adequate clearance to combustibles as you go through the wall. Essentially this means cutting a BIG hole where the pipe will go, and framing the pipe with appropriate non-combustible materials to fil the hole. I don't know the details of what is required for an oil burner like you have, but I'd be surprised if they were worse than what is required for a wood stove. If you look through a few stove manuals, they have descriptions of what is required for through wall assemblies, or I think you can get kits from some of the class A chimney outfits...

However this is definitely the kind of thing you might want to run by your local code official and / or insurance company types first if you need to get their blessings... They may give you a problem given that this is somewhat of an antique, and also because of the general concerns that people have about putting any sort of fire burning appliance in a garage...

Gooserider
 
I got the burn pot cleaned out tonight, turned on the fuel, and it lit right up! At first I had a hard time getting it to stay burning, I must have went through 10 matches, but finally stayed burning. I left the door open for a few minutes so I could watch it, at times the flame would almost got out, so I closed the door, and soon after the flame went to blue. I turned the carb up to 3, and it was burning ok. I'm assuming the longer it burns the better it will put out heat? Also, what is the round door on the exhaust pipe? It has some sort of adjustment knob on it, but can't figure out what it does.

I guess my next step is to run an exhaust and see if it will keep the garage warm.

Thanks for the help everyone.
 

Attachments

  • stove (Small).jpg
    stove (Small).jpg
    42.2 KB · Views: 3,800
BrileyR said:
I got the burn pot cleaned out tonight, turned on the fuel, and it lit right up! At first I had a hard time getting it to stay burning, I must have went through 10 matches, but finally stayed burning. I left the door open for a few minutes so I could watch it, at times the flame would almost got out, so I closed the door, and soon after the flame went to blue. I turned the carb up to 3, and it was burning ok. I'm assuming the longer it burns the better it will put out heat? Also, what is the round door on the exhaust pipe? It has some sort of adjustment knob on it, but can't figure out what it does.

I guess my next step is to run an exhaust and see if it will keep the garage warm.

Thanks for the help everyone.

Been a LOOOOOOOOONG time since I worked on one of those. Still have my Grandpa's DuoTherm factory service kit sitting in the shop. Everything that 55Razor said is correct so follow that advice. DuoTherm was one of the better brands along with Lear-Seigler but parts are non existent anymore. Fortunately there wasn't much to break on them.

As to the round plate in the flue pipe, that is a barometric damper that regulates the amount of draft on the firepot. This is an important piece of the operating puzzle on all those drip type fuel oil stoves. IIRC the draft should be about -.02 to -.03 on that particular model. Some of the larger units were spec'd at higher draft. The old factory service kit has a draft gauge in it yet. If you can get your hands on a gauge or a finely calibrated manometer it would be good to check the flue and see what it is actually pulling as the draft is pretty critical to a clean, no soot burn. The knob is a special weight that changes the position of the damper by moving the balance point, thereby increasing or decreasing the size of the opening in the barometric tee.

One other thing. That type of appliance depends on draft for proper operation of the burner. Draft is created by the height and length of the chimney. If you exit the building out the side wall you will need to elbow vertically I would say a minimum of 8-10 feet to get a satisfactory draft. If you do elbow it out and then up, be prepared for a little smoke and smell when first lit. Using single wall pipe that cools off quickly will probably accentuate the problem.
 
Status
Not open for further replies.