need advice; installing 30-ft liner for fireview

  • Active since 1995, Hearth.com is THE place on the internet for free information and advice about wood stoves, pellet stoves and other energy saving equipment.

    We strive to provide opinions, articles, discussions and history related to Hearth Products and in a more general sense, energy issues.

    We promote the EFFICIENT, RESPONSIBLE, CLEAN and SAFE use of all fuels, whether renewable or fossil.
Status
Not open for further replies.

dreezon

New Member
Hearth Supporter
Aug 7, 2009
173
Peoria, IL
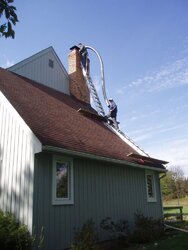
As soon as the weather allows, I will be installing the liner for my Fireview. I've got a 30-ft run, and I have to wrap it with the .5 inch insulation and metal cladding. Then I have to get it up onto my roof and somehow negotiate it down into the chimney.

Any tips before I proceed? With all that wrapping, I can't imagine you'd want to bend it too much, but raising 30 feet of it strait up in the air might be a challenge too, especially if there's any wind.

I will also need to put an S-curve in the bottom 5 feet or so in order to have it come out of the damper in the centered location. That will have to be done after I get it down the chimney, but I won't be able to reach up there with my hands.

I could really use some guidance from someone with experience. The stuff bends, but with a considerable amount of effort.

Oh, one other thing: does the liner need to be cleaned before applying the spray adhesive for the insulation. Is the adhesive really necessary? The manual seems to indicate that it's optional.
 
One thing that helped me out was i slid a piece of cardboard
up against the cutout damper. This allowed the liner to run directly through
the damper opening without getting caught up in the process.
I also made a wire "grab" at the end of the liner with a rope tied to it. The rope will make it through
before the liner, a few good tugs and it was through the opening.
I would imagine the S curve could be done after the liner is pulled through.

Brad
 
bfunk13 said:
One thing that helped me out was i slid a piece of cardboard
up against the cutout damper. This allowed the liner to run directly through
the damper opening without getting caught up in the process.
I also made a wire "grab" at the end of the liner with a rope tied to it. The rope will make it through
before the liner, a few good tugs and it was through the opening.
I would imagine the S curve could be done after the liner is pulled through.

Brad

Thanks for the input, bfunk. Are you saying you ran your liner in from the bottom up?

I'm coming down from the top, but I'm wondering how we're going to get 30 feet of it up into a straight vertical position above the chimney. I've seen images of guys uncoiling the liner as they feed it down, but I can't do that with the insulation and cladding already wrapped around it.

Olympia included a nose cone puller, but I don't know how I'm supposed to use it to pull an ovalized liner through an 5.5-inch damper opening.
 
No i did mine from top down.
You will never get it 30 ft. straight up in the air.
I had a friend help hold the excess as high as possible while i
pushed and straightened it down the chimney. It wont hurt to also have someone on the inside
pulling rope as you and friend push down liner. I have only done one so i am no
expert, but these tips helped me quite a bit.
 
I just did a 27' the other day. It was without insulation(I'm going to pour it) so yours will probably be more difficult. My dad helped and was able to hold it at first but with the way my roof is I was on my own after a few feet. If I had any offsets I would've used a pull strap to help it down with someone pulling a rope.

Attached a pic. of the install....
 

Attachments

  • PA110013.jpg
    PA110013.jpg
    89.8 KB · Views: 212
We'll, so it sounds like you have to kind of bend and straighten as you—at leas for the first third to half, I'm guessing (after that, surely you can stand the rest up?).

But here's the remaining question: How much bending can you safely do with the insulation and cladding on it?
 
Having a friend or two to help will be invaluable. Someone tugging on a rope from below will make the job much easier and if you can have another person helping you on the roof...all the better. I think the secret to this job lies in the pitch of your roof (or lack thereof). If you've got good footing it is a breeze. If not, it sucks and is dangerous. Many of us have done this project and it really is not that hard. That stuff flexes more than you would think. It will kink if you push it too hard, however, so be a bit careful. The cardboard idea is a good one and I wish I had thought of that. The friction builds up quickly the more liner is introduced into the chimney so any relief will pay off. Be sure you have a decent amount of play on each side of the liner (with insulation) otherwise the you'll get the liner down 10 feet or so and the friction will be so great that you will not be able to go further. Good luck. You are going to enjoy the Fireview!

-Todd
 
Well, I got it in yesterday, with my dad standing at the other end of the peak feeding, and my wife at the bottom tugging on the nose cone. Actually, I was shocked how easy it went down. Getting it wrapped with insulation and covered with the steel mesh was far more difficult. I think we had it fed down in about ten minutes time, maybe less. The biggest difficult was slowing it down enough to straighten it before it went too far in.

Probably helped that my flue was 9.5 by 12 inches.

I used a round nose cone on my ovalized end, and the band clamp went on with no trouble. All I had to do was stop it just above the damper frame and remove the cone. We actually had to fight to keep the thing from slipping down as we were rounding out the end and making all out adjustments.

Also for rounding out the end, we got it most of the way by me pulling out from the inside and my dad pushing in on the wide part, then we put a deep-throated bar clamp and put a little more hurt on it. After that it was mostly a matter of using a pair of pliers to bend in some ragged parts on the end so they wouldn't hang up on the opening of the tee.
 
Status
Not open for further replies.