PE Pacific Insert Not Bullet-Proof

  • Active since 1995, Hearth.com is THE place on the internet for free information and advice about wood stoves, pellet stoves and other energy saving equipment.

    We strive to provide opinions, articles, discussions and history related to Hearth Products and in a more general sense, energy issues.

    We promote the EFFICIENT, RESPONSIBLE, CLEAN and SAFE use of all fuels, whether renewable or fossil.
Status
Not open for further replies.
Pics:
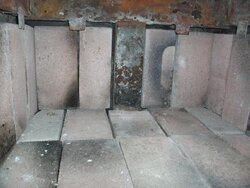
I flipped all the fire bricks over, and the bottoms & backs were like new. Should be good for a couple more years or so.
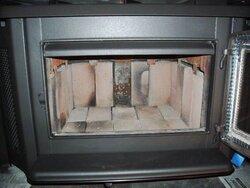
A full shot of the insert.
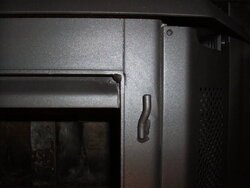
Left face & close up.
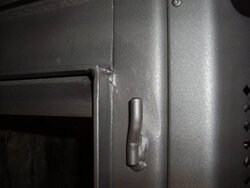
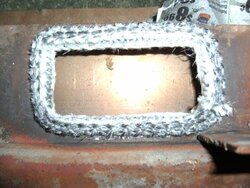
There is one small area where the tiger pad made a small groove, while the welder was trying to smooth & polish the weld behind and just above the hinge.
I did not want the hinge cut off and rewelded on just to polish it perfect. I told him, to do his best and good enough. I am ok with it, and once the door is on you can't see much at all. And from a couple feet away ya see nothing.
He literally had to hold his finger (in his glove) against the back of the tiger pad to get enough pressure & contact tot the repair near the hinge area. The tiger pad was thing and would just flex if he did not push his finger against the back of it while It was spinning.
 

Attachments

  • LT FACE PAINTED.jpg
    LT FACE PAINTED.jpg
    34.2 KB · Views: 600
  • LT FACE CLOSE UP.jpg
    LT FACE CLOSE UP.jpg
    32.2 KB · Views: 623
  • FULL COMPLETE.jpg
    FULL COMPLETE.jpg
    43.2 KB · Views: 603
  • FIREBOX INNER.jpg
    FIREBOX INNER.jpg
    48.3 KB · Views: 595
Fire.
I am also trying my new prototype baffle gasket. It is door glass gasket which folds longways in 1/2. I centered it's sticky side to the the baffle opening edge, then folded it over to meet the area around the outside of the baffle surface where it rests on the back ledge. To this point the stock, and both my hand made gasket do not stop secondary from going on in the back along the baffle rear lower edge into the back of the firebox. I have decided to live with that bit of secondary back there, which may actually help burn the wood in back, as I never end up with charcoal back there. At least I know the gaskets survive the burning season very well and are truly reusable.

As for my review and view of PE at this point.
The dealer actually turned out ok. I did most of the legwork, but wanted things done as quick as possible, and I am sure he knew that. I took the initiative and he went with the flow.
Cory at PE was very helpful, and gave me no attitude, and generally seemed like he wanted to resolve the issue and honor the warranty. I would buy PE products again, and would have no problem recommending to anyone I know or was interested. I feel very comfortable knowing PE stands by their product & warranty. I will however keep my eye open for any further issues. I hope this is the end of any cracking & such.
My only real beef is the quality control dept. I know of a couple guys/gals that need their asses handed to them. They are the last in line to assure a quality, properly made & prepared product goes out to the consumer. And whoever was on duty the day mine was crated, was asleep at the wheel. Which the way the check off card was scribbled, indicates. The EBT should be another thing double checked before shipping. After 3 years, only after I decided o pull it out and check it, did I find it was not even completely put together and operating properly. I am not knocking the company, but the QC dept. Every phase of the build to the paint to the QC & crating is equally as important. In the end, I would still buy again. I would check everything including the EBT and every other operating component before installation though.
2 thumbs up here for PE.
 

Attachments

  • WINDOW GASKET AS BAFFLE GASKET.jpg
    WINDOW GASKET AS BAFFLE GASKET.jpg
    54.9 KB · Views: 896
  • SANY0062.jpg
    SANY0062.jpg
    47.7 KB · Views: 563
  • SANY0065.jpg
    SANY0065.jpg
    44.2 KB · Views: 573
Hogwildz said:
Ok, I should have let the pain air cure a couple days, if it becomes a problem, I'll sand & refinish. I just had to see how it is operating .
I wanted to see if it operated better now that the EBT flapper was in position and covering the hole when it should be. I did not run it hot enough to engage the EBT yet.
Seems more level and more easily controllable. I won't really know till its up to full temp.
Here are some photos:
Right face after paint, and close up.
EBT, notice the bees, flys & ladybugs. Note to self, during yearly cleaning, pull EBT, inspect & clean.
Sorry, forgot to take a phot of the flapper in correct position. it has a tab on each side that sits in a slot in those brackets each side.

Hey, I can actually "see" a picture in this post (usually I can't) The pic I see looks like the left face close up but it's tagged as right face close up? I updated the yr bought, if you know the month I'll add that too.
 
53flyer said:
Hogwildz said:
Ok, I should have let the pain air cure a couple days, if it becomes a problem, I'll sand & refinish. I just had to see how it is operating .
I wanted to see if it operated better now that the EBT flapper was in position and covering the hole when it should be. I did not run it hot enough to engage the EBT yet.
Seems more level and more easily controllable. I won't really know till its up to full temp.
Here are some photos:
Right face after paint, and close up.
EBT, notice the bees, flys & ladybugs. Note to self, during yearly cleaning, pull EBT, inspect & clean.
Sorry, forgot to take a phot of the flapper in correct position. it has a tab on each side that sits in a slot in those brackets each side.

Hey, I can actually "see" a picture in this post (usually I can't) The pic I see looks like the left face close up but it's tagged as right face close up? I updated the yr bought, if you know the month I'll add that too.

7/06 is the date on the QC card. I ain't pulling the insert to red the tag on the back.
11/15/06 Deposit put down, 12/2/06 paid fro and brought home.
As for the pictures. Its a habit of mine. My work is insurance adjuster dealing with tractor trailer wrecks. I label my photos per if your sitting in the vehicle, not looking at from front.
Hence right side is curbside, left side is driver's side. Sorry bout that.
 
Two notes:

1. to me it looks like when the crack was ground down it did not go all the way through is that the case?
2. I have pacific insert and while I do not have face cracks I do have 1 cracked internal weld that does not go to an outside an source. I will monitor it and if it gets bigger or more show up it will be reported to my distributor.

unit purchased in 2007 not sure of manufacture date.
 
Hi, i have restore about 30 PE stove and i can tell you that i have see thoses kinds of cracks(the ones each sides off the door) on many stoves.And the baffle support rails are almost always to change.The baffle itself is always wrap at a certain degree and have to be changed sometimes.The small Vista seem to be the one with less problems.The Summit and Super 27 seems about the same.I have se those cracks on 15 years units and also on units with only 3 to 4 years.If PE said that they have see them on only 6 units ,i have see it myself on a lot more units! I just have check my own 2005 Summit and i have 2 cracks begening each sides of the door and i can confirm than the stove never overheat.It is a conception problem that they have for many years and never correct.The snew supports rails in stainless seem to be better.Thoses stoves are fun to heat,work very well but seem to wear out fast.
 
Burning Sensation said:
Is there an over firing temp listed in the manual? If not then then I think you are ok saying that you never over fired it according to the instructions.

There is not. I just got off the phone with the factory. I asked about normal operation temp ranges and what the over fire line would be. I was told" We don't test the stoves so it would have to be a judgment call on part of the operator. It's just a common sense thing. If you see parts glowing or the baffle is warped/warping then the unit is being over fired." To me that is as vague as you can get. I called because I did see this info in the manual for the T6 we just ordered either, so I wanted to know definitively from the factory. So much for that. I don't recall ever not having either in writing or over the phone with a factory a normal operating range and over fire temp line not to cross, we have used a lot of burners over the years in different rentals and places we have owned.


I guess as the factory says, you just need to use commonsense. I know that didn't help, but it's hard to help when the builders don't have any for you.


Owl
 
wxman said:
Two notes:

1. to me it looks like when the crack was ground down it did not go all the way through is that the case?
2. I have pacific insert and while I do not have face cracks I do have 1 cracked internal weld that does not go to an outside an source. I will monitor it and if it gets bigger or more show up it will be reported to my distributor.

unit purchased in 2007 not sure of manufacture date.

WX, yes the crack was completely through the weld. It was just finer and harder to see once ground out.
 
It honestly looks almost as good as I knew. I hope the cracks stay gone for you, if nothing else, at least until the end of the heating season this year.
 
Stove looks great Hog. Nice repair and fast. Thanks for the tip on the glass gasket for the baffle seal. I'll have to try that.
 
Hogwildz said:
Fire.
I am also trying my new prototype baffle gasket. It is door glass gasket which folds longways in 1/2. I centered it's sticky side to the the baffle opening edge, then folded it over to meet the area around the outside of the baffle surface where it rests on the back ledge. To this point the stock, and both my hand made gasket do not stop secondary from going on in the back along the baffle rear lower edge into the back of the firebox. I have decided to live with that bit of secondary back there, which may actually help burn the wood in back, as I never end up with charcoal back there. At least I know the gaskets survive the burning season very well and are truly reusable.

I was actually told by a dealer that you don't even need the gasket and that some people who accidentally sweep theirs out with the ashes don't ever put another one in. What are PE owners thoughts on that statement?
 
53flyer said:
Hogwildz said:
Fire.
I am also trying my new prototype baffle gasket. It is door glass gasket which folds longways in 1/2. I centered it's sticky side to the the baffle opening edge, then folded it over to meet the area around the outside of the baffle surface where it rests on the back ledge. To this point the stock, and both my hand made gasket do not stop secondary from going on in the back along the baffle rear lower edge into the back of the firebox. I have decided to live with that bit of secondary back there, which may actually help burn the wood in back, as I never end up with charcoal back there. At least I know the gaskets survive the burning season very well and are truly reusable.

I was actually told by a dealer that you don't even need the gasket and that some people who accidentally sweep theirs out with the ashes don't ever put another one in. What are PE owners thoughts on that statement?
That could be true, but I would rather have that air go to the front of the baffle then just flow back there, looks like its going to do both now with the gasket. My home made gaskets last longer so its not an issue now for me.
 
Hogwildz said:
pilot-werx said:
I have a PE Summit. Will be a year old next week. If you are happy having it welded then so be it...
Check your Stove plate or QC card for date of manufacture. If between 2006-2007, keep an eye on the problem areas.
I am happy to be able to have heat soon, as it is getting cold here. If they want tp replace it next spring or summer, I would not turn a new one down.
I don't have time to wait till the middle of winter for a new one now. And highly doubt that option is on the table as of yet.

Looking through the paper work, the QC tag indicates it was built on 09/18/08. Time will tell....

Your repair looks like there was nothing ever wrong. Nice job! What did you use for paint?
 
pilot-werx said:
Hogwildz said:
pilot-werx said:
I have a PE Summit. Will be a year old next week. If you are happy having it welded then so be it...
Check your Stove plate or QC card for date of manufacture. If between 2006-2007, keep an eye on the problem areas.
I am happy to be able to have heat soon, as it is getting cold here. If they want tp replace it next spring or summer, I would not turn a new one down.
I don't have time to wait till the middle of winter for a new one now. And highly doubt that option is on the table as of yet.

Looking through the paper work, the QC tag indicates it was built on 09/18/08. Time will tell....

Your repair looks like there was nothing ever wrong. Nice job! What did you use for paint?

Thanks,
The insert actually came with a card from Stove Bright, the paint they use at PE factory. So that is what I bought.
It is Black Metallic. The local hardware stores, HD & Lowes did not carry anything but Rustoleum.
I was out on a job Wednesday and stopped by a stove shop I was considering prior to making my initial insert purchase from another shop. Thy had the cans of Stove Bright paint in stock.
I was pleasantly surprises to find at the shop it cost $9.95. I wanted it that day too. As I ended up painting everything that night.
I looked online and it ran around $13.00 to $16.00. And I would have shipping to pay and the wait fro it to be shipped.
PE has agreed to also reimburse me for the can of paint also.
I just noticed my damn door glass gasket has about an inch area inside that the glass edge is not covered bu the gasket portion inside. Not PE's fault, as I replaced the glass and gasket last year I think it was.
It is tight on the outside, so should really be a non issue. But now knowing it is there, I just can't stop thinking about it, and will replace it and correctly install a new one.
I notice I am becoming an anal perfectionist when it comes to my wood burning. Hope I don't get Howard Hughes syndrome ;)
Could be real bad trying to put more splits in with tissues covering my hands.

We are supposed to drop to 26 tonight. Summit is going, I am babying it for now, but house is 72. Good for me, the girls are wrapped up in blankets. Sheesh.
Looks like I am off to the hardware store tomorrow for a door glass gasket.
 
We are supposed to drop to 26 tonight. Summit is going, I am babying it for now, but house is 72. Good for me, the girls are wrapped up in blankets. Sheesh.

Wimps :). So when do the 30NC afterburners kick in Hog?
 
BeGreen said:
We are supposed to drop to 26 tonight. Summit is going, I am babying it for now, but house is 72. Good for me, the girls are wrapped up in blankets. Sheesh.

Wimps :). So when do the 30NC afterburners kick in Hog?
Well, I am working on the last wall of stone in the bedroom, then I can get the flooring down, and I am contemplating changing the flooring I planned to install in the office.
It a southern facing room, and was looking at some sweet looking 16" x 16" black granite tiles at HD last weekend. Was going to use that for a hearth, then install the laminate flooring around it. Was also thinking of raising just the area under the stove very high, so high I could stand up straight & load it, and save my back some pain. Then cultured stone around the sides of the platform. I am pretty set on the raised platform now, but have been thinking of installing the black granite on entire office floor, which is next to the entrance, so I would have to do the entrance in it also. I think I remember it being $3 something a pc, so it would prolly be somewhere around a grand to do in those areas area. I already have the laminate for it. But the black granite would give some great passive solar heat in the winter. I just can't make up my mind. Any suggestions?
 
If the granite is textured, it should work ok, but I wouldn't put it on the floor if it was glossy. With wet shoes or boots, it could become a skating rink. Not fun if you're toting in an armload of wood. If it does have good texture for flooring, then I would consider adding a contrasting border made of smaller tiles in a simple geometric pattern. The border could wrap around the hearth and look pretty trick.
 
BeGreen said:
If the granite is textured, it should work ok, but I wouldn't put it on the floor if it was glossy. With wet shoes or boots, it could become a skating rink. Not fun if you're toting in an armload of wood. If it does have good texture for flooring, then I would consider adding a contrasting border made of smaller tiles in a simple geometric pattern. The border could wrap around the hearth and look pretty trick.

Its pretty smooth. If I was going to use it, I would put a entrance mat or rug at the doors, and maybe a small area rug in the center. Kinda defeats the purpose I guess.
I think I will stick with the laminate which is a Dupont Real Touch, and is also a stone pattern, more grays though. I'll do the hearth in the Granite to meet the laminate flooring level, but also raise the hearth just under the stove, do the sides walls of the raised portion in cultured stone, and the top again in granite. Less costly, and might actually look pretty good. I def want it raised high enough that I can load while standing up. Back has been not cooperating very much lately, and putting off getting cut open for as long as I possibly can. Processing the wood alone makes me pay for days afterward, but I truly love doing it, so its fair trade off while I still can do it.
 
Hog, not to change subjects, what kind of burn times should I be getting loaded with red oak n/s split mixed with non-split?
 
Asked and answered many times, search and ye shall find.

But burn time and effective heating time are subjective and house/location specific.

But you should easily be able to load the Summit at bedtime, and be able reload it without kindling in the morning, I have been able to relight without much effort over 12 hrs if the box was stuffed and closed down for the day.
 
Wacky1 said:
Hog, not to change subjects, what kind of burn times should I be getting loaded with red oak n/s split mixed with non-split?

Wacky, Madison pretty much summed it up.
Depends on many things, insulation in the house, outdoor temps, wind, draft etc.
When it is warm like today, I am still looking at some solid red coals from about 13 hours ago.
Now in the colder weather, it burns down quicker it seems to me. Maybe a stronger draft also.
You should have no prob loading before bed, and having plenty of coals to restart at reload in the morning.
Larger splits & rounds will yield longer burn times.
One problem you may find with all oak, is lots of coals.
 
Hogwildz said:
Wacky1 said:
Hog, not to change subjects, what kind of burn times should I be getting loaded with red oak n/s split mixed with non-split?

Wacky, Madison pretty much summed it up.
Depends on many things, insulation in the house, outdoor temps, wind, draft etc.
When it is warm like today, I am still looking at some solid red coals from about 13 hours ago.
Now in the colder weather, it burns down quicker it seems to me. Maybe a stronger draft also.
You should have no prob loading before bed, and having plenty of coals to restart at reload in the morning.
Larger splits & rounds will yield longer burn times.
One problem you may find with all oak, is lots of coals.

OK, that is what I am getting timewise, and yes, lots of hot coals. Just checking to see if it gets really cold if I would be able to open it up a little and still get 10+ hrs. I have had it shut down since Friday morning and the concrete below the hearth is still warm!! Thanks! ;-)
 
Status
Not open for further replies.