What to do w/ creosote?

  • Active since 1995, Hearth.com is THE place on the internet for free information and advice about wood stoves, pellet stoves and other energy saving equipment.

    We strive to provide opinions, articles, discussions and history related to Hearth Products and in a more general sense, energy issues.

    We promote the EFFICIENT, RESPONSIBLE, CLEAN and SAFE use of all fuels, whether renewable or fossil.
Status
Not open for further replies.
Gooserider said:
Well, have had the VC Encore that replaced our old smoke dragon for a couple years now, and while I'm probably burning less wood, I can't say that it was as much of an improvement as I was hoping... It also has not done as good a job of keeping the chimney clean as I would have hoped...

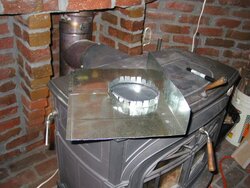
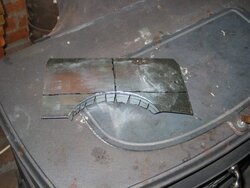
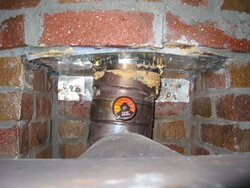
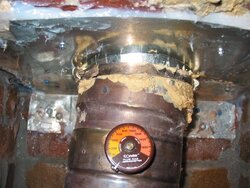
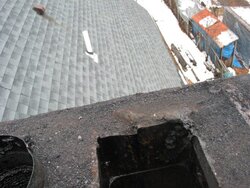
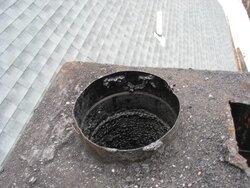
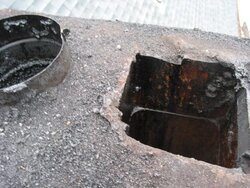
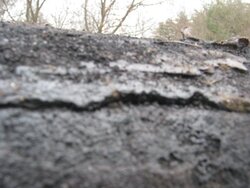
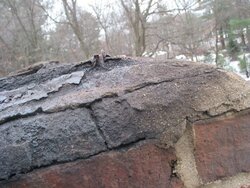
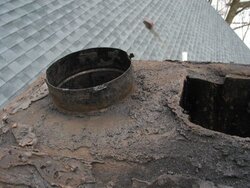
Both last year and this year, when I cleaned after one winters burning, probably about 5 cords of mixed hardwoods, mostly well seasoned (HF moisture meter typically showed about 16%) I got enough creosote out of the chimney to mostly fill my 16 gallon shop vac.... Probably at least 60-80% was in the top 10 feet of my 25' chimney, which is the part that sticks out of the roof. This last part was so bad that initially I could not get my 6" poly brush up through the liner, I had to get a second 6" steel brush and trim the bristles on it down to a cone shape about 3" on the top and 5.5" on the bottom. After running that through (with difficulty) a couple of times, I could then get the poly brush through. (again with difficulty)

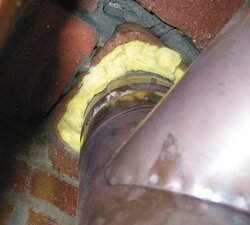
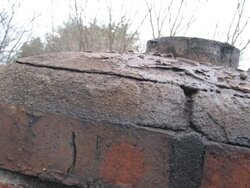
I'm sure I would benefit from trying to insulate the liner, but I'm not sure how - the chimney is clay tile lined with 8x8 tiles, and barely has room for the 6" SS flex liner. (How long do flex liners last anyway, this one is at least 15 years old, and I strongly suspect is original to the ~30 yr old house - but has only gotten heavy use for the last 3-4 years) Certainly it doesn't have room for a blanket liner, and I don't know if I'd even be able to do poured insulation unless it was really thin stuff...

However right now my main question is what, if anything I should do with the several gallons of black crunchy type creosote that I've got in the shop vac? It's supposedly unburned fuel, can I "reburn" it by adding small amounts at a time to the stove and get my heat back out of it?

If that doesn't work, does it have any value as fertilizer / compost material in the vegetable garden?

Any other practical uses, or should I just put it out for the trash guys to deal with?

Gooserider

Yes.
 
Yup, you got two options: 1) fix that liner or 2) open up "Gooserider's Organic Creosote Compost/Wood Preservative/BBQ Flavoring Wholesale Factory Outlet". I expect supply will continue to exceed demand until the 30% creosote tax credit is enacted. Look for it on page 13,182 of the cap & trade legislation.

:) :) :)
 
You said most of the creosote was at the top 10' and I can see why, there is about that much chimney exposed. I would try stuffing rock wool insulation around the top and bottom of the liner and let the air space between become the insulator.
 
Good idea to insulate top. I think rock wool just by itself may allow airflow. I would make sure the top and bottom have sealed metal plates.
 
If Gooserider has a problem with creosote forming in his liner why would putting a "Block off Plate" help. By not having the "Block off" the stove is keeping his chimney/liner warmer!
If you have never been on top I bet your cap needs to be sealed again. I put some insulation on my top cap before sealing it up. I think your problem is your by-pass not sealing and thats why you are getting a dirty liner with the cat engagaed.....
 
I don't get much out of my chimney, but I burn what I get. It seems to burn well. Waste not, want not.
 
Lanning said:
If Gooserider has a problem with creosote forming in his liner why would putting a "Block off Plate" help.
This is based on the assumption that makeup air is being sucked down the gap between the liner and the clay tile. If warm air was going out instead of cold coming in, then it wouldn't cool the liner as bad and might actually warm it.
 
Lanning said:
If Gooserider has a problem with creosote forming in his liner why would putting a "Block off Plate" help. By not having the "Block off" the stove is keeping his chimney/liner warmer!

The top of his chimney is cold. Yes, warm air will rise around the liner but will quickly be cooled by the surrounding brick. As the air loses heat to the cold brick (and the outdoors) it then sinks back down. My understanding is that by having both top and bottom sealed the dead air space will provide better insulation than having just the top sealed (which keeps air in but still permits convective flow within the chimney and thus more heat loss through the masonry).
But correct me if I'm wrong - I don't know if that's actually the case or just an assumption I've made by misinterpreting posts on this forum!
 
Gooserider:

To make that much creosote, the stove _CAN'T_ be burning right. Even without the (retrofit) catalyst in use, my smoke dragon has never made more than a single (full) grocery bag of creosote a year... burning full time, not always the best wood, not always the best burn practices, somewhere on the order of 3 cords per year.

Something pretty much _HAS_ to be wrong with the stove... the cat should be burning most of the volatiles that created all that creosote.

Find the problem with the dang stove... and the block-off plate wouldn't hurt, but the absence of a block-off can't be blamed for the <creation> of the volatiles.

Frankly, I'm amazed - looking at your set-up and noting the amount of creosote you make - that enough loose creosote doesn't fall, fill the tee and block your draft completely during the season. And it sounds like the stuff at the top of the chimney might be hard glazed as well. You could have a walloping fine chimney fire one day... though you might never know it given the 'brick and mortar' flue surround.

Creosote is excellent fuel, and really shouldn't be thrown away. Just bag it (medium size shopping bag) and toss the bag on a hot fire (when the stove _IS_ burning properly again), engage the cat and enjoy the heat.

(Or was your original post tongue in cheek?)

Peter B.

-----
 
Peter B. said:
Gooserider:

To make that much creosote, the stove _CAN'T_ be burning right. Even without the (retrofit) catalyst in use, my smoke dragon has never made more than a single (full) grocery bag of creosote a year... burning full time, not always the best wood, not always the best burn practices, somewhere on the order of 3 cords per year.

Something pretty much _HAS_ to be wrong with the stove... the cat should be burning most of the volatiles that created all that creosote.

Find the problem with the dang stove... and the block-off plate wouldn't hurt, but the absence of a block-off can't be blamed for the <creation> of the volatiles.

Frankly, I'm amazed - looking at your set-up and noting the amount of creosote you make - that enough loose creosote doesn't fall, fill the tee and block your draft completely during the season. And it sounds like the stuff at the top of the chimney might be hard glazed as well. You could have a walloping fine chimney fire one day... though you might never know it given the 'brick and mortar' flue surround.

Creosote is excellent fuel, and really shouldn't be thrown away. Just bag it (medium size shopping bag) and toss the bag on a hot fire (when the stove _IS_ burning properly again), engage the cat and enjoy the heat.

(Or was your original post tongue in cheek?)

Peter B.

-----
No I really did want to get advice on what to do with the collected creosote, though this discussion has taken on a bit of a life of it's own...

At any rate, I'm starting to work on making a blockoff on the bottom. I figure that it can't hurt, and might help with some of the stuff...

As a "mystery deepens" item - yesterday (10/31) was an extremely warm day for the season, and also very windy... I had loaded a bunch of wood in when I got up, before realizing how warm it was and so we had a fire going that really wasn't needed, but did have it damped down a fair bit. The wood may have been a bit on the moister side as well, it was "chunk wood" that I didn't cover until recently... The GF and I came out into the living room, at one point and found the room was smoky and fire smelling - in room CO detector read ZERO - I checked immediately... I turned up the thermostat on the stove, and the smoke seemed to improve. I checked the non-burning stove in the basement, and the basement air was clear, so I don't think we were backdrafting down the second flue. I also couldn't see any sign of smoke coming out from the Encore - all doors were tight, and no sign of smoke coming out the back... Only possibilities that occur to me are that either the top seal on the liner is bad (as many have suggested) and smoke was coming back down the outside, or the wind was reversing the draft on the stove and blowing smoke out the air inlet...

Currently I have just bought a section of 26g galvanized ducting to make the plate out of. I couldn't find any rock wool or equivalent at either the local hardware store or Home Despot, but I did find some fiberglass pipe sleeving rated for steam pipes - the really high density rigid stuff, that I plan to stuff up between the liner and the tile. I want to get as tight a seal on the bottom as I can, so that if / when I get up to the top, I can pour the stack full of vermiculite or equivalent without it leaking out the bottom...

Gooserider
 
Gooserider:

An added note...

For those saying cold air on the flue lining; and/or for those suggesting air intrusion into the lining.

I have (on 'top' of my own smoke dragon) a not-quite-to-code 3' section of black pipe between two sections of Class A stainless downstairs/upstairs allowing both substantial cooling as well as some air intrusion which almost certainly promotes more creosote formation that I would have otherwise.

But my stove isn't an EPA model or a model of clean burning, for that matter... and as mentioned, I don't get near the creosote build up that you claim.

If I had an EPA stove, and I had a comparable amount of creosote formation, you betcha I'd be looking carefully at the stove, my burning practices or the wood moisture... before looking for other causes.

I've been known to be wrong.

Peter B.

-----
 
In mentioning all the possible flue problems, I have to agree that the prime suspect would be the stove. My Dad used to get creosote like that when he ran a 70s airtight VC Defiant into an unlined exterior brick chimney (yes, he had a fire). It was all bad - stove burning unseasoned wood too slowly into a flue that was too cool.

How does the stack look outside when you burn with the bypass shut - any smoke, or clear?
 
[quote author="Gooserider" date="1257049656"]First off, I don't have a "slammer" -

Sorry for the poor communication skills,,,trying to avoid getting "windy" i sometimes write poorly enough so that others have to
read too hard for my meaning. (see what i mean?)
It`s my house i was referring to about the "slammer". Why haven`t I fixed it yet? Been in a wheel chair, then on crutches, finally down to a cane since shortly after i found the forum! That was one mean old oak tree, that took me out. I`ll get even with it soon enough, when the BTU`s go to work for me!

Having never asked the question,,i thought that the shiny , glazed over creosole deposits, was the creosole...and that the large, light , flaky chunks i got from a sweep , were the end results of that glaze having ignited. (silly me)

That "brick rockett" is unique indeed
 
Me Thinks = MAGIC HEAT = Problem Solved

:)

Sorry, I couldn't help myself.

Seriously, if the liner is suspect, wouldn't a better choice (once the GF gets a job) to replace it with an insulated 5.5"?

And to answer your original question, with that much creosote, I'd send it to the dump.
 
wendell said:
Me Thinks = MAGIC HEAT = Problem Solved

:)

Sorry, I couldn't help myself.

Seriously, if the liner is suspect, wouldn't a better choice (once the GF gets a job) to replace it with an insulated 5.5"?

And to answer your original question, with that much creosote, I'd send it to the dump.

Magic Heat as a solution is kind of like the spoof laundry adds I remember seeing as a kid - "See ugly shirt with stain... Wash it in New Super Kleeno, ugly shirt is gone, stain is still there..." - Substitute - See chimney full of creosote, add Magic Heat, house & chimney gone, creosote still there... :lol:

A better liner would be a good idea, but in the meantime, I hope that a blockoff plate will help... It might even be reuseable when I get the new liner...

Speaking of blockoffs, I have started on it, and made some progress, but trying to fasten it in place is driving me nuts - I seem to have a chimney made from bricks that are either 'bullet proof' or "crumble on contact"...

I have some Tapcon screws, and some of those expanding rivets... The expanding rivets don't seem to hold at all. The tapcons on one side seemed to go in perfectly. The other side would either not tighten up, or on the last one litterally melted the tip of the drill bit...

Frustrating as all get out... However I think I've got a decent setup once I manage to get it secured properly.

Gooserider
 
i watched as a friend knocked a firebrick loose from the mortor as he attempted to put a bird screen on the top of his chinmey,,Using an 18 v. Dewalt.Tapcons work great with a perfect hole, and not too much torque on the final tightening (snapped a few heads off). Sounds like your bit got dull on the first hole and walked around enlarging the second hole while drilling.
So my question is: Would it be best to drill the mortor joints when the time comes to install my block-off,,or is this stuff bullett-proof also?
 
ml said:
i watched as a friend knocked a firebrick loose from the mortor as he attempted to put a bird screen on the top of his chinmey,,Using an 18 v. Dewalt.Tapcons work great with a perfect hole, and not too much torque on the final tightening (snapped a few heads off). Sounds like your bit got dull on the first hole and walked around enlarging the second hole while drilling.
So my question is: Would it be best to drill the mortor joints when the time comes to install my block-off,,or is this stuff bullett-proof also?

I got a couple holes on the bad side that didn't work, before I did the one on the good side that did... Part of the not so fun part is that the space is really difficult to get into with a drill, or even just bare hands... Brick on two sides, the pipe on the third, and the stove in front... I have a nice 1/2" Milwaukee hammer drill, but the thing is really long, which doesn't help any...

Gooserider
 
Bringing this back up, I finally dumped the camera onto the computer, and have some photos of the bottom block-off plate that I made... I have also been having some white knuckled adventures up at the top of the chimney - will also post some more about that...

The first shot is looking up the bottom of the stack past the tee on the back of the stove to where the SS liner goes into the clay flue liner... The tile edges are not completely flush with the bricks, but are pretty close. The masonry and bricks aren't all that even either.

The second shot is from the other side of the stove, and shows how I stuffed the gap between the tile and liner full of fiberglass pipe insulation - note the yellow stuff...

After stuffing, I cut this first piece of sheet metal out of a section of 26g metal duct that I got at the local hardware store - the square metal section on the back is a "factory bend" and will go up against the back wall of the chimney area. The hole was cut to fit around the SS liner, with the flaps to allow clamping it around the pipe. The split in the center will be covered by a second piece

Once I got it cut, I had to test fit it, this is one of the later test fits, just before I did the final install.

After I got it to fit, I applied LOTS of refractory cement and silicone, and got it up in place.

Then I cut the second piece to go around the front of the pipe and seal the slit in the first piece.

Finally I got it all in with a couple shots of the finished installation. It looks rather sloppy, in terms of the silicone and cement drippings, but it doesn't really show unless one is really crawling around near the stove and looking up. You can't see any of it from above, and even looking in it's mostly shadowed pretty heavily.
 

Attachments

  • IMG_3684.jpg
    IMG_3684.jpg
    58.4 KB · Views: 187
  • IMG_3693.jpg
    IMG_3693.jpg
    27.7 KB · Views: 155
  • IMG_3698.jpg
    IMG_3698.jpg
    59.7 KB · Views: 191
  • IMG_3701.jpg
    IMG_3701.jpg
    52.7 KB · Views: 168
  • IMG_3702.jpg
    IMG_3702.jpg
    62.4 KB · Views: 184
  • IMG_3704.jpg
    IMG_3704.jpg
    49.2 KB · Views: 175
  • IMG_3706.jpg
    IMG_3706.jpg
    65.8 KB · Views: 192
  • IMG_3708.jpg
    IMG_3708.jpg
    60.7 KB · Views: 192
The bottom block off plate seems to have helped a little bit, but not very much...

One of the other things I wanted to do is to pour the space in between the stainless steel liner and the flue tiles full of vermiculite so as to insulate the stack, especially the part of the chimney above the roofline, and thus reduce the amount of creosote condensing there.

I also got a couple of Proper-topper "Extendaflue" caps from Craig, so that I can get the two flues in the chimney to exit at different levels (currently they both exit at the same level) and thus hopefully make sure that I don't get any drafting from the living room flue going down the flue to the basement stove, as seems to happen on occasion now...

After gathering the materials, I spent a fair bit of time chasing a friend who is a painter, and also does chimneys on the side, hoping he could do this... I finally got him up there yesterday, and he got the existing double cap off (with much difficulty) but was not able to go further - He left the ladder up for me, and I went up there this morning and did some white-knuckle cleaning around the chimney top, and took some photos that I'll be attaching...

The problem is with the crown of the chimney...

As I understand the normal construction of a chimney, the clay tiles are supposed to stick up out of the crown an inch or two, and the plate that closes off the top of the flue with a liner should be removable (although perhaps not easily...) If this is the case, my approach would have been fairly easy - pull the top cover off the liner, pour in the vermiculite, put the cap back on, and then put the extendaflues on and clamp them to the exposed clay tiles as they are designed to do...

The crown on my chimney appears to have been made in two layers. Presumably the bottom layer would look like the standard construction, but then a second layer appears to have been added that covers the top plate of the liner, and the exposed tile on the basement flue... The guy that I had go up there said he was neither qualified nor comfortable with the idea of trying to chip off the upper layer of the crown, and I have decided that doing useful work while hanging onto the top of a rickety 40 foot ladder is not something I can do either... In addition I am not sure it is at all wise to attempt doing masonry work in this weather - I want the stuff to set up, not freeze up...

Right now, I have no cap on either flue, but the crown appears to be in decent shape overall - I think I can get through the winter the way it is... After burning season is over, I will find a more qualified sweep that can do masonry repairs and have him work over the crown of the chimney to get everything done right.... (Suggestions welcome, though I have one person in mind...)

Now for the photos - Sorry they are a bit disjointed, but it was the best I could do while hanging onto the ladder with one hand, and waving the camera around with the other... Between the various shots you should see the two openings for the flues - the square opening is an 8" x 8" tile that serves the basement stove (which is almost never burned) while the round one is a 6" SS liner that connects to the stove in the living-room. The living room flue is about 25' tall, the basement flue is 30-35'. You can also see the crown, and the apparent seam between the layers, and a closeup of the seam at one point...

I am very interested in any ideas on how best to deal with this, other than the approach I suggested of getting the crown reworked...

Gooserider
 

Attachments

  • IMG_3717.jpg
    IMG_3717.jpg
    64 KB · Views: 168
  • IMG_3719.jpg
    IMG_3719.jpg
    65.1 KB · Views: 187
  • IMG_3721.jpg
    IMG_3721.jpg
    42 KB · Views: 187
  • IMG_3732.jpg
    IMG_3732.jpg
    61.5 KB · Views: 195
  • IMG_3724.jpg
    IMG_3724.jpg
    72.4 KB · Views: 179
  • IMG_3727.jpg
    IMG_3727.jpg
    41.8 KB · Views: 169
  • IMG_3729.jpg
    IMG_3729.jpg
    68.6 KB · Views: 175
  • IMG_3730.jpg
    IMG_3730.jpg
    62 KB · Views: 177
From what i recall from, " Show us your beard Day at school",, you are a full grown version of me,perhaps a little more hair as i tend to reflect sunlight,, good job on tackling that enclosed space, particularly along the back, tight quarters for sure! You must be in good with craig, as last i checked there was a minimal quantity purchase on those extend a flue`s,, (I too am in need of doing the same thing for the same reasons) Forty footers get hard to move,,Don`t they?
Can`t help you much gooserider,,but thanks for the update,,,come on Craig,,chime in!
 
ml said:
From what i recall from, " Show us your beard Day at school",, you are a full grown version of me,perhaps a little more hair as i tend to reflect sunlight,, good job on tackling that enclosed space, particularly along the back, tight quarters for sure! You must be in good with craig, as last i checked there was a minimal quantity purchase on those extend a flue`s,, (I too am in need of doing the same thing for the same reasons) Forty footers get hard to move,,Don`t they?
Can`t help you much gooserider,,but thanks for the update,,,come on Craig,,chime in!

You need to do your own deals with Craig on that - I got a little non-standard treatment because of the title under my name, not sure what he would do for regular users.... I will say the Extendaflues are a bit on the heavy side, but are very solidly made and look great...

Gooserider
 
Status
Not open for further replies.