Harman Accentra "Gummy Stove" syndrome solution

  • Active since 1995, Hearth.com is THE place on the internet for free information and advice about wood stoves, pellet stoves and other energy saving equipment.

    We strive to provide opinions, articles, discussions and history related to Hearth Products and in a more general sense, energy issues.

    We promote the EFFICIENT, RESPONSIBLE, CLEAN and SAFE use of all fuels, whether renewable or fossil.
Status
Not open for further replies.

vferdman

Member
Aug 17, 2007
74
South Hadley, Mass
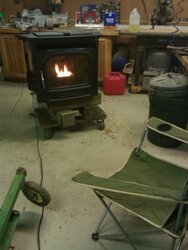
I have struggled with my Harman Accentra-2 stove for 2 months since I got it used. The problem was constant shut downs with 6 blink error code in low demand situations. I have tried many different things, but the final thing that was actually the real cause of the problem was that my stove had the dreaded "Gummy Stove" syndrome, which caused the pellet feeder to become partially obstructed and not be able to feed pellets at a low rate.

See these threads to read all about the problems and various attempts to fix them:

https://www.hearth.com/econtent/index.php/forums/viewthread/48122

https://www.hearth.com/econtent/index.php/forums/viewthread/49226

I finally managed to fix the problem. This thread will be dedicated to describing the solution to the "Gummy Stove", so please go and read the other threads (they have pictures of what a gummy stove looks like) to learn about the problem.

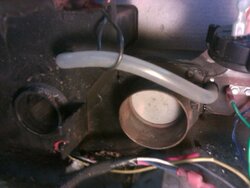
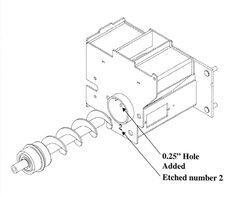
The solution had to be two fold. First order of business was to clean out the gummy build up from the feeder. Second was to modify the stove so as to prevent the build-up of gunk in the future. This problem is well known, especially in Accentra stoves. The solution has been known for a while also. A bypass tube can be added between the intake air inlet and the feeder to create an air stream from the back of the auger tube to the front thereby eliminating the combustion gas build-up in that tube.. In fact, in 2007 Harman changed the design of the feeder slightly to incorporate this solution. Harman's factory design modification achieved the same exact end as the bypass tube, but is much more simple and elegant than the tube. I will talk about this later in this post.


1. The cleaning

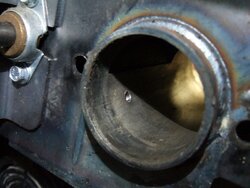
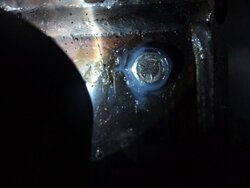
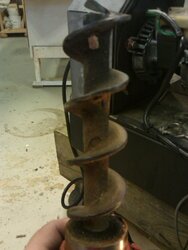
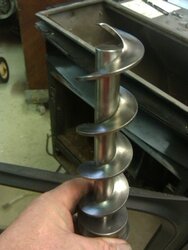
Cleaning the stove was more involved than the actual modification. It turns out that the gummy build-up is water soluble. So, to clean it I removed the auger and the burn pot, emptied the hopper of any pellets and made sure the pellets were gone from everywhere else I could reasonably get to in the stove. I also removed the slide plate and soaked it in hot water for an hour or so, then wiped it clean and dry. It ended up looking real clean with no traces of gummy crap left. I then used 2" plumbing test plugs I bought at Home Depot to plug up each end of the auger tube. I also stuffed a bunch of rags where the slide plate would go in. I then used an empty pellet bag that I cut up into a large piece of plastic to cover the motors and electric stuff in the back (I used masking tape to hold the plastic where I wanted it). Then I poured boiling water into the hopper and let it sit for 15-20 minutes. Then I opened the test plug at the front of the auger tube and dumped the contents into an empty container (old coffee can). I then repeated the procedure. between the first and second filling/dumping I used a toilet brush to pull through the auger tube. Then I used an old bottle brush to get into the "windows" and get more stuff out from the feeder. LOTS and LOTS of crap came out and it was stinky. I kept old towels spread out around the stove to sop up the stinky mess. It took a while, but I got all the gunk out eventually. I then let the stove sit for 24 hours before assembling to make sure that everything is dry.

Re-assembly required a new burn pot gasket ($3 at the dealer), so if you do this, make sure you have one before you start. Getting igniter wires back in was a bit fiddly, but not so bad. I used a piece of cord to push through the hole at the back all the way to the front. Then I taped (masking tape) one of the igniter wires to the cord and pulled it back with the cord. I then repeated the process for the second wire. Plugged the wires back in and put them where they belong, sealed the plug with blue RTV.

To be continued... (ran out of space)
 

Attachments

  • FactoryUpdate3.jpg
    FactoryUpdate3.jpg
    26.4 KB · Views: 2,769
  • FactoryUpdate2.jpg
    FactoryUpdate2.jpg
    26.5 KB · Views: 2,721
  • FactoryUpdate1.jpg
    FactoryUpdate1.jpg
    36.4 KB · Views: 2,832
  • BypassTubeMod.jpg
    BypassTubeMod.jpg
    50.5 KB · Views: 2,826
...Continued

2. The modification

This mod has been done with a bypass tube by the stove techs for years and they are very familiar with it. So familiar, in fact that the mod I did, which replicated the new auger tube design is looked upon as something "untried" and/or "unproven". Well, I have tried it and I have proven it at least in my case. I have thought about the two mods a lot before undertaking any action and decided that the two mods are exactly the same thing as far as aerodynamics of the stove are concerned. This is not a case of two different pronceples, this the case of exactly the same thing accomplished by two different methods. So, the bypass tube mod is, in my mind, every bit as effective as what I did and really, there is no difference between the two save for the methods. The reason I chose the method I chose is because I deemed it easier to do and more elegant looking. Actually, there is absolutely no sign of any modification from the outside. You need to remove the auger to see the mod or if you remove the slide plate cover when cleaning out the fines you will see a strange bit there. So, with all that out of the way, let's see what the principle of the modification is. The idea is to create a small amount of air flow from the back of the auger tube to the front where the burn pot is. This will prevent the combustion gasses from lingering in the auger tube and entering the feeder above the auger and eventually into the hopper. In order to create this air flow a hole is drilled in the feeder body and some air from the intake stream is introduced to that hole. this is what the bypass tube does. In the bypass tube mode a hole is drilled in the feeder body just above the auger and then one hole is drilled in the intake body. Then the two holes are connected by a hose or a pipe (3/8" in diameter). That's all. The air from the intake body gets split about 70% / 30% between the combustion (burn pot) and air wash of the window, so now a small amount of that 70% for the combustion is routed to the back of the auger tube and eventually makes it to the burn pot as well, but carrying with it some of what would cause gummy deposits. So much for the bypass tube mod. Now for the mod I have made. It so happens that just under the auger is the channel that carries the above-mentioned 70% of the intake air from the inlet to the burn pot. A well-placed hole ends up letting air directly from that air channel right into the auger tube at the back. This is the alternative to the bypass tube mod. A well placed 1/4" hole creates a shunt between intake combustion air channel and the back of the auger tube. To drill that well-placed hole it is easiest to first drill a hole in the outer part of the feeder just under the slide plate actuator shaft. See pictures for clarity. They are very descriptive and if you've ever opened that fines clean-out as you should regularly for cleaning you will recognize the place. After drilling the outer hole (I used a 12" long drill bit, which was the perfect tool), just keep going to the auger tube and drill through that. Once that hole is made, it is necessary to plug the outer hole. I took a 1/4" bolt and cut off most of its shaft leaving only about 1/8" of it below the head. It is really important to make sure that the plug will not interfere with the auger tube hole as the outer access hole and the auger tube hole end up very close together. I think that if I had to do it again, I would drill the access hole a bit lower and that would create more space between the two holes. Anyway, with the bolt head and 1/8" of shaft I used blue RTV to plug up the outer access hole and make sure no part of the shaft blocked the auger tube hole (it didn't, 1/8" long shaft got absorbed by the thickness of metal in the wall of the feeder). I let the RTV set for 24 hours while the stove was drying out from the cleaning. That about does it. No tubes, no signs of mods from outside, same functionality. Stove has been running on low (63 degrees) temp setting for days on end now. No shut downs and no smoke or smell of smoke or anything that resembles smoke in the hopper.

Thanks to all who helped me get this done. Your support is greatly appreciated. I hope that this write up will serve others with similar problems. I have found no single place with all the info anywhere, so I am placing it here as public service.

I am in no way encouraging anyone who is not versed in basic home DIY projects to try this on their stove. If you are not good with your hands and/or tools, not good with understanding simple mechanical and aerodynamic principles, please seek professional help for your stove. I am not in any way responsible for your actions, your warranties, etc. Do this at your own risk.

Pictures are:

1. Outer hole plugged up with a bolt head
2. Windows above the auger tube are clean :)
3. 1/4" hole in the auger tube
 

Attachments

  • DSCF6134.jpg
    DSCF6134.jpg
    59.4 KB · Views: 2,646
  • DSCF6128.jpg
    DSCF6128.jpg
    27.8 KB · Views: 2,529
  • DSCF6121.jpg
    DSCF6121.jpg
    39 KB · Views: 2,498
Nice job! Thanks for sharing.
 
Just to follow up. It's been almost two weeks with not a single 6 blink shut down (not counting when it actually ran out of pellets a few times). I also have not seen even a hint of smoke in the hopper at any level of pellets since I performed the modification. I've been running the stove on very low room temp setting of 63 degrees AND it has not been all that cold outside. This means low demand, which was a problem before. No problems at all (knock on wood)! Just keeps going all day and all night. Outside air has been connected the whole time since the modification.

I think I am ready to call this a success.

Thanks again to all who helped!
 
nice description, but I dont think in two weeks you can tell..........Im hoping you got it though!
 
Lousyweather said:
nice description, but I dont think in two weeks you can tell..........Im hoping you got it though!

Well, I see what you are saying. It takes years to gum up the feeder, but what I mean is this. In the past two weeks since the mod I have not had a single shut down and I have not seen ANY smoke in the hopper. Before the cleaning and the modification I kept getting shut downs every time there was low demand and every time I had less than a third of the hopper of pellets there would be lots of smoke in the hopper, especially if the outside air was connected. I attribute no shut downs to the cleaning I performed and no smoke to the modification. I assume smoke in the hopper is an indicator of gumming process going on. Lack of smoke HOPEFULLY means lack of gumming process. As you said, I hope this is the case and only time will tell. For now I am happy as I have been spending way less fuel keeping the stove operating. It is not in the primary living space, so I rarely need to crank it up to more than 63. When I do it comes up to temp real fast, but most of the time I need it to keep that basement at just above 60, which it does just fine now.
 
glad to see that you've worked this all out. happy burning.
 
Delta-T said:
glad to see that you've worked this all out. happy burning.

Thanks! I appreciate all the help and support. Looked high and low for info on this, but came up blank until people here have pitched in and helped me out with some info and wisdom.
 
pbaehr said:
That looks great do you think it will work on my gummy p38 the fire box looks the same??

If you determine that it's the dreaded "Gummy Stove", then this should work provided that it's the same design. I think it is, but I am not 100% sure. Someone with a P38 should pipe in on that. I know that the Accentra was the most effected by this problem, but that does not mean that other models don't suffer from it. Remember that it's the two part process. First you need to clean out the crud from the feeder (need to remove the auger). This alone will make the stove work properly, but without the modification the symptom will eventually return. So, step two is the modification. Doing just the modification will not get rid of the symptom because the symptom is caused by the build-up of junk in the feeder above the auger. The crud prevents the pellets from being fed properly, especially at low rates. This starves the stove for fuel and it shuts down. Good luck with it. I know I was very frustrated with my stove until I fixed it and now I couldn't be happier with it. It's a really nice stove!

In my case, it has now been over 2 months after the modification and feeder cleaning. The stove did not shut down once! I had it set at 63 degrees in room temperature mode since the fix and to this day it just keeps on working without fail. It has been warming up lately, which means lower demand on the stove, but it has not effected the operation one bit. Runs like a champ. I did give it a good cleaning a few weeks ago just for a good measure. It was DIRTY! What with burning through almost a ton of pellets at one stretch. I only cleaned the normal things mentioned in the manual, not the feeder box (which involves removing the auger) or anything. Just basic maintenance, nothing more. So far so good!
 
Hello all,

I have dug up this thread because I have just purchased a used 2004 Accentra and it has creasote all over the firebox and auger tube. It hasnt reached the fines clean out yet. I think I may need to perform this mod but need clarification on it. Is the OP just drilling one .250 hole at the upper end of the tube. Sorry if its a dumb question but what can I say I'm thick as a brick. Is there anything I can use to cut the creasote with? It just seems to smear around. Thanks.
 
3650 said:
Hello all,

I have dug up this thread because I have just purchased a used 2004 Accentra and it has creasote all over the firebox and auger tube. It hasnt reached the fines clean out yet. I think I may need to perform this mod but need clarification on it. Is the OP just drilling one .250 hole at the upper end of the tube. Sorry if its a dumb question but what can I say I'm thick as a brick. Is there anything I can use to cut the creasote with? It just seems to smear around. Thanks.

To perform the mod two holes are drilled, but only one hole remains open in the end result. The first hole is drilled to gain access to the auger tube from the weldment. After the auger tube hole is drilled the access hole is plugged up. See my pics above where I used a bolt with RTV to plug up the first hole. Once you get into the stove to do this job it will make sense. The diagrams above are very clear. The first hole is drilled in the auger tube weldment, then through that hole the auger tube is drilled. Then the weldment hole is plugged up. Hope that's clear.

But let me ask this. Do you know for sure this stove has a problem? I would not jump into doing the mod unless I knew for sure that the stove is a "gummy stove". Not all 2004 stoves had a problem, you know. Creosote on the fire box is the most normal thing in the world. The problem stove's symptom is not creosote at all. It is gummy deposits on the sliding plate and in the feeder box above the auger. This gummy stuff is NOT creosote. In fact, it is unburned resins from the pellets. The problem stove will force some unburned gasses back up the feeder box and they will accumulate there eventually causing problems with pellets properly feeding down to the auger. The sticky gummy build-up is water soluble and looks nothing like creosote. If I were you I would remove the slide plate from the feeding mechanism and examine it. If it does not have the gummy build-up, you do not have a problem. Also, try using the stove and see if you get unwarranted shut-downs. If not, you are in good shape. Don't go rushing into a fix of something you are not sure is broken.
 
I want to do this now, so I don't have to shut down my stove and try and disconnet the pipe in the middle of a January cold snap. It's more preventative. I'm not sure if I have the issue or not for certain all I know is that the inside of the stove and auger is covered with gummy soot that I cannot wipe away with anything. It just smears all over the place. When I test burned the unit after I had cleaned it the best I could, I saw alot ov smoke coming from the underneath the burn pot. I guess this is the sooty substance burning. Is the slide plate you are refereing to the plate that you remove to clean out the fines? If so I have removed it to clean and there were dry fines in there but no soot. Is there any harm in doing this now while the stove is disconnected and readily accesable for modifying? To be honest I don't think this stove has been used all that much. Its dead quiet when running and other then the soot it looks absolutely new everywhere else. My other stove, which I am replacing with this, is a Quadrafire Mt Vernon. In the 3 years that I have had it I have not had one sign of anything black or sooty anywhere in this stove. Rust is another story.
 
3650 said:
I want to do this now, so I don't have to shut down my stove and try and disconnet the pipe in the middle of a January cold snap. It's more preventative. I'm not sure if I have the issue or not for certain all I know is that the inside of the stove and auger is covered with gummy soot that I cannot wipe away with anything. It just smears all over the place. When I test burned the unit after I had cleaned it the best I could, I saw alot ov smoke coming from the underneath the burn pot. I guess this is the sooty substance burning. Is the slide plate you are refereing to the plate that you remove to clean out the fines? If so I have removed it to clean and there were dry fines in there but no soot. Is there any harm in doing this now while the stove is disconnected and readily accesable for modifying? To be honest I don't think this stove has been used all that much. Its dead quiet when running and other then the soot it looks absolutely new everywhere else. My other stove, which I am replacing with this, is a Quadrafire Mt Vernon. In the 3 years that I have had it I have not had one sign of anything black or sooty anywhere in this stove. Rust is another story.

I am not sure if it will hurt anything to mod the stove that does not have a problem. I wouldn't do it, but that's just me. I don't like to fix that which is not broken. In my experience (I am a professional engineer) that never leads to anything good. All I can tell you is that soot is not what causes problems. The sticky gummy stuff that causes problems is unburned stuff. It is yellow-tan type color and is water soluble. If you have a lot of this stuff built up in the feeder (between hopper and auger) it will cause stove to shut down. This stuff needs to be cleaned with hot water (see my description in various threads). Just performing the mod and not cleaning the sticky stuff will not cure the shut downs. Both cleaning and the mod need to be done to a problem stove. Again, I say a PROBLEM STOVE. If yours is not a problem stove you will waste a lot of time on all this for nothing. This does take some time. To properly clean the feeder, you pour boiling water through the hopper into the feeder having first removed the auger from the auger tube, the burn pot and plugged the tube with pipe plugs. Then you let the water sit there until it cools and dump it removing most or all the sticky stuff. This needs to be repeated until the feeder is free of sticky stuff, then you can do the mod and reassemble everything. You will need a burn pot gasket as the burn pot will need to come off for cleaning. It's a bit of a pain of a job to do all that and i would not do it unless I was sure I had an issue with the stove. As I said before, soot on the auger is not an indication of the problem. Seems it's normal. I would burn through a bag or two of pellets before I jumped to any conclusions. I can also tell you that I did not need to disconnect the exhaust pipe to do any of this. Your installation may be different as far as access, but stove does not need to be disconnected to do the mod. If you want to just do the mod regardless of the presence of the problem and there is nothing to clean in the feeder right now I suppose that can be done in hopes that it will not cause problems later, but I would not do the mod on a healthy stove. If the stove does have a problem, but it's new and has not had a chance to accumulate the sticky stuff, you could go the whole season or two before the problem actually occurs, so I don't think there is a risk of mid-season shut down. Anyway, hope you figure it out and it all works out for the best. It's a great stove once this issue is not an issue. I have been enjoying it very much since I dealt with the problem.
 
I have a 05 Accentra and just last season I started to get the sticky stove. Smoke in hopper. Pulled the auger, cleaned everything I could get to and installed a bypass tube. Last year was the first year I used outside air and was wondering if that was the cause. All clean and painted and anxious to see if the tube makes a difference, I cross my fingers.
 

Attachments

  • get-attachment.aspx.jpeg
    get-attachment.aspx.jpeg
    34.7 KB · Views: 1,470
  • get-attachment.aspx.jpeg
    get-attachment.aspx.jpeg
    33.9 KB · Views: 1,527
  • get-attachment.aspx.jpeg
    get-attachment.aspx.jpeg
    40 KB · Views: 1,298
  • get-attachment.aspx.jpeg
    get-attachment.aspx.jpeg
    33.3 KB · Views: 1,533
Fire needs to be hotter, more air.
 
Is this common for pre-2007 Accentra's - or is it hit or miss? I'm looking at a used one built in 2004. Was at a house that the guy did not use it much. Went back to a dealer who is cleaning it up. What's a fair price for a used one? Only going to give me 30 days for a warranty. Would the dealer know about this issue?

Was giving it serious thought until I came across this thread on "Gummy Stove" syndrome. Now I'm thinking brand new (has mod) and mfr warranty is the way to go...
 
Have the stove shop install the tube while they have it .Im surprised they didn't suggest it. Or do it yourself. Drill two holes and insert a tube. Not very difficult .
 

Attachments

  • get-attachment.aspx.jpeg
    get-attachment.aspx.jpeg
    33.3 KB · Views: 1,373
Well I put it back several days ago. I'm sure I'll be pulling it out again to install the tube. Should have done that. It's obviously an upgrade. What kind of tube is that? Fuel line or something heat resistant?
 
gtown said:
Is this common for pre-2007 Accentra's - or is it hit or miss? I'm looking at a used one built in 2004. Was at a house that the guy did not use it much. Went back to a dealer who is cleaning it up. What's a fair price for a used one? Only going to give me 30 days for a warranty. Would the dealer know about this issue?

Was giving it serious thought until I came across this thread on "Gummy Stove" syndrome. Now I'm thinking brand new (has mod) and mfr warranty is the way to go...

If you are at all handy and the price on the used one is good, I would go for the used one. The problem with the gummy Accentras is well known and very fixable. Otherwise these stoves are great. Not all older stoves have a problem. A thing to look for is a yellowish ring of deposits at the bottom of the hopper. Also, if you are able to pull the slide plate and examine it for gummy deposits it will tell you if the stove has a problem now. Of course, if the stove was not very much used the symptoms may not have developed yet. But even if they do develop down the line, the fix is fairly simple and reliable. If the price is good, it's worth it. That's my humble opinion. These things are expensive new, I understand.
 
how much is the kit? i guess it must include a couple of threaded ferrels, hose ans some hose clamps. cant be that much. does anyone know the diameter? where to place the holea? do you just eyeball them or does the kit have a templat?
 
3650 said:
how much is the kit? i guess it must include a couple of threaded ferrels, hose ans some hose clamps. cant be that much. does anyone know the diameter? where to place the holea? do you just eyeball them or does the kit have a templat?

If you do the mod I did, you do not need a kit or tubes or anything like that. The 1/4" hole in the auger tube accomplishes the same thing as the bypass tube. The idea is to introduce some induction air (air flow produced by combustion fan motor) into the auger tube. Where exactly the air enters the tube is not important. This air flow prevents the gases from going up the auger tube, into the feeder and hopper. The bypass tube takes some air from the induction chute and sends it into the auger tube. The hole mod does exactly the same thing without any tubes. When you drill the whole as per diagram you create a shunt for the induction air into the auger tube. Either mod does the trick. Whatever you find easier to do is what you do. I have not heard of any kit for the tube mod, but 3/8" tubing is easy to come by. You do not need any ferrules, just use some RTV to cement the tube at both ends. The air traveling through it will not be hot at all (induction air from wherever you get induction air - outside in my case or room ambient) There is not much heat at that part of the stove, so I guess any 3/8" tube will do. I've seen people do it with copper ice maker tubing as well as with clear aquarium pump tubing. Whatever you like. I like the hole mod I did because it eliminates many of these questions and provides a very direct path for air to enter the auger tube. Also the hole mod has no points of potential failure, whereas the tube mod has several. The tube itself can fail, as well as both ends of the tube are points of potential failure and leaks. I found the hole mod much more sound, so that's what I did. So far it's been a season and a half since my mod (and cleaning) was done and no sign of any gummyness or smoke in the hopper. No shutdowns either, so I assume the mod worked for me.

Best of luck.
 
ok thanks for clarification on both mods. i fired the stove for third time since the install. no shutdowns, several wisps of smoke from under the burnpot while burning on high. time will tell if i have a gummy stove. i really like it. its dead quiet compared to the other stoves ive had. i hope it performs well throughout the winter. thanks again.
 
Status
Not open for further replies.