Gentlemen, it's been very interesting reading through the forums. I mainly took interest and found this site off other references on the internet. Mainly because of my latest project.
The issue: While spending the night at my deer camp with my 13 year old daughter, the electricity went out. We awoke to the realization that my electrical heater was not functioning at about 2 a.m. (quite a wonderful feeling). I then realized that it was not in my best interest to rely on heat from electricity when the electricity itself was being supplied to far out areas and was not dependable.
The details: My "deer camp" is actually an 8x20 office trailer that I converted into a two room camper. It has a kitchen area on one side and a bunk area on the other that are connected through an open doorway.
The project: I decided to make a small pot bellied stove that could burn coal or small pieces of wood. I was able to locate an old metal deep well water tank that seemed the perfect size. The picture may seem large, but the tank itself is approximately 18" in diameter and about 24" deep. I shortened the tank a bit from it's original length. After shortening it, I capped it with some 1/4" plate steel. I then had my shop's welder cut a hole and braze a pipe onto the top for venting, (4"). I cut the doorway (9"x9") and did most of the small project welding myself, which included the edging, hinge, latch, heat plate, and legs. I have a grating cut to size for inside to keep the fresh embers off the bottom. I have burned it a few times. It does heat up nicely, but obviously still needs some work. My last item would be cutting the vent into the front. I prefer to cut a square opening underneath the door and use a slide vent. Once I get the whole thing finished off, I'll clean the whole thing up again and paint it a nice uniform stove black. This may seem very amateur,..and it is. However, it is my first stove project and I'm pretty proud of myself so far. I know the trickiest part will be the installation, but I have until next hunting season to get that right.") I'd appreciate your input.
I'd appreciate your input.
The issue: While spending the night at my deer camp with my 13 year old daughter, the electricity went out. We awoke to the realization that my electrical heater was not functioning at about 2 a.m. (quite a wonderful feeling). I then realized that it was not in my best interest to rely on heat from electricity when the electricity itself was being supplied to far out areas and was not dependable.
The details: My "deer camp" is actually an 8x20 office trailer that I converted into a two room camper. It has a kitchen area on one side and a bunk area on the other that are connected through an open doorway.
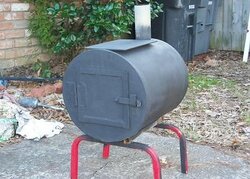
The project: I decided to make a small pot bellied stove that could burn coal or small pieces of wood. I was able to locate an old metal deep well water tank that seemed the perfect size. The picture may seem large, but the tank itself is approximately 18" in diameter and about 24" deep. I shortened the tank a bit from it's original length. After shortening it, I capped it with some 1/4" plate steel. I then had my shop's welder cut a hole and braze a pipe onto the top for venting, (4"). I cut the doorway (9"x9") and did most of the small project welding myself, which included the edging, hinge, latch, heat plate, and legs. I have a grating cut to size for inside to keep the fresh embers off the bottom. I have burned it a few times. It does heat up nicely, but obviously still needs some work. My last item would be cutting the vent into the front. I prefer to cut a square opening underneath the door and use a slide vent. Once I get the whole thing finished off, I'll clean the whole thing up again and paint it a nice uniform stove black. This may seem very amateur,..and it is. However, it is my first stove project and I'm pretty proud of myself so far. I know the trickiest part will be the installation, but I have until next hunting season to get that right.
I'd appreciate your input.