Hearth project

  • Active since 1995, Hearth.com is THE place on the internet for free information and advice about wood stoves, pellet stoves and other energy saving equipment.

    We strive to provide opinions, articles, discussions and history related to Hearth Products and in a more general sense, energy issues.

    We promote the EFFICIENT, RESPONSIBLE, CLEAN and SAFE use of all fuels, whether renewable or fossil.
Status
Not open for further replies.

Snowy Rivers

Minister of Fire
Feb 7, 2010
1,810
NW Oregon
New Hearth coming along very well now.

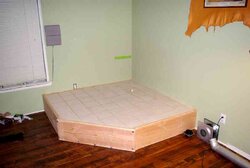
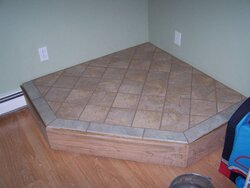
Got up early this morning and got the grouting all done.

Wiped the HAZE off the tile tonight and it looks sweeeeeeeeeeeet.

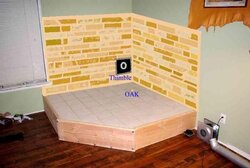
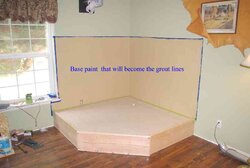
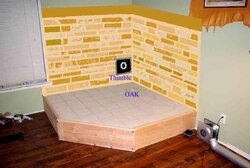
Decided to forgo the rock look panel surround for the area due to the high cost and are going to give a go at doing a Faux stone look using paint and some magic tricks.

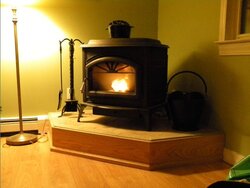
Definately looking forward to the "FIRST FIRE" in the New (to us) stove.

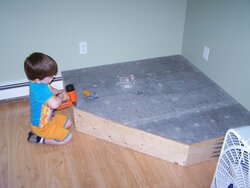
With other mods recently to the room its going to be nice to be able to rearange the furniture now and then.

The hearth is big enough and the stove will sit back far enough that one can plant their tushy on the front of the hearth and warm up while watching the TV.


Tomorrow I am going to start the Paint thing.

WE shall see how it all turns out.

Home improvement, Yeah buddy, what a concept.


Snowy
 
Got a couple piccy's here.

One is the actual setting at present with the grouting all done on the tile.

NOW I took the liberty of tossing the pix into photoshop and giving it a little massage to get a "HOPEFULLY" realistic idea of what the finished "Faux Stone" paint magic will look like when completed.

We have the paint sitting here so I just sort or hacked some colors together in the Pallet on photoshop that would be in the same sort of ball park and fiddled with it a bit.

Even tossed in the wall thimble just for giggles.

Here it is.

Snowy
 

Attachments

  • Hearth with grout done.jpg
    Hearth with grout done.jpg
    16.6 KB · Views: 294
  • photoshop2.jpg
    photoshop2.jpg
    41.4 KB · Views: 317
Thanks for the compliments

I only had to cut 4 tiles. The one where the OAK pipe comes through and the three triangle pieces up front.

Last summer I found a tile saw at a garage sale for $5. It was missing the water pan, the drive belt and the belt guard.

I found a manual online and got the belt number and was able to get one through the auto parts store locally.

The guard is just "KEEP YOUR FINGERS OUT OF THE BELT OK"

The water pump is there so I just put it in a small pan with a hose trickling water in to make up the loss and do the cutting out on the patio where I can wash the tile waste off easily.

Belt cost $12 so the whole deal was $17
Hmmmmm made a tough job easy for sure.


Now after looking over the Photoshop workup, I am excited.

Today I am going to get going on the actual Faux paint work on the wall.

Need to mask off the area and get the Base color done first (Will define the grout lines)

Once the base is good and dry,I can tape off the area that will be the actual grout lines using Blue masking tape (does not stick hard to base paint)

Then its a matter of using a natural sponge to dab the colors onto the areas that will be the stones.

We picked a grout color and 3 colors of BUFF that will be the stones.

I used a dry sample of the grout color and had the paint store scan it with their computer scanner tool and then "HOPEFULLY" match the grout color so the tile grout and the stone wall grout will be the same. ;-)

Once the paint work is all done I may add a trim moulding around the "STONE" area to add a finished look and possibly a little bit of depth too.


I have never seen this up close and personal, only in a video at an online tutorial.

WE shall see.


Going to be fun for sure.

Still looking forward to the real goal. BUILDING A FIRE IN THE NEW (TO US) STOVE.

Hope to have things pretty well wrapped up and the stove in within another week.

Want to be able to use the stove some before the weather warms too much.

The local weather is supposed to be near 60 today. I may be able to get the base off the Advantage 2 T and clean and paint it today or tomorrow after work.

I am going to bring the stove into the house in pieces.

Base
Main body less the cast iron door
Cast door

Will reassemble in place on the hearth rather than have to wrestle the beast in whole.

Also I can keep from messing up the paint job.

If need be I can paint only the base and then repaint the side and top panels come summer when they can dry real good in the hot sun.

I hate the smell of curing paint when your trying to run a new stove for the first time.

Stay tuned for more exciting news from the Ranch as Snowy thrashes away at this project.

This summer I am going to rewire this stove and install some industrial Mosfet timer relays and toss the original control board assembly.

The fire brick in the stove needs a tad bit of loving too. The center panel is worn some in the center areound the drop tube.

Some fire pot cement will take care of that issue and restore the panel to good condition again.

Actually the fire cement is harder and tougher than the original fire brick backing material ever was.


Snowy
 
UPDATE

Got the base coat of paint on the wall now and need to let it dry well before I can start the taping process for the grout lines.

Thinking about using 2x6 for a top border above the rock look.

Here are some more piccy's of things and the concept for the boarder.

Snowy
 

Attachments

  • Base paint.jpg
    Base paint.jpg
    19 KB · Views: 277
  • photoshop2.jpg
    photoshop2.jpg
    42.6 KB · Views: 297
Wanna see something scary? Here's a pic of my hearth right after grouting.

Look familiar?
 

Attachments

  • 100_2283.jpg
    100_2283.jpg
    53.7 KB · Views: 236
Whoa

Looks great.

Did you leave the wall as is or do some magic on it too???


Snowy
 
Winding down for the late afternoon now. Wanted to allow the base coat of paint to dry well before applying the masking tape for the rows of stone.

Went out and got a take and bake Pizza.
The daughter came over to tend to her horse and brought the grandson along (3 yrs old now)

Little fellow has a Bazillion questions about what I am doing. On and off the hearth far more than I would really like. Oh well, to have half his energy eh ??

Likley things are going to be quiet for the rest of the afternoon and eavening now.

Once we get the masking done for the stones, we can sponge paint like crazy.


Later troops

Snowy
 
I left the wall alone. I'm looking forward to seeing how yours comes out.

I could have used that tile cutter you've got. I did all my cuts (lots of them) with a masonry blade on my small table saw.
With all of the tiling that I've done I wish I bought a wet saw a long time ago. I always just figured I could get away without it.

I put my grandson to work.....:)
 

Attachments

  • stove22810.jpg
    stove22810.jpg
    39.1 KB · Views: 231
  • 100_2276.jpg
    100_2276.jpg
    38.7 KB · Views: 224
warmncozy said:
Wanna see something scary? Here's a pic of my hearth right after grouting.

Look familiar?

Yep, pretty scary...the wall is almost the same exact color too :gulp:
 
For sure

See what mine looks like and then you can maybe do the same thing or something with a slightly different twist.

We were going to go with NEXTSTONE but the cost was $40 per each 15"x48" piece.

I could swallow that but, I have a lot of other stuff that I want to do around here come summer like replace several deck boards and some siding on the lower portion.

Stain the entire deck again plus replace some window trim that has warped from 17 years up here in the wind,rain and nasties.

Once the stove project is complete I also ahve a tile floor in the master bath to do. (Been on hold for 4 years) :bug:

Now that I have that cool little tile saw doing that room will be a snap. (Lots of stuff to cut and fit around)

Never a dull moment around this place. Also need to repair the main entry doorway in the main stable. (Past Boarder missed the 8 foot wide doorway with the BOBCAT and took out the door upright and the rollup door track too.

ARRRRRRRRG

Last summer was devoted to rebuilding the diesel engine in the DaHoooooley Pickup truck.

What with being self employed I run out of time.

The other issue is that my patience is inversely proportionate to the amount of time I have been awake, and I generally rise at about 5 am.


4 oclock rolls around and all bets are off. :grrr:

This little home improvement project is the first thing I have done around here other than just maintenance since we finished building the place in early summer 94.

Just got a Bug in my Butt and decided to try my hand at something different.

I was tired of the Old Earth Stove and the PITA it was to clean every week or so.

The whitfield is light years ahead as far as maintenance and cleaning.

With the large area around the stove on the hearth, I can get at everything inside the stove and not have to be cramped at all.


Thinking about some of the hearth tools to place on the hearth for asthetics too.

Maybe a coal bucket, a tool set and other goodies just to make it look cool.

I screen my nut shells as I get them from barrels in the basement and pack them upstairs in 6 gallon wash soap buckets (Costco )

The buckets are all colors depending on what came in them. Looks funky with white, green and orange buckets sitting around but it gets the job done.

Maybe I need to build a little storage cabinet to put the shells (Pellets) in, that would look cool.


AWWWWWE.. Maybe plastic wash soap buckets are not soo bad afterall. :roll:

Snowy
 
Status
Not open for further replies.