Blaze King -- Looking For More Information

  • Active since 1995, Hearth.com is THE place on the internet for free information and advice about wood stoves, pellet stoves and other energy saving equipment.

    We strive to provide opinions, articles, discussions and history related to Hearth Products and in a more general sense, energy issues.

    We promote the EFFICIENT, RESPONSIBLE, CLEAN and SAFE use of all fuels, whether renewable or fossil.
Status
Not open for further replies.

fdegree

Feeling the Heat
Oct 20, 2009
403
Southern Delaware
I am considering building my own hearth for the Blaze King that I plan to buy this summer. While trying to layout a template on the floor (so I can see how large it will be), and create a list of materials, there is some information I can't seem to find.

I plan to get the King Parlor...

1. How much depth does the fan kit add to the stove? I want to get my rear wall clearance correct, and I believe this clearance is 6" with the fan kit installed.
2. What is the required R-value of the hearth? I skimmed through the owners manual that I downloaded from their web site and I didn't see it anywhere...I probably overlooked it somehow.


Thanks!!!
 
Not sure about the parlor, but the fans on the back of the Ultra are about 5". As far as I know, nothing other than spark protection is required for the hearth.
 
fdegree said:
I am considering building my own hearth for the Blaze King that I plan to buy this summer. While trying to layout a template on the floor (so I can see how large it will be), and create a list of materials, there is some information I can't seem to find.

I plan to get the King Parlor...

1. How much depth does the fan kit add to the stove? I want to get my rear wall clearance correct, and I believe this clearance is 6" with the fan kit installed.
2. What is the required R-value of the hearth? I skimmed through the owners manual that I downloaded from their web site and I didn't see it anywhere...I probably overlooked it somehow.


Thanks!!!

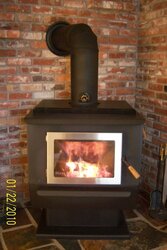
If you buy the Ultra the clearances are as minimal as you can get . I have had mine nice and hot and the hearth is only slightly warm . Mine is the pedestal model. one thing to think of (without knowing your installation) is that the pedestal model is 38 inches to the top of the collar on the stove...hopefully you will have the ability to run 36 inches vertical 8 inch pipe prior to any elbows.
{DRAFT
This appliance may not operate properly if the draft is below .02” of water as measured using a water manometer. Draft
below .02” will cause excessive smoke spillage, incomplete combustion and fire startup problems. Low draft may sometimes
be improved by making a chimney taller, and the use of double wall stove pipe. The use of two 45° degree elbows
in place of 90° elbows is recommended. Exterior chimneys may be too cold to achieve proper draft with these units. If an
exterior masonry chimney is being used it should be lined with a listed stainless steel liner. An external factory built chimney
should be enclosed in an insulated chase.}

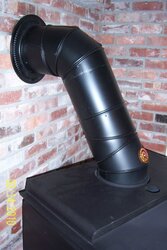
**I can attest to the 2 45's being better than my old single 90 design.
So factor that into any raised hearth you might be thinking about. But as far as hearth requirements i did not see any other than the dimensional requirements for the spark coverage.

{Installation – General Instructions
FLOOR PROTECTOR
The stove must be placed on a floor protector.
A floor protector is a noncombustible surfacing applied to the floor area underneath and extending in front, to the
sides and to the rear of a heat producing appliance.
To provide the proper clearances, the floor protector must extend
18" in front of the loading door opening.
8" from each side of the loading door opening.
KEJ floor protector must be no smaller than 34” x 45".
PEJ floor protector must be no smaller than 32” x 44".
The floor protector must extend to the wall under a wall exit installation and must extend 2” beyond each side of
the horizontal section of chimney connector
Floor Protection—Top View}

excerps are from the manual...as I read it only proper dimensioned non combustable material is called for for your hearth.

Below is a couple of pictures...my hearth is slate and mortar with a brick edge. the pics show the old vert to a 90 and then the 2 45's whcich works much better.

Hope this helps.
 

Attachments

  • 100_1737.jpg
    100_1737.jpg
    48 KB · Views: 596
  • 100_1718-2.jpg
    100_1718-2.jpg
    48.5 KB · Views: 589
hoverp said:
hopefully you will have the ability to run 36 inches vertical 8 inch pipe prior to any elbows.

That shouldn't be a problem for me. I should be able to go straight up through the ceiling and roof with no elbows. I plan to use either double or triple wall pipe...I'm not sure which would be best, so I need to learn a little more about that.

Thanks for the input. This shouldn't be as costly as I was originally expecting.
 
fdegree said:
hoverp said:
hopefully you will have the ability to run 36 inches vertical 8 inch pipe prior to any elbows.

That shouldn't be a problem for me. I should be able to go straight up through the ceiling and roof with no elbows. I plan to use either double or triple wall pipe...I'm not sure which would be best, so I need to learn a little more about that.

Thanks for the input. This shouldn't be as costly as I was originally expecting.

I will be really interested in what you find for smoke out the door on mid burn reloads with the straight application(no elbows to deal with ) please let me know how it performs when you get her running and used to burning with her...
 
hoverp said:
I will be really interested in what you find for smoke out the door on mid burn reloads with the straight application(no elbows to deal with ) please let me know how it performs when you get her running and used to burning with her...

It won't be until next season. I hope to purchase and install the stove over the summer. But, I'll be sure to post how it is working once it is all finished and I've learned the nature of the thing.
 
fdegree said:
I am considering building my own hearth for the Blaze King that I plan to buy this summer. While trying to layout a template on the floor (so I can see how large it will be), and create a list of materials, there is some information I can't seem to find.

I plan to get the King Parlor...

1. How much depth does the fan kit add to the stove? I want to get my rear wall clearance correct, and I believe this clearance is 6" with the fan kit installed.
2. What is the required R-value of the hearth? I skimmed through the owners manual that I downloaded from their web site and I didn't see it anywhere...I probably overlooked it somehow.


Thanks!!!

Here is how I built mine......Complete Overkill :vampire:

I had surgery recently and didn't see this post until just today.


A little over 6" rear clearance (see pic below)

I far exceeded the "R" value of the hearth per my discussion with 2 different employs at Blaze King.

The main hearth (throne ;-P ) is 60" wide x 30" deep........Sized One full sheet of Hardibacker x Three 1/2" thick! No cutting ;-)

The hearth portion that lays close to flush with the wood flooring is 18"x60" (again no cutting of 18" tiles, at least from front to back)


The tile is 3/8" thick Travertine from Home Depot ($2.99 sq-ft)

The Travertine crown is 12" long and costs about $5.00 per Lineal foot.

The raised portion of the hearth was built using wood 2x4s and is engineered to hold 3 times the weight of the King model. Lots of air space and cross members.

So with the 1 1/2" hardibacker and 3/8" travertine your looking at 1 7/8"thick 1.875"

Its raised about 5 1/4" off the floor and that makes the lip of the firebox 26" off the ground for close to "zero bend loading" (here after ZBL™)

I will be turning and milling a decorative matching Goldenfire brown O.A.K. from aircraft aluminium for maximum eye appeal.....


The main hearth (throne tongue wink ) is 60” wide x 30” deep….....Sized One full sheet of Hardibacker x Three 1/2” thick! No cutting
znvimb.jpg


2vtpjlu.jpg


Fans are almost flush with the air intake
ekknzs.jpg


]
2ugcpyu.jpg

2 feet from front of stove to front of hearth! Manual calls for 18"
2dntae.jpg

about 10" from wall to where center the Outside air connection will be located.
2zjg75e.jpg

My design leaves 16" to 17" of side protection or double the called for amount
2wmjre8.jpg

This picture shows the location of the rebel base...oops I mean the OAK and electrical 4" passage to the basement.
dww8kl.jpg

Stone that will go around the edges on the sides
t9tzkg.jpg
 
Thanks for the reply, Hiram. Your hearth is very similar to what I have pictured in my mind. I think I am going to go a little bigger. Plus, I will have to offset my stove to one side due to the roof trusses, but that will allow for storage of wood and a place to put wet items for drying.

The pictures helped a lot!!!
 
fdegree said:
Thanks for the reply, Hiram. Your hearth is very similar to what I have pictured in my mind. I think I am going to go a little bigger. Plus, I will have to offset my stove to one side due to the roof trusses, but that will allow for storage of wood and a place to put wet items for drying.

The pictures helped a lot!!!

I'm glad I could be of assistance. :)

I'm going to build a towel drying rack out of aluminum or 304 stainless.

I love waking up in the morning and having a nice warm towel to dry off with! (plus after the shower, it puts some humidity in the air.

Please post some pictures when/while you build your hearth.

Cheers,Hiram
 
I am by no means as qualified as the folks who have been doing this a while, but I did just finish my hearth and install of my BK ultra. I took a very thorough picture journal of the process if you are interested in seeing the work if for nothjing more than ideas. Hope your project is as enjoyable to you as mine was to me.

Take Care
Mike
 
Michael J said:
I am by no means as qualified as the folks who have been doing this a while, but I did just finish my hearth and install of my BK ultra. I took a very thorough picture journal of the process if you are interested in seeing the work if for nothjing more than ideas. Hope your project is as enjoyable to you as mine was to me.

Take Care
Mike

Mike,
I for one would really enjoy seeing the picture journal.

And looking good my friend.....looking good :cheese:

index.php
 
Michael J said:
I took a very thorough picture journal of the process if you are interested in seeing the work if for nothjing more than ideas.

Mike


Yes please...
 
Status
Not open for further replies.