Everything Fisher

  • Active since 1995, Hearth.com is THE place on the internet for free information and advice about wood stoves, pellet stoves and other energy saving equipment.

    We strive to provide opinions, articles, discussions and history related to Hearth Products and in a more general sense, energy issues.

    We promote the EFFICIENT, RESPONSIBLE, CLEAN and SAFE use of all fuels, whether renewable or fossil.
Status
Not open for further replies.
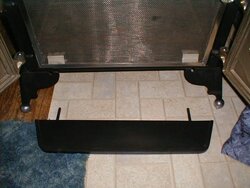
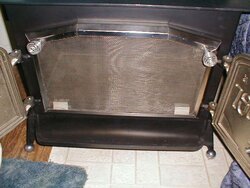
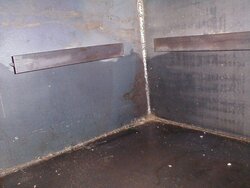
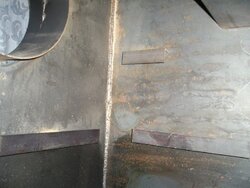
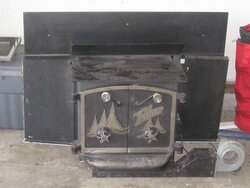
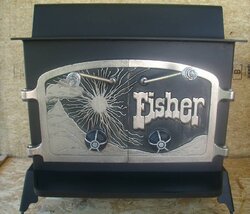
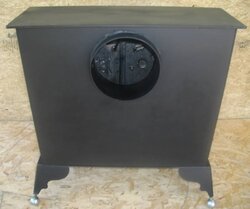
I just joined this forum as I have an older pre 1980 Fisher Wood Grandpa stove that is in need of having the bricks in the back replaced. It is a great stove, the original owner and builder of this house that installed the stove had put in vents above stove which allows hot air to go up into a pipe system where a fan blows it into the second floor frontroom. I live in a two story Lindal and this stove heats the entire house in cold weather and if it is above freezing I usually don't even burn (I live in Southeast Alaska). I love this stove and it is on a beautiful rock hearth I don't want to replace it as the stove pipe on the back goes through the hearth and I think it would be hard to find an exact match. I burned it last winter with about half of the upper back bricks missing and now I notice a large greyish discoloration happening on the back. I am thinking this is not a good thing and want to replace the bricks...my question is can I get the back bricks out without taking the bottom ones out?? It looks a little daunting. There are only two angle irons in the back that hold the bricks in and two on each side. The sides are in good shape, one brick is broken and has started to come out but I think I can push it back down. The back ones are history though...they are all broken down more than half way. We bought this house 12 years ago and only fired the stove up once at that time and it was too hot downstairs for my husband...he passed away 8 years ago and with the oil prices skyrocketing I started burning wood....fell in love with the heat and the stove. I put a message (we call it muskeg messages) on the radio this am to see if anyone in town has experience in bricking or advise on doing it. I received a call from someone this evening who lives in a cabin down on the island next to the one I am on and he is coming to town tomorrow and will take a look at it. I am hopeful that he can help me out and I can get this stove fixed by winter. If any of you have done any rebricking and have any words of wisdom I would certainly appreciate them. This has been a very interesting thread.
 
  • Like
Reactions: Todd67
Hi Rexanne and welcome to Hearth.com!

You are correct in not burning it with broken bricks. In time, the heat will not only ruin the paint, but warp the steel plate and create bulges. Not good.

Replacing the brick is simple once you get it good and clean. Ash is very fine and hard on a vacuum cleaner, so I use an old one that I'm not attached to in case the fine dust makes it through the bag and into the motor. The paper throw away bags have worked for me so far. So I just shovel out all the ash I can, vacuum it good, and put gloves on to start removing the bricks. The first one may seem like a loose tooth that needs to be wiggled and pulled, but you can't do anything wrong. If you can't get any out, you may need to take a hammer and break one in half and remove the pieces. Once one is out, the others in the line will wiggle sideways and come right out. Draw a diagram of how they are positioned so you remember how the originals were put in. When they are all out, vacuum the entire stove real good so they will all lay flat and fit under the angle iron clips. It's not a difficult job, but I find it best to remove all of them since you will probably find some are cracked. They aren't expensive. I'd replace them all and you're good for another 30 plus years, forever if you're careful loading it.

Packed ash will stop you from getting them in right. It gets in everywhere between the cracks and joints.

Broken bricks are due to rough handling and loading. No doubt someone had the habit of throwing logs into yours and hitting the back to break them.

Your first fire with all new bricks may seem slow and strange. There is moisture in the new bricks from manufacture, and even though they are fired in an oven, your first fire will evaporate and draw more moisture out of them. So if you think you killed the heat output of your stove the first time, fear not......... once the cooling capacity of water is removed totally from the bricks it will be back to normal.

By leaving about an inch of ash on the bottom when cleaning it out, you protect the bottom bricks and prolong the fire by keeping oxygen from the bottom of the logs as well.
 
Coaly, thank you so much for the reply. The fella who called me to help out stopped by today and he said he would be happy to do it for me. My job right now is to get it cleaned out better!! There still is some ash in there so I have to figure out how to get it all out without ruining my vacume...maybe get some different filter for my shop vac...will shop around tomorrow. He has done a lot of work on wood stoves and said it "will be a piece of cake" I got a box of 6 bricks today and they will fit in the back where the broken ones are. I live on an island of 3,000 people with two hardware stores and luckily one store actually had the bricks! My other option would have been to fly them down from Juneau. I will be more careful in the future loading my stove, I probably am guilty of breaking off some of them as I toss some pretty big pieces in there. It is a great stove though it is simple and burns great, gets hot fast and once I get it going good I close the front dampers and when it gets good and hot I dampen it down from the chimney...If I put big logs on a nice bed of coals I can keep it going all night. We don't have good hard woods here, I burn spruce or cedar for fast burning and hemlock for a slower burn. I would like to grease the hinges and the damper screws as they are all a little creaky...will a high heat grease be sufficient...I don't want to try and get the doors off in case I break a hinge or something...Thanks for the help you certainly know your stoves and if this gentleman hadn't offerred to help me out I would have tackled the task with your advise and felt a lot better about doing it. Thanks again. Rexanne
 
Yes, it's a good idea to grease all the moving parts each year when the stove is cold, before for the next season. It prevents rust too.

Any high temp grease like automotive wheel bearing grease is OK, the higher the temperature, the better. I find the black "Moly" grease to last a season of burning. The threads on the air adjuster knobs is another thing to keep lubricated. You don't want to wear the threads out and allow the knobs to become loose and wobbly on the bolt thread.

If you have the door hinge pin that you can see the head of the pin on the top, you can tap one out at a time with the doors closed, and grease it before putting it back in. ( Some doors have the pin pressed into the door hinge with no head showing on top. These doors are designed to lift off, and burn the stove with the fireplace screen installed. They were designed to not lose the hinge pins with the doors off the stove. )

Once the pins are greased; ( and you know they will come out easily ) Open the doors, and they can be easily lifted off the stove. A dab of grease on the stove hinge that supports the weight of the door allows the door to move extremely easily. Each year you should be able to lift each door off, apply some grease to the pin and hinge, set the door back on, and you're good to go. No tools necessary.

To grease the air knobs; Open the air draft cap all the way, and reach in between the draft cap and the door with grease on the end of a stick, screwdriver, Q-tip....... whatever you have handy that's thin enough to slip between the knob and door to apply a blob of grease on the thread. By spinning the knob closed and open a few times it will work the grease into the treads and it will spin like a Hot Wheels car wheel.

Now you will know how your stove is supposed to "feel". Hang on to the doors when you open them, or you will let them wack the sides of the stove ! Some newer models actually have a door stop pin welded to the lower hinge to prevent them from opening too far and wacking the stove. Amazing what a little lubrication does.
 
2w5mwx4.jpg


Well, it's been a while now, but the urgent postings I made to Coaly back a couple months ago were over this stove I found on the Corvallis/Albany Oregon Craigslist. Looks like one of the original stoves and due to the location it was probably made in Bob Fisher's original shop, chances are! Fellow selling it wanted $150. too bad he would not have been interested in getting it across the country to one of Fisher Stove's greatest fans ever! (I mean Coaly!) Tough to tell some of the details in his photos, but it looked like a winner! Hope whoever got it appreciated it.

Fisher, WOOD STOVE - $150 (SE ALBANY)
Date: 2010-05-19, 1:37PM PDT

I have a fisher wood stove, made in springfield Or.

In good shape, could use some new paint. SOLID, metal, cleans up with a wire wheel

2.8" long x 1.6" wide x 2.10 tall

Willing to trade, or cash..

* Location: SE ALBANY
 
hey coaly-------the rarest of the rarest is on ebay. the xl with the sunburst. the 10 inch flue is on the back. i wonder how many xl's have the flue on top?
 
Yes, the seller also refurbishes Fisher Stoves. The pictures of stoves earlier in this thread, in the particle board cubicles were his as well. Been in contact for quite some time. He wants an early one to make like new, but to keep for himself after seeing my early ones.

I'd like to get this one, and put it in the collection to keep it new.

He follows this thread, is a rancher, and has a friend at a local foundry replate his doors as needed. He also has a original mold to make the bear feet. He was supposed to have some cast from it this summer. This stove was in the original box. It is new. He knows the owner of the fireplace shop it came from, and it was left over in the back room of the business when they stopped selling Fisher Stoves. Years later he aquired it, and only looked at it from the top of the box. It was taken out for the pictures on eBay.

Don't know if any were made with the "Sun" door other than the rear flue.
 
She's all mine !
 

Attachments

  • XL 2.jpg
    XL 2.jpg
    65.9 KB · Views: 2,411
  • XL 3.jpg
    XL 3.jpg
    62.5 KB · Views: 2,290
  • XL 4.jpg
    XL 4.jpg
    33.7 KB · Views: 2,219
  • Like
Reactions: Todd67
I just picked up a really nice Fisher fireplace insert for $100. I have no use for it but I could not pass on the price. I do not know the model # but I will post a picture. It also came with the surround
 
Good move. You can easily triple your money on that deal. If you wait until October or November it should go for 500 or more. ($100 investment in gold might net you 5 bucks by winter)
There are no model numbers. They were simply called "Fireplace Insert". Available with plain cast iron doors, plated brass, or plated with nickel for the chrome look. The older ones used a chain for the adjustable damper, later models had a rod to move the damper. Later models also had a glass door option with secondary air intakes under the doors for an air wash to keep the glass clean. Brass plated doors are the most common.

Here's the stats for resale;
Min. 8 inch flue
Takes logs to 27"
Heats approx. 1750 s.f. (this is very conservative, many heat over 2000 s.f.)
24 3/4" wide X 36 3/4 Length (Deep) X 21 3/4" High
Extends 11 inches into hearth
Approx. weight 525 lbs. (solid door model in box)
Door opening 17" wide X 10 1/2" high
That's from 1980 paperwork. Newer models may differ slightly.
 
I am not looking for a profit or too make money but it was in such great shape I could not pass it up and I will keep it as a backup. It has the nickel on the front and looks real nice. I will post pics later in the week
 
coaly said:
A somewhat rare 1976 Grandpa model. Most of the '76 Bicentennial door models were Grandma.
(notice the early springs as well) This one came out of hibernation early this year!
On eBay in Ohio.
Update; $499 reserve price, Sold for $760. New home, Columbus Ohio.
I just bought the exact same thing off Craigslist(the 76 Grandpa). I thought $100.00 was pretty steep, lol. Original nice firebrick. This was so heavy it was tearing up the mans driveway. Mine is only stamped in the back with a serial number(no ID plates). Randy
 
Picked up my brand new XL at the ABE (Allentown Bethlehem Easton) Airport finally !

First surprise is the removable ash shelf. You can see the two holes drilled through the leg fronts that it installs through.

The screen and frame is all stainless. Doors and handles are nickle plated inside and out.
 

Attachments

  • P9100035.jpg
    P9100035.jpg
    53.3 KB · Views: 1,999
  • P9100034.jpg
    P9100034.jpg
    59.1 KB · Views: 1,991
Second surprise is a second row of firebrick above the first. Instead of angle iron welded to the side sheets, flat iron welded into a T is used to hold the top of the bricks on the bottom level. This T forms a shelf for the second row of fire brick to be placed above the first. The bricks fit upright as normally installed.

No smoke baffle since this is pre 1980.

The first picture shows the T iron. The second shows the angle iron to hold the top of the second course of brick. The wet looking discoloration of side sheet at bottom is due to cleaning with WD-40. I'll be using MAAS metal polish on the inside to remove the light surface rust that has started on the inside of the unpainted steel plate.
 

Attachments

  • P9100037.jpg
    P9100037.jpg
    45.2 KB · Views: 1,949
  • XL.jpg
    XL.jpg
    80 KB · Views: 1,972
Here's an oddity on eBay;
(item #220680079231) This is a Papa Bear with an 8 inch top flue.

Pre 1980 box with welded angle iron corners, with a post 1980 arch top door. That combination was fairly common at the door change in 1979 just before the UL listed stoves. But not with an 8 inch flue !

Can't explain the use of 8 inch instead of the regular 6 inch outlet on a single door "Bear Series" stove. (only Fireplace Series double door used 8 inch) I verified with the seller that it is definitely an 8 inch with pictures below. Even stranger, she has 2 of them, both the same.
The man that purchased these passed away around 1995. He had one in the basement area of the home which was about 1600 sq. ft,, and he had an attached workshop at the same level that was about 1800 sq ft. He had one on each side. This seller actually sold the house for his son in 2000, and they didn't want the stoves. Her brother lives next door and bought them. One of them is now for sale.
Here are some pictures not on eBay that were taken for me. She also has a brother living in Tennessee that can have the stove at his home for pick up extending the pick-up area farther north.

Special built to cure a drafting problem?? Remember these were only sold at Fisher Showrooms back then, so many times the welding shop was right behind the showroom to do whatever was needed for an install.
 

Attachments

  • 8 inch Papa Bears.jpg
    8 inch Papa Bears.jpg
    73.4 KB · Views: 2,028
  • 8 inch Papa flue.jpg
    8 inch Papa flue.jpg
    33.4 KB · Views: 1,950

Attachments

  • Grandpa Screen 195 eBay.jpg
    Grandpa Screen 195 eBay.jpg
    83.2 KB · Views: 1,800
  • Grandpa Screen 195. eBay.jpg
    Grandpa Screen 195. eBay.jpg
    84.5 KB · Views: 1,746
Don't blame me Coaly lol. I couldn't get a fair price for the stove with the screen, Randy
 
I wouldn't mind finding a screen for my grandpa bear! Is ebay the best place to find one? I was going to post of picture of my stove after I got it all cleaned up but can't figure out how to do it. When I try to add as an attachment it says it is "too big". Can someone tell me how to put a picture on here? Thanks.
 
Rexanne said:
I wouldn't mind finding a screen for my grandpa bear! Is ebay the best place to find one? I was going to post of picture of my stove after I got it all cleaned up but can't figure out how to do it. When I try to add as an attachment it says it is "too big". Can someone tell me how to put a picture on here? Thanks.
You should be able to downsize the images in your camera & then they should load. There was another screen on Ebay & don't know if its still there(kind of beat up though). Ebay is your best bet along with Hearth ads here, Randy
 
Hey Coaly i have a fisher insert that has the exact same doors as the stove pictured at the bottom of page three of this thread.My wife and I used it for about five years before we moved and we enjoyed it very much. I got the insert from a friend of my moms who bought a house and asked me if I could come and haul it to the dump. I got to keep the scrap metal money. I wanted an insert but at the time could not afford one. Long story short I kept it repainted it and polished the crome/stainless not sure what it is and used it untill we moved. I still own the house that the fisher is at. I have never found any info on the stove. there is a tag on the ash tray just below the doors on the front of the stove but it is to faded to read. I have allways wanted info on this stove as to what it was as far as what model and stuff. the top of the stove is flat except for a small step up for an air chamber that surrounds the stove. There is an inlet for the air chamber underneath the ashtray at the bottom of the insert and the outlet at the top. It has an 8 inch flue and can hold 24 inch logs. Now for the bad part.....The insert was to wide at the back to slide all the way into my fireplace so i made a cardboard template to fit the fireplace and cut the back corners of the stove off on an angle and welded new plate on and then welded new steel to close the air chamber back in to the same angle of the stove. Like I said thats what I could afford. Any info that you could give me or point me in a direction to get some info would be greatly appreciated.....Thank You...............Mike
 
Mike;
With those doors, you have a "Fisher Fireplace Insert". No Bear name, just an "Insert".

The tag on the ash shelf in red paint said CAUTION Hot while in operation. Do not touch. Keep Children, Clothing and Furniture away. Contact may cause skin burn. See nameplate and instructions for use. For solid fuel use only.
Here's a picture of the early UL tag. And a picture of the entire unit to be sure it's what you have. The blower in the pic was an accessory. The door is Nickel plated. Some use a chain to control damper, others a rod and lever.

If that's it, PM me your email and I'll send you an Owners Manual in pdf.

As long as the cutting and welding is in a workman like manner, the price is right !
 

Attachments

  • Insert Tag 10-28-80.jpg
    Insert Tag 10-28-80.jpg
    29.5 KB · Views: 2,208
  • Insert with Blower.jpg
    Insert with Blower.jpg
    20.7 KB · Views: 2,110
Status
Not open for further replies.