My Install, step by step

  • Active since 1995, Hearth.com is THE place on the internet for free information and advice about wood stoves, pellet stoves and other energy saving equipment.

    We strive to provide opinions, articles, discussions and history related to Hearth Products and in a more general sense, energy issues.

    We promote the EFFICIENT, RESPONSIBLE, CLEAN and SAFE use of all fuels, whether renewable or fossil.
Status
Not open for further replies.

Berone

Member
Sep 17, 2007
132
Peekskill, NY
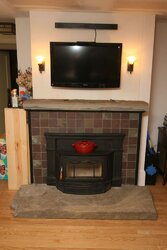
This thread is a year old, but I wanted to show the (mostly) finished product. If you remember my project, you can skip to post #19 (https://www.hearth.com/econtent/index.php/forums/viewthread/44289/#698077)

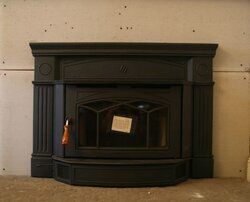
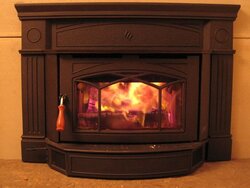
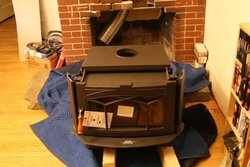
I'm installing a Hampton I300, so I thought I'd do a step by step of how I'm doing it. Hopefully if I'm making any mistakes someone will catch them on the way. If I'm not it may serve to give ideas to others. Or, as it's going along, to serve as a cautionary tale.
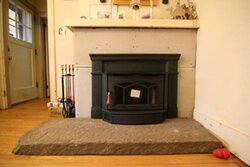
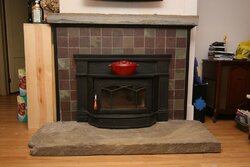
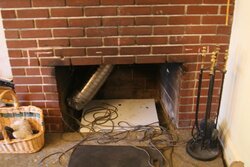
My existing hearth is not deep enough for the Hampton, but I didn't want to dig into the floor to lay more tile, besides which I prefer the look of a raised hearth.
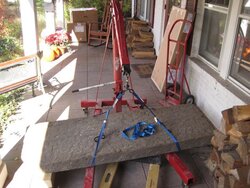
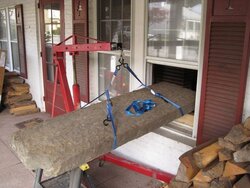
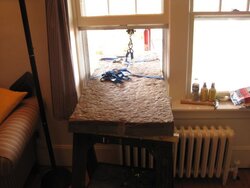
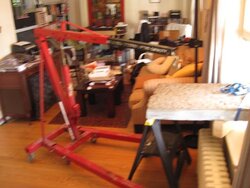
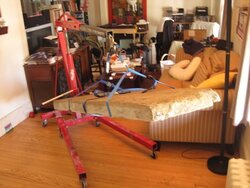
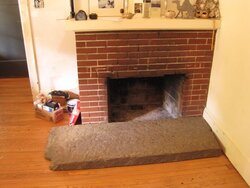
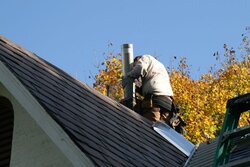
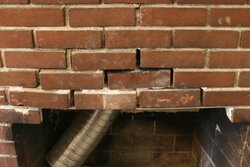
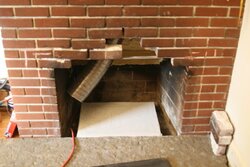
So I bought a piece of stone that was 4" thick (creating a sufficiently raised hearth to eliminate the need for heat protection) and had it cut to a width that would be sufficient for the needed ember protection. The stone yard delivered it to my driveway and I got it onto a dolly and onto my porch, but the arrangement of my doors wouldn't allow me to roll it into the living room as I had hoped. Tipping it up onto another dolly would have worked, but the stone is over 600 pounds and I didn't think my infant son and I could manage it. So I went around the corner to my mechanic and he lent me a folding engine hoist. It took a bit of maneuvering, but I was able to get it up, pass it through the window, and lower it into place. I padded up the inside of the firebox with a stack of 1/2" Durock which got me level to 4". Monday morning my roofer is coming to help install the liner (slate roof) and in the afternoon the insert will be delivered.
 

Attachments

  • hearth-1.jpg
    hearth-1.jpg
    63.5 KB · Views: 1,280
  • hearth-2.jpg
    hearth-2.jpg
    62.2 KB · Views: 1,283
  • hearth-3.jpg
    hearth-3.jpg
    56.6 KB · Views: 1,275
  • hearth-4.jpg
    hearth-4.jpg
    37.6 KB · Views: 1,294
  • hearth-5.jpg
    hearth-5.jpg
    44.7 KB · Views: 1,289
  • hearth-6.jpg
    hearth-6.jpg
    51.5 KB · Views: 1,295
  • hearth-7.jpg
    hearth-7.jpg
    44.3 KB · Views: 1,474
Unfortunately this forum's software doesn't let you control the order that the images appear, but I'm sure you can figure out the way they go. I should also mention that a near future renovation of the house will remove the wall on the right of the fireplace, at which time I'll bump the hearth over to center it.
 
Wow! I'm starting to feel bad about about the whining I did about some difficulties with my install. Impressive solution.
 
Monday morning - the roofer showed up! Actually there were supposed to be two but one had the flu. No problem, I only needed one to get the liner into the chimney (later the boss showed up bringing the wrong slate, but that's a different problem). He set up the ladders and got the cap off the chimney while I prepped the liner. He hauled the liner up and dropped the rope down the chimney to me. A little bit of tugging, a bit of back and forth and it slid right in. The chimney cleaners had done a good job because it came down to me without any soot or dirt. Okay, so it was about 10" short. You can't have everything. I ran to the local sheet metal place and got a 2' piece of stainless steel pipe which my roofer attached at the top (I wanted the flexibility at the bottom) (see photo) and we were done. He buttoned up on top and the liner was in. Took a little longer than I had hoped, but that was my fault for not having bought a longer liner. Ready for the insert to be delivered.

And then the wheels came off the wagon...
 

Attachments

  • Liner and oops-1a.jpg
    Liner and oops-1a.jpg
    50.7 KB · Views: 1,105
  • Liner and oops-2a.jpg
    Liner and oops-2a.jpg
    47.3 KB · Views: 1,122
I had checked all of my measurements multiple times, particularly double checking that I could raise the hearth 4" and still get the insert in. I needed 21 1/2" and I had just heavy of that at the opening, and I had knocked out some bricks so I would have it at the back. Unfortunately I didn't peer in far enough when I measured. Sure, I have the clearance in the front, but then the damper drops down 1/2" a bit further back. I didn't see that and now I have just about 21" of clearance which is not enough. Bad. I'm going to have to remove the whole damper, which I hadn't planned on. Out comes the sawzall again with the cast iron cutting blade. I have one fear, which is that the damper is actually also serving as a lintel for the fireplace facade bricks. Nothing to be done for it now - the damper has to come out. A bit of sawing, whacking and tugging and it's out. Along with the bricks that it was, in fact, serving as a lintel. I grab a piece of 1/4" steel I have around which is just big enough to serve as a temporary lintel. I tap it in above the offending line of bricks and remove them, giving myself more than enough room, and then remove the bricks above it that are loose. I'm going to need to get a piece of 3" angle to serve as a permanent lintel and then mortar the bricks back in. Fortunately pretty isn't a big deal here, since I'm going to cover the whole facade with cement board and then slate. I just need to get it stable again. I hesitate to even call it structural, since it only has to hold itself up. Waiting now for the insert to arrive and wondering where I'll put it since I have to keep working on the opening. I somehow think I will have to reschedule Thursday's inspection...
 

Attachments

  • Liner and oops-8a.jpg
    Liner and oops-8a.jpg
    44.9 KB · Views: 1,102
  • Liner and oops-9a.jpg
    Liner and oops-9a.jpg
    42.9 KB · Views: 1,107
Well she's here and I'm a bit grumpy. 21" would have fit in just fine. Of course if I had waited for it to arrive and check it wouldn't have fit, so...
 

Attachments

  • The Insert Arrives-1a.jpg
    The Insert Arrives-1a.jpg
    47.2 KB · Views: 1,105
Life, work and an 8 month old got in the way of this project a bit. There aren't many photos now, since not a lot happened that was visible. The bricks got cemented back in and I covered the whole thing with cement board as planned. Turns out it was a good thing that I lost those bricks and removed one course when I put in the new lintel, because with those bricks in there would have been no way to reach the liner to make the attachment. Not that it mattered. A buddy of mine with small hands came over and, with me working from inside the stove and him slipping his arms into the available space we tried to get the liner to seat. No way! We fussed with it for about an hour, bringing the insert in and out and trying to maneuver it every which way. The liner just wasn't flexible enough to make the "s" shape we would have needed to drop it in. My friend suggested that if the liner were a couple of inches shorter it would still make up and we might have the flexibility we needed. So he went off to work while I trimmed it down. He came back later that night and we tried again. Nope, nada, nothing. While he was gone, though, I thought about a toilet I had installed once and the offset flange I had used to get it away from the wall. Hmmm... wonder if there's such a thing for chimney liners. OF COURSE THERE IS!!! I went and got one from my dealer the next morning and was done in 15 minutes. Makes me really wish I had kept up on this thread, as I'm sure someone would have told me about it.

Anyway, got the insert in place and then began the incredibly tedious job of attaching the surround and tweaking it. I would have thought that would have been easy, since there are really only 4 pieces and two of them just drop into place. It's the other two - the side pieces - that have ten attachment points on each side, each of which is slotted and adjusts in multiple directions. I'm sure the guys who do this every day can do it in no time. It took me about 3 hours over 2 days to get it right. I thought I was done at one point, when I discovered that the door wouldn't open. Had to start again. Then finally putting the fan in place. I had taken the suggestion from someone on this forum and run the power for the fan down the ash dump from the fireplace to the basement. Since the whole unit is raised 4 inches I had a very nice and safe trough to run the extension cord. The fan, which I thought would just slip onto its clips, was another nuisance. Turns out all I had to do was loosen the bolts on the clips, but when you're working upside down and can't even see those bolts and there's no mention of them in the installation manual it is a bit of a drag.

Anyway, here it is, waiting for the inspector to come tomorrow. I have an unexpected day off on Saturday. Maybe I'll work on the tile.
 

Attachments

  • insert closeup-1.jpg
    insert closeup-1.jpg
    29.3 KB · Views: 1,007
It's looking good! Make sure to show us a pic with the tile in place (and of course, a fire in it!).
 
Wow I am impressed, that is a ton of work! Coming along very nicely though. Cheers!
 
av8roc said:
Wow I am impressed, that is a ton of work! Coming along very nicely though. Cheers!

Good job - love the stone, and appreciate how hard and frustrating it can be to get it right...
 
Thanks for the encouragement. Here's a picture from a bit further out. You can see that the hearth is off center and crammed against the wall. That wall is coming out in a future renovation, at which time the hearth will shift over. I'm also going to replace the mantle with the drop off from the hearth - turned out to be the perfect size. Right now, though, I just want to get a fire lit!
 

Attachments

  • Front view-2.jpg
    Front view-2.jpg
    22.8 KB · Views: 943
Love it!! I have a stone patio out back with rocks that look like that, which the previous owner put in place. (they are actually historic stones from an old casemate fort that the stone guy happened to have laying around.) There were two extra large stones not used in the patio, maybe just a little smaller than what you have there. One sits like a little low garden table on the well head, and the other is on two log rounds like sort of a flintstone bench. I have been eyeing these. My tile hearth is flush and I don't really want to mess with it, like tear it up or tear up the wood floor around it. I also don't want a true raised hearth because it would make my clearances way off for the mantel surround. So I was planning on just getting a pc of ugly stove board to extend the hearth during burning season. Now that I see your cool install, my "flintstone furniture" rocks outside are calling to me. AND, I have double french doors in the back so there would be no problem getting it in! Hmmmmm.

I was wondering, if I did this, how I would get the stove up to the right level on the stone. Your solution looks like a good one. Question though, did you put anything under the stone? Like so it would sit level and not mar the floor below it? I would kind of like whatever I do to be kind of reversible if the next person in this house doesn't want wood heat or doesn't like the hearth. I wonder if it could be cushioned with a thin sheet of drywall or something.

Now that I see how cool yours looks, I am seriously considering this. But in my case it's a more highly travelled area. Like, really toe-stubby. Maybe I'll take some pics of the rocks and show them here, and tape out the floor... hmmm.

Anyway that looks great, sorry about your damper and thanks for sharing the photos and inspiring!

Oh, and I think the asymmetrical placement of the stone actually looks really neat!
 
I didn't put anything under the stone. When I remove that wall and kick it over the floors are getting redone, so I'm not concerned about scratching them up in the process. I decided there is a limit to how much I care about the next person in the house. I bought it with most of the window panes cracked and the galvanized drain pipes rotting out, so I think I'm delivering it in better condition than I received it! The insert has value and I don't think anyone who doesn't like it will really buy the house.

Toe-stubby was a concern. We rearranged the room a bit to allow a better flow, and then I dropped a heavy box in the corner of where the hearth would land. We lived with that for a couple of weeks before making a decision. It wasn't a problem so we went ahead. First night the hearth was in place I stubbed my toe! Not since then, though, and there was a big clutter in the room at the time.
 
Good looking stove. Will the end of the stone be left ragged? I am piling over the specs for the exact same insert and is on the top of my list. I have a metal fire box (Heatilator) that does not leave much room in the back/height dim. Tell us how it does when you get your fires going.
 
So, the cement board you have stacked in the back, what is it? And does it have a certain R value or whatever?
I am finding myself faced with a big problem. I sought out a stove that would sit partially on the hearth, and now I have it, and I see that it's supposed to be on a 6" raised hearth. I have a flush hearth. S$*)*#!
BUT, I also have this rock that you inspired me about when I saw your install to begin with.
110k4nk.gif
It's exactly the size I would need to cover the current flush hearth plus about 10" in front of it that I also need to be non-combustable. (29" X 64"). It's only about 3.5" thick, but if I put a piece of cement board under it (I would want to cushion the floor below a little) and then one or two pcs. of cement board in the same shape of the stove, and right under the stove, and in the fireplace enough of a stack to even it up like you did, I think that would probably get me my 6" or darn near it. Then I would just have to worry about how to make the stone work with the bottom of the mantel, and/or raise the mantel, which would not be a small matter, but anyway - just trying to figure my options here and wonder what your board is made of.
 
I used Durock to stack up in the back. I didn't worry about R value, just that it be non-combustible. Since it actually sits inside the firebox, I didn't need to increase the R value; I just needed something that wouldn't catch fire. Which insert did you end up getting?
 
She burns pretty!
 

Attachments

  • fireplace burning-1a.jpg
    fireplace burning-1a.jpg
    40.6 KB · Views: 747
It does look beautiful!
I got a used Englander 24 JC, which sticks out onto the hearth by 9-10" (15" sitting back in the firebox). So, yeah I have an issue. Yours looks wonderful though!
 
Nice job, looks good.
 
Less than one year later I'm closer to finishing my installation. I did the renovation to the room, removing the wall that made the fireplace look awkward. Also installed the mantle that was the drop off from the hearth. The tile is damaged slate from my roof that I cut to size. The corners are steel and there's a wood cornice painted to match. (It's high enough to be out of combustion range). I still have to tile the sides, but I wanted to get the front done so I can fire it up! I can do the sides any time.
 

Attachments

  • fireplace finished-5 small.jpg
    fireplace finished-5 small.jpg
    92.3 KB · Views: 520
  • fireplace finished-2 small.jpg
    fireplace finished-2 small.jpg
    73.1 KB · Views: 629
That is quite a project. It really finished up nicely, thanks for posting the update. You will be enjoying that beauty for many years to come.
 
really looks sharp
 
Status
Not open for further replies.