Ideas / Materials needed for header post, to be located next to new stove chimney liner tee - with p

  • Active since 1995, Hearth.com is THE place on the internet for free information and advice about wood stoves, pellet stoves and other energy saving equipment.

    We strive to provide opinions, articles, discussions and history related to Hearth Products and in a more general sense, energy issues.

    We promote the EFFICIENT, RESPONSIBLE, CLEAN and SAFE use of all fuels, whether renewable or fossil.
Status
Not open for further replies.

Northeaster1

New Member
Oct 10, 2008
119
Nova Scotia
Hi Folks,

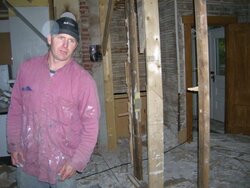
I have installed a new, insulated 6" solid SS liner in the brick chimney, complete with a new hole in the masonary for the tee and new stove location. (old location was cookstove in kitchen, around corner).

We have also ripped out the wall that used to separate the kitchen from the dining room (will be using dining room as new living room / stove room).

I have a temporary wall up, to support the above weight, and plan on installing two 2"x10", as a header, to carry the load, and let me remove the temporary wall. Distance is about 11 ft.
I had planned on using two 2x4s as jack studs ( at each end), and one more on each side to run up the sides of the 2x10s, on each end.

My problem is that the jack studs would be too close to the chimney tee, and I am now considering if I can use non-combustible materials for the jack post, next to the tee, suchs as a steel jack post, covered up with steel studs, and cement board????

Ths issue is that I had figured I could have the studs right next to the chimney, as my insulated liner allows me zero clearance to combustibles....But, I forgot about the actual clearance necessary to the (hot) chimney tee!!

Even if I use a steel post, I suppose I could not even paint any cement board covering it, unless I was approx 18" away??
 

Attachments

  • DSCN1197.jpg
    DSCN1197.jpg
    48.1 KB · Views: 300
Edit - I had believed that I required 18" clearance to combustibles, from the tee / stovepipe - but I now believe that is for single wall pipe.

I am hoping I can use something like the below masonry adapter, that would allow me to attach double stove pipe to the liner, reducing clearance requirements to 6", I believe.

Is it then possible to connect single wall pipe to the double wall, likely at the elbow or below, so I can get more radiant heat from the pipe (once clear of combustibles)?Selkirk DSP Double-Wall Black Stovepipe Masonry Adaptor - For Wood Burning Stoves
Every vent installation is different. That's why Selkirk offers this handy DSP Double-Wall Black Stovepipe Masonry Adaptor. With this venting accessory you can connect DSP Stovepipe directly to a standard masonry chimney or a masonry chimney lined with a SuperPro venting system.

PS. I plan on leaving the exposed chimney brick, so the only combustible nearby would be the jack post, or paint on cement board, around a jackpost.

Any advice would be appreciated!!


Allows DSP Stovepipe to be installed through a masonry chimney wall
For connecting directly to a masonry chimney or to a SuperPro lined chimney
.015" stainless steel inner liner with 26-gauge steel outer wall
6" clearance from combustibles
Scratch-resistant black finish
Available in two diameters
Lifetime warranty
UL Listed
Dimensions:

6"
6" inner diameter with 6.5" outer diameter
11.75" H x 10" W
8"
8" inner diameter with 8.5" outer diameter
11.75" H x 12" W
 
before you install any stove or insert into that fireplace chimney, it must pass a NFPA 211 lever 1 inspection plus be completely cleaned

If you have spaces between the angle iron lintel an open passage to your header, it would have never passed the inspection .

my immediate questions would be what else is non compliant ? any silicone caulk dose not meet the heat range required,

The area in question should be fully pared with refractory cement
 
Pyro - Thanks for the input. I am in Canada, and believe that all I need is to pass a WETT certified inspection of the stove and the install.
The chimney was cleaned on the inside, and an insulated liner was installed, per manufacturer's instructions, which allow zero clearance to combustibles, adjacent to the masonry.
You mentioned angle iron and fireplace opening... juts to clarify, it is not, and was never a fireplace. There is an old masonry chimney on the left (in picture) and the newer chimney on the right, where you can see the tee coming out of the masonry. I will certainly put cement / proper material around the tee once I have chosen the type of connector that will be connecting to the tee.

If I have missunderstood, please feel free to explain further!! I apprciate the help!

BeFreen - I will get some pics next weekend, but won't be there till then. Thanks!
 
Northeaster1 said:
Pyro - Thanks for the input. I am in Canada, and believe that all I need is to pass a WETT certified inspection of the stove and the install.
The chimney was cleaned on the inside, and an insulated liner was installed, per manufacturer's instructions, which allow zero clearance to combustibles, adjacent to the masonry.
You mentioned angle iron and fireplace opening... juts to clarify, it is not, and was never a fireplace. There is an old masonry chimney on the left (in picture) and the newer chimney on the right, where you can see the tee coming out of the masonry. I will certainly put cement / proper material around the tee once I have chosen the type of connector that will be connecting to the tee.

If I have missunderstood, please feel free to explain further!! I apprciate the help!

BeGreen - I will get some pics next weekend, but won't be there till then. Thanks!

Sounds good. This may not be an issue with double-wall connector. Do you have an estimate of how close the new thimble will be to the future wall?
 
I can really put it on either side of the tee, but not too far away, as it will not line up with a decent spot on the other end. I could go at least 6" to the right of the tee (past the temp wall you see in the pic), but anymore will start to get away from the center of the room, and the idea is to still support any loads from up above.
 
Well, you are going to need a building inspector in the end, so it may be best to see what they will accept. I would suggest moving the support to the right unless that causes you to not line up with the joist overlap above. Otherwise you could place two posts either side of the thimble at the required clearances and bridge between them to carry the new beam above. You might even be able to make that look symmetrical.

What supports the load transfered to the floor from above? If you are transferring the load of the floor above onto a pair of posts holding a cross beam, then you will want a firm foundation from the basement to the posts. I think that makes sense - does it?
 
Hey Brent, thanks for the advice.

- I will have to check to see how much I can move the new beam, to one side or the other, without missing the joist joints, if there are any.
The house is only 20 ft wide, and 26 ft long, and has a 13:12 pitch roof. My uncle-in-law?? is an experienced carpenter, - him and another carpenter both felt the od wall (and new beam) are not holding much weight, based on the small size of the house, and the roof loads being transferred to the outside walls.
- Good point about the firm foundation needed for the posts - I will look into that. I did actually build a two post system bridged at the top, to support a new beam in my camp, which is only a foot less wide, and had beams spanning 19 ft, without any support in the middle. (Both buildings are over 100 years old, small buildings with very steep roofs).

- I will not be getting a building permit, as I am just doing some minor renovations < $5000.

I will likely stop by a stove place this week, to see what options are there to connect to the tee (single vs double wall) and what clearances they require.
 
Status
Not open for further replies.