
Modifying a central wood furnace for secondary burn
- Thread starter FixedGearFlyer
- Start date
-
Active since 1995, Hearth.com is THE place on the internet for free information and advice about wood stoves, pellet stoves and other energy saving equipment.
We strive to provide opinions, articles, discussions and history related to Hearth Products and in a more general sense, energy issues.
We promote the EFFICIENT, RESPONSIBLE, CLEAN and SAFE use of all fuels, whether renewable or fossil.
You are using an out of date browser. It may not display this or other websites correctly.
You should upgrade or use an alternative browser.
You should upgrade or use an alternative browser.
- Status
- Not open for further replies.
This comment is pure speculation for discussion only. Take my opinion lightly : ) I am just thinking that the secondary tubes at the top would work better if they ran parallel to the smoke shelf. Then the holes should be approx 45* angle. This is assuming the smoke exits the stove in the front by the door. If the smoke path is on the sides then that is different. The only thing that makes me think the pipes should be running in the opposite direction of your design is the way my wood stove is designed. The pipes all run parallel to the smoke shelf. Either way nice project. I love seeing retrofits that work, it is a nice accomplishment. Well done!
sparke -
My thoughts exactly and when my pipes are exhausted or when I get antsy to try something different I'm going do that with my next "try". Actually the way the pipes are in the 30NC they are all turned at a slightly different angle to follow the path of smoke and burn up the most possible on its way out.
My thoughts exactly and when my pipes are exhausted or when I get antsy to try something different I'm going do that with my next "try". Actually the way the pipes are in the 30NC they are all turned at a slightly different angle to follow the path of smoke and burn up the most possible on its way out.
That's what I have drawn up - dual inlet pipes entering on each side of the door, running just above the coals, then up the back wall (so far, just like what's posted above), then into a 'ladder' that comes back toward the front. Each 'rung' will come off the supply tubes with T-fittings and be connected to both sides of the ladder. I'm hoping to squeeze in 4 rungs with the front most one just behind the front edge of the baffle. I only have 19 inches of front to back space, so I may need to thread a few pipe slugs to make it all fit. I doubt they'll have the right sizes available at Ace or Lowes . . .
FixedGearFlyer said:That's what I have drawn up - dual inlet pipes entering on each side of the door, running just above the coals, then up the back wall (so far, just like what's posted above), then into a 'ladder' that comes back toward the front. Each 'rung' will come off the supply tubes with T-fittings and be connected to both sides of the ladder. I'm hoping to squeeze in 4 rungs with the front most one just behind the front edge of the baffle. I only have 19 inches of front to back space, so I may need to thread a few pipe slugs to make it all fit. I doubt they'll have the right sizes available at Ace or Lowes . . .
Yes exactly! That's the way I was going to do it and didn't have the right size pipe at the time. I should have done it right the first time. Oh well, there is always next time. Don't forget to add one or two dielectric unions so you can remove the "ladder" when it goes bad. It will also be easier to install. That's how I'm going to redo mine, when/if I do. Keep us posted.
If you have a home depot, they'll thread you whatever size for free if you buy the pipe from them.
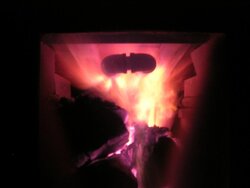
OK, another update, I lit a fire tonight b/c the temps are dropping. So happy with the results. I have huge secondaries, see the pics, sorry it's so blurry, old dig camera. (The pic doesn't do it justice.) Flue temps are 300+ and the best part, no smoke from the chimney! The difference was the operator. I waited before adding wood and got it coaled up all over enough that it wasn't smoking. The pic is about an hour into it.
Attachments
That's awesome!
I bought the parts this evening and had to change the layout a bit. The only way to thread together a ladder section was to put unions in the middle of each rung, and that took up too much space. I now have three pipes running N-S coming off a manifold in the back.
I took a picture of the secondary tubes assembled outside the furnace, but can't upload directly from my iPhone, so I'll post it in the morning. Our toddler is also in bed, so I can't fire up the bimetal hole saw and start the install. Guess I'll have to wait for morning ...
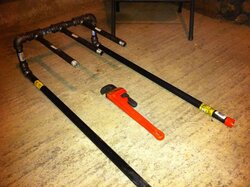
Here it is. I just need three pipe caps for the ends and two holes drilled in the front of the furnace.
The problem with the ladder arrangement was that there was no way to get it all threaded together in a ladder layout without big unions in the middle of each rung. This layout should work, although I don't have the coverage I was hoping for. The baffle is 19 inches back-to-front, and this will give me about 15 inches, so the tips of the secondary tubes will be about 4 inches shy of the baffle edge. I'll cut down the long pipes once it's all assembled so that they extend about an inch and a half past the front of the furnace, thread the ends, and put caps on them to control the airflow.
I went with 3/4-inch pipe for the manifold and 1/2-inch for the secondary burn tubes. I may find that it's undersized and rebuild it with 1-inch and 3/4-inch pipe, but I'd rather not have to worry about run away furnaces, especially when I'm travelling for work and it's just my wife and toddler at home. Until I know the design and sizes are dialed in, I'll just use furnace cement to seal the holes around the tubes, then will weld it once I have everything working correctly.
Attachments
Yes, I remember that that is why I opted not to do that. The one time i did try it, I ended up threading one side all the way in and then unscrewing it as I threaded into the other side working my way through the ladder that way. But then there was the problem of getting it through the door. Is that going to be a problem with your nice design?
My other thought would be to use some 1 1/4-1 1/2 pipes on the side coming into the front of the furnace, then 90 up toward the top, then another 90 back toward the front of the stove, but instead of using "T's" drill into the round pipe and slide the 1/2-3/4" perpendicular pipes into the outside ones. Make them long enough so they will slide all the way into one side, but can be taken out easily enough. Then you could insert a pin through those pipes to hold them into place so they wouldn't fall out. That's the way some stoves do it with the stainless burn tubes. It would work better with 2" square/rectangular stock in place of one of the pipes returning toward the front of the stove. Is that clear as mud?!?@?! In any case keep us updated!
My other thought would be to use some 1 1/4-1 1/2 pipes on the side coming into the front of the furnace, then 90 up toward the top, then another 90 back toward the front of the stove, but instead of using "T's" drill into the round pipe and slide the 1/2-3/4" perpendicular pipes into the outside ones. Make them long enough so they will slide all the way into one side, but can be taken out easily enough. Then you could insert a pin through those pipes to hold them into place so they wouldn't fall out. That's the way some stoves do it with the stainless burn tubes. It would work better with 2" square/rectangular stock in place of one of the pipes returning toward the front of the stove. Is that clear as mud?!?@?! In any case keep us updated!
My original plan was also to thread all the rungs into one side, then thread them into the other while unthreading half way from the first, so that's clear as a bell.
Unfortunately, the execution was a bit tougher. My 6 3/4-3/4-1/2 reducing T's and 2 3/4-1/2 reducing 90's are all from an assortment of manufacturers and vary in length and depth by a few fractions of an inch. By the time I added up all those fractions, I couldn't get anything to line up and the pipe is too stiff to bend successfully. Even if I could, the idea of doing that INSIDE the stove was less than appealing!
The larger, drilled manifold with insert rungs is a great idea! Too late for this iteration, but I'll keep it in mind for the future.
If I take off the two longer pipes, I can get the manifold through the door diagonally with some finesse.
I'll be drilling holes in the furnace and installing it as soon as it cools down from this morning's fire.
Oh! Also forgot to add that I've completely lined the firebox and baffle with ceramic fire brick. Even now, my fires are hotter, cleaner, and last longer, but it dramatically increased the time it takes to heat the furnace up to the blower kick-on temp. I think I get that back on the other side of the burn, but it's a bummer when it's 56 on the first floor at 6:00 am and I want some quick heat.
It used to take 5 minutes to get the fan to cycle and now it's 10 to 15.
It used to take 5 minutes to get the fan to cycle and now it's 10 to 15.
FixedGearFlyer said:Oh! Also forgot to add that I've completely lined the firebox and baffle with ceramic fire brick. Even now, my fires are hotter, cleaner, and last longer, but it dramatically increased the time it takes to heat the furnace up to the blower kick-on temp. I think I get that back on the other side of the burn, but it's a bummer when it's 56 on the first floor at 6:00 am and I want some quick heat.
It used to take 5 minutes to get the fan to cycle and now it's 10 to 15.
Yes, but you are heating up a thermal mass which will cause the fan to stay on longer and your heat will be much more even throughout the burn. That's what I've noticed too. In the end I think it's worth it.
Un-freakin'-believable!
I couldn't concentrate on my work, so I knocked off for a long lunch, put in the tubes, and lit a fire.
I got a small bed of coals with a quick, hot burn using kindling and wrist-size rounds, and loaded it up with good splits. When it was burning nice and hot after the reload (450 on the furnace front and about 500 on the flue), I knocked down the door air supply on the door, waited about 5 minutes, and reduced the spin draft on the ash pan door to about 15%.
The furnace doesn't have a window, so I can't post pics, but I can crouch on the floor and peer through a couple of tiny holes in the door's flapper. What did I see? FLAMES DANCING ON THE CEILING Yeah
Yeah
After it stabilized, my furnace front temps are around 500 and my exhaust temps are around 400. That's the first time I've ever seen my flue temps lower than my stove temps without smoldering the fire, and even then I've never seen it with either of them that high.
After 1/2 a burn and very little concrete data, I'm already thinking that I should increase the air supply to the secondary tubes. I think that 3/4 inch supply manifold pipe may be too small, or that the 1/16 inch holes I drilled in the secondary tubes should be greater in number or size, but I'm going to give it a few weeks before I make any more changes. If I make a change, the first thing I do will be to drill out the secondary tube holes to 3/32 and add a few more. Hopefully that will pull more air through the supply manifold.
The important thing is that we're burning clean and closed down, which is unreal. I've burned clean, and I've burned closed down, but never at the same time!
I'll post pictures of the installed tubes after this fire dies down and try to figure out some way to get a video, but that's doubtful.
I couldn't concentrate on my work, so I knocked off for a long lunch, put in the tubes, and lit a fire.
I got a small bed of coals with a quick, hot burn using kindling and wrist-size rounds, and loaded it up with good splits. When it was burning nice and hot after the reload (450 on the furnace front and about 500 on the flue), I knocked down the door air supply on the door, waited about 5 minutes, and reduced the spin draft on the ash pan door to about 15%.
The furnace doesn't have a window, so I can't post pics, but I can crouch on the floor and peer through a couple of tiny holes in the door's flapper. What did I see? FLAMES DANCING ON THE CEILING
YeahAfter it stabilized, my furnace front temps are around 500 and my exhaust temps are around 400. That's the first time I've ever seen my flue temps lower than my stove temps without smoldering the fire, and even then I've never seen it with either of them that high.
After 1/2 a burn and very little concrete data, I'm already thinking that I should increase the air supply to the secondary tubes. I think that 3/4 inch supply manifold pipe may be too small, or that the 1/16 inch holes I drilled in the secondary tubes should be greater in number or size, but I'm going to give it a few weeks before I make any more changes. If I make a change, the first thing I do will be to drill out the secondary tube holes to 3/32 and add a few more. Hopefully that will pull more air through the supply manifold.
The important thing is that we're burning clean and closed down, which is unreal. I've burned clean, and I've burned closed down, but never at the same time!
I'll post pictures of the installed tubes after this fire dies down and try to figure out some way to get a video, but that's doubtful.
It does that to you doesn't it?!? Same here. Can't concentrate until you figure the thing out. Sounds like you have success though. Nice Work!
The holes in mine are just a bit larger than 3/32 (smallest bit I had) and I think I have too many of them. But what I do notice is that the secondaries tend to move around to different parts of the firebox (those areas that are offgassing the most, I suppose). So in short, I'm under the impression that the secondaries will move to different parts of the firebox and suck the air in as needed. Maybe someone else can chime in if that's incorrect.
The holes in mine are just a bit larger than 3/32 (smallest bit I had) and I think I have too many of them. But what I do notice is that the secondaries tend to move around to different parts of the firebox (those areas that are offgassing the most, I suppose). So in short, I'm under the impression that the secondaries will move to different parts of the firebox and suck the air in as needed. Maybe someone else can chime in if that's incorrect.
laynes69
Minister of Fire
Secondaries will not suck out the air in a firebox. There will be a constant supply of secondary air entering the firebox at all stages of the burn. The only way those secondaries will burn is when your temperature is right, and there is the proper oxygen supply. With our furnace we don't need a huge firebox full of flames to burn cleanly. After a while the firebox will get hotter as the wood will outgass more and more into the burn. Then the furnace will go into the coal stage and produce heat. So keep experimenting when you close down and you will extend your burns as well as burn cleanly. What you guys are doing I wanted to do with our old furnace, but I just went the easy route and bought a furnace that had everything you guys are doing and then some. Good luck with your furnaces.
laynes69 said:Secondaries will not suck out the air in a firebox. There will be a constant supply of secondary air entering the firebox at all stages of the burn. The only way those secondaries will burn is when your temperature is right, and there is the proper oxygen supply. With our furnace we don't need a huge firebox full of flames to burn cleanly. After a while the firebox will get hotter as the wood will outgass more and more into the burn. Then the furnace will go into the coal stage and produce heat. So keep experimenting when you close down and you will extend your burns as well as burn cleanly. What you guys are doing I wanted to do with our old furnace, but I just went the easy route and bought a furnace that had everything you guys are doing and then some. Good luck with your furnaces.
Laynes - I meant to say the secondaries suck the air into the firebox or understand as the air being sucked out of the secondary tubes by the fire. I guess I wasn't clear enough on that. After the firebox gets hot enough the secondaries take over and they just light up over the top of the glowing pile of charred/charring wood beneath. That's with the primary air turned down. Question for you, what are your avg temps on your flue? What are your temps of the firebox itself and is that a read with an infrared or surface mount thermometer?
laynes69
Minister of Fire
Can't tell you the firebox temperatures. There is no way to measure them. Basically almost the whole front of the firebox is a glass door, and the front of the furnace is a second layer, the firebox its self is behind the front of the furnace. My flue temps are normally 175 to 200 on the surface about 8" or so away from the furnace with the damper closed and a good hot fire burning. When our damper closes, the temperatures will increase in the plenum, and lower at the flue. But if the damper is open and there is a roaring fire, the temps will jump to 250-350 surface and the plenum will get hot. Our temps run lower because of the secondary heat exchanger. The old furnace would produce more heat at a time, but it was a waste of wood, and the burn times weren't there like now.
TCaldwell
Minister of Fire
pretty ingeneous, do you know a heating tech with a testo 327 or better portable fluegas analyser. The probe inserts into a small hole in the flue pipe and can be plugged or patched between tests. This will tell the residual o2 content of the fluegas [ stiometeric for wood is approx 7.5%] and a accurate flue temp and calculate a approx combustion effiency %. You could run a load with the secondary ports capped off [ stock] and then one modified [ ports open] to calculate actual gains. Beyond that you could experiment with modulating the secondary air to mainiain the 7.5% set point. try pressureizing the secondaries with a heat gun or hairdryer when at high burn, you probably will not need much air to see results. This is almost more fun than alot of other....
tom
tom
I'm as happy (and cozy!) as a bug in a rug!
Not only am I seeing longer burns with more heat transferred to the house rather than going up the chimney thanks to the secondary burn modification, but at 6:30am this morning, I still had coals left over from yesterday's 2:00 *PM* burn and was able to get a new fire going just by add some kindling and small splits.
This morning I have the furnace completely closed down with active secondaries, a furnace front temp of 550 and flue temp of 400. Based on the stoves stock performance, I'm very content with the results so far.
Tom, I'm now on a mission to find a flue gas analyzer! I would really like to have some hard evidence to determine the effects of the changes. It would also be beneficial to tune the system to a quantitative measure of efficiency rather than tuning to temps and a completely subjective evaluation of what 'looks right'.
Interestingly, I think that much of the gain in efficiency and the extended coaling time is due to the smaller, more insulated firebox created by the fire brick modifications. My completely unprofessional, unscientific evaluation is that the firebox on this thing was just too big to burn efficiently. It made up for inefficient and incomplete combustion through volume . . .
laynes69
Minister of Fire
FixedGearFlyer said:My completely unprofessional, unscientific evaluation is that the firebox on this thing was just too big to burn efficiently. It made up for inefficient and incomplete combustion through volume . . .
I think thats why so many furnaces couldn't even come close to becoming EPA Certified without huge modifications of the unit itself. I guess the EPA will consider the B415 standards when they put new emission requirements in place for central heaters. I know the firebox on the new furnace is half of the size of the old (Hotblast 1500). But the burns are longer and hotter. Alot of people say its impossible, but if they seen what I have seen and you guys who have done some mods, they would change their minds.
TCaldwell
Minister of Fire
fixed gear flyer, a little off context but i assume you are a track rider, I used to be a roadie.
tom
tom
I wised up and put a mirror outside that reflects my chimney so I don't have to run outside and check for smoke the whole winter. That way I can stand inside and tune in the fire just right. My new motto is "no smoking".
Fixed gear flyer - I also figured out how to get the pipes parallel to the door. Two pipes on each side attached to your in/out pipe and stagger them in between each other. (In with straight pipe, 90 up, short threaded stub, 90 toward the front of the furnace, T in as close as you can to the back, straight pipe, 90, same thing on the other side, but stagger the T and 90 in where the other side isn't to cover the dead spot and cap the ends). That way the pipes with the holes are removable and can be easily installed inside the furnace. You just have to weld in place or brace up with firebrick somehow. That will be my next mod when I get too bored with this. I'm also toying with the idea of extending the baffle toward the door to get more of that smoke burned up and retain the temps inside the "firebrick box".
Fixed gear flyer - I also figured out how to get the pipes parallel to the door. Two pipes on each side attached to your in/out pipe and stagger them in between each other. (In with straight pipe, 90 up, short threaded stub, 90 toward the front of the furnace, T in as close as you can to the back, straight pipe, 90, same thing on the other side, but stagger the T and 90 in where the other side isn't to cover the dead spot and cap the ends). That way the pipes with the holes are removable and can be easily installed inside the furnace. You just have to weld in place or brace up with firebrick somehow. That will be my next mod when I get too bored with this. I'm also toying with the idea of extending the baffle toward the door to get more of that smoke burned up and retain the temps inside the "firebrick box".
Ha! A mirror outside sounds like an awesome idea, which proves to me that we're both obsessed! ")
I just started my second burn of the day - mainly because I put some polyurethane down on a floor and had to open windows - and it's just amazing! It's like I bought a new furnace!
Tom, my username has two meanings. One, I used to ride on the track and was pretty quick. Two, I'm a commercial pilot and flight instructor and used to work for Cirrus Design in the Flight Standards department. All of our aircraft were fixed-gear. Both of those references were current when I started using it on another forum many moons ago.
Fair warning to all who want to try this: your threaded iron pipe will not be easy to make changes to once it's installed and fired a few times.
I just tried to pull mine to increase the size of a few secondary air tube holes and had to break one of them off with a pipe wrench and breaker bar, destroying it in the process. The cast iron fitting is fine, but the pipe's threads were destroyed. If I had wanted to take the whole thing out, it would require a torch or sawzall...
I had a spare (thankfully!) and am trying a burn with the new hole pattern now. Hoping for even more improvement!
- Status
- Not open for further replies.
Similar threads
- Replies
- 6
- Views
- 596
- Replies
- 9
- Views
- 2K
- Replies
- 17
- Views
- 799
- Replies
- 18
- Views
- 782