Pictures of my conversion/install

  • Active since 1995, Hearth.com is THE place on the internet for free information and advice about wood stoves, pellet stoves and other energy saving equipment.

    We strive to provide opinions, articles, discussions and history related to Hearth Products and in a more general sense, energy issues.

    We promote the EFFICIENT, RESPONSIBLE, CLEAN and SAFE use of all fuels, whether renewable or fossil.
Status
Not open for further replies.

johnstra

Feeling the Heat
Sep 6, 2010
334
Northern Colorado
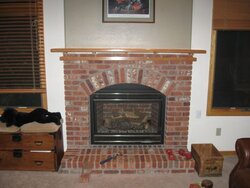
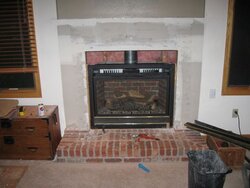
Here's what I started with. It was ok, but I'm just not happy without a wood burner. And I don't miss the noisy fan. It came out pretty easily.
 

Attachments

  • IMG_1572.jpg
    IMG_1572.jpg
    45.4 KB · Views: 536
  • IMG_1576.jpg
    IMG_1576.jpg
    42.2 KB · Views: 542
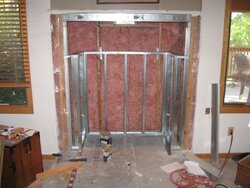
Here's what the steel framing for the firebox looks like...
 

Attachments

  • IMG_1581.jpg
    IMG_1581.jpg
    50.4 KB · Views: 546
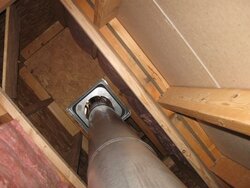
Looking up the chase at the new Simpson double-wall class A - 20 feet of it in total.
 

Attachments

  • IMG_1591.jpg
    IMG_1591.jpg
    44.8 KB · Views: 516
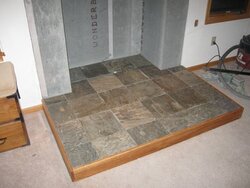
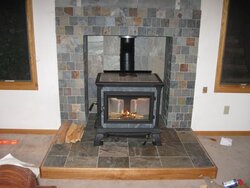
Here's a shot after the firebox was closed in and the tiling underway. And another of my first break-in fire after the stove was set.
 

Attachments

  • IMG_1597.jpg
    IMG_1597.jpg
    44.2 KB · Views: 514
  • IMG_1612.jpg
    IMG_1612.jpg
    46.4 KB · Views: 511
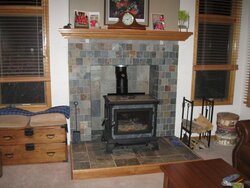
And the *almost* finished product. I still have one small row of tile to do at the top and a bit of drywall patching to take care of.

The kids, wife, and dog love to park themselves in front of it...

Oh, and I have to raise that picture now that the mantel is higher!
 

Attachments

  • IMG_1687.jpg
    IMG_1687.jpg
    52 KB · Views: 512
That is a huge improvement, not only in heating, but visually. Very nice job!
 
Wow! Very well done, indeed. You're going to get so much more heat outta that install!
 
That looks incredible, You do absolutely Outstanding work! :)
Very Impressive....
 
nice work - looks very well done up the flue etc
 
Jeebus!! That looks familiar.. We must be brothers from different mothers! You don't have a picture of the old fireplace sitting forlornly on the deck do you?

Nice work.
 
The Fireview and hearth really complement each other . . . very nice look.
 
very nice install. good work.
 
Thanks for the compliments.

I can't take credit for the tile. My wife long ago started calling my work SBU... Sturdy But Ugly. So I had a pro do the tile.

Those of you who have seen the photos of Dakotas Dad's project, you'll see that mine is essentially a clone. It's a lot easier having a good model to work from. Thanks DD! No, I don't have a photo of the old FP on my deck, but I do have one of it in my garage. Does that count?

It's supposed to snow here tonight and again on Thursday. That'll make the new stove all the better.

-john
 
johnstra said:
Looking up the chase at the new Simpson double-wall class A - 20 feet of it in total.

looks 100% better, is there supposed to be no insulation the next level up on the chase?
 
greythorn3 said:
looks 100% better, is there supposed to be no insulation the next level up on the chase?

I wish I'd insulated it all the way up. I was focused on cold air coming down and oozing into the room, so I concentrated on insulating the lower section really well. I have about 6" of mineral wool on top of the "ceiling" of my firebox and the walls are insulated up a ways as you can see in the chase. I didn't really think much about the chase being cold and affecting the draft. I thought there would be enough heat from the pipe and the house to keep it reasonably warm. What you see in the picture is pretty much how it looked when I opened it up.

Edit: Forgot to say, there's a baffle about 10' up with fiberglass insulation on top of that and everything below it is insulated. Insulation above that baffle is spotty.
 
Wow, great job to both of you guys... Suddenly the wheels are turning and I am thinking of a similar reno and tearing out the R14. I would love to do that with a T5.
Great work again.
 
Hey Johnstra,

Thanks for posting the photos--I always enjoy them, and your install looks great. I'm designing a similar nook, with my own tweaky features.

And now, my questions. ;-)

Are you using a 90 degree elbow at the back of the stove, and a jog in the stovepipe to align with the chimney?

Did you build that mantle yourself? Crown molding? Nice.

All the Best,

George
 
The stove is rear-vented. I used double-wall pipe. The collar attaches flush on the back of the stove and there is a 4" adapter from the collar to the DVL pipe. That goes to a 6" adjustable section that is attached to a tee, which does make a 90* turn. Then, off the top of the tee, I use the 45* sections to offset the rest of the way to the chimney. I really wanted to top vent, but I just didn't have the space. If you plan to recess your stove into the cavity, then it's easier to just offset off of the top. I wanted the ability side load, so my stove needed to go out in front of the cavity.

On the mantel... It was on my original fireplace (though I snapped the picture after I'd pulled the crown molding off). I had to modify it and box in the bottom to use it on my new setup, but it wasn't too hard making it work.

-john
 
johnstra said:
The stove is rear-vented. I used double-wall pipe. The collar attaches flush on the back of the stove and there is a 4" adapter from the collar to the DVL pipe. That goes to a 6" adjustable section that is attached to a tee, which does make a 90* turn. Then, off the top of the tee, I use the 45* sections to offset the rest of the way to the chimney. I really wanted to top vent, but I just didn't have the space. If you plan to recess your stove into the cavity, then it's easier to just offset off of the top. I wanted the ability side load, so my stove needed to go out in front of the cavity.

On the mantel... It was on my original fireplace (though I snapped the picture after I'd pulled the crown molding off). I had to modify it and box in the bottom to use it on my new setup, but it wasn't too hard making it work.

-john

Hi John,

Thanks for telling me more about your installation.

Funny thing about your mantel. When I saw your original photo, I thought "What a cool double tier Art Deco type mantel! That's me for ya. ;-P
 
Status
Not open for further replies.