Newbie trying to pex a building

  • Active since 1995, Hearth.com is THE place on the internet for free information and advice about wood stoves, pellet stoves and other energy saving equipment.

    We strive to provide opinions, articles, discussions and history related to Hearth Products and in a more general sense, energy issues.

    We promote the EFFICIENT, RESPONSIBLE, CLEAN and SAFE use of all fuels, whether renewable or fossil.
Status
Not open for further replies.

tinrat

Member
Nov 14, 2010
10
Central Illinois
fotki.com
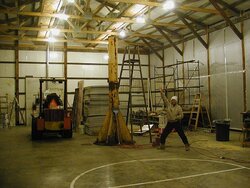
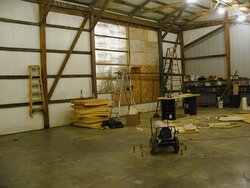
Hello everyone. I am preparing to pour concrete (hopefully Friday the 19th) in a 40’x64’x16’wall building I constructed this year. I have 2400 ft of pex and an 8-loop manifold. Grade for the pour is at 5-6” with a larger cavity in the middle to accommodate the base for a 17’ swing jib crane. I have materials to hopefully place 3” of insulation around the edge and 3” under the first 4’ of perimeter and 2” (240-3'x4' used sheets) under the rest. I also have a roll of thin plastic 4’ wide I hope to lay out under the insulation to help as a moisture barrier. On top of the insulation I have steel livestock panels I hope to lay down and secure the pex to. then I hope to go over the top of the pex with a roll of 4' tall fencing as an additional reenforcement to the concrete.
I am open to any thoughts on this project? Most of this build is from used or gathered materials. I have been trying to read as much as possible about hydrionic slab heat and hope my ideas on this work. I just found this forum and wish I had found it a month ago. A couple things I am curious about. How close to the outer wall should the pex be to be efficient? Should the larger deep area around the jib crane be insulated the same as everything else? And could I, or should I omit pex in or around the crane? I hope to rebar this area in a heavy-duty manner. Any and all input on this project would be greatly appreciated. Thank you.
 
Welcome to the hearth ! Here's a couple of my thoughts. The grid you put under the pex must be flat. If not you risk cutting into the pex when you cut the floore. the pex should be in the bottom 1/3 of cement but not on the bottom. You can buy rebar chairs or use whatever you have. Be sure to tie the pex to the grid good so it dont float to the top. keep all loops as close to the same length as possible. search the net for free software for pex layout. (Very handy). When I didmine I kept the pex back about 2' from the overhead doors so I wouldn't loose as much heat from the cement outside. hope this helps Hopefully your plastic is wider than 4' when un-folded, you should tape any seams and use thick enough plastic that you dont tear holes in it. Hopefully whis helps.
J.T.
 
Wirsbo makes a great pex staple system, that you use to staple the pex to the foam. It is easy to use, the stapler it self is designed to be used standing up, so ne bending over, it is really a lot faster than tying to rebar, and the pex says out of the way when you make your relief cuts. Others will say this is not the best way to put in the pex, but it is recommended by Upnor/Wirsbo one of the biggest pex manufacturers out there.
 
I have done a ton of these, a few points -- make sure that you put PVC conduit 90 degree sweeps over the tube where it exits the floor, let it stick out a couple of inches or more, this will keep the tubing from being inadvertently sheared off , also how far down is the water table ?, if it is less the six feet, 9 is better. Then you will need to insulate under the whole floor with at least 1 inch dow board. On a building that size we would put in about 5 - 300 ft rolls. more doesn't hurt, 12 inch on center for a couple rolls on perimeter then 24 inch OC after that. We always flood and pressurize before we pour. 100 PSI. it lets u know there are no leaks, it floats less, and expands the tube a little. I always am on site when the job is poured and walk down every inch of pour with the cement heads " they will mess it up" If you have a problem at this stage it's almost impossible to correct. I wouldn't worry about getting the placement of the tube up in the slab. it 's hard enough to keep it down. with rolled fencing you will fight this, if it looks like it's laying pretty flat then a little pull up on the fence won't hurt. Remember that this has to be saw cut later and we don't cut over an inch. works well never hit a line and the floor cracks on the cut. If you can make an uncoiler it will go better less twist etc. Just need something that you can put the tube on that will spin. No splices under the slab.
 
Although I didn't do it, I found credible info stating that the pex should be 2" down from the top of the concrete. Concrete is a poor conductor of heat, and you want most of the heat to go up, not down. That said, mine was stapled to 2" foam with 4-5" of concrete above. Our low temps have only been about 25 so far, so after this winter when we hit -30F I will make my final evaluation. Indication at this time is that it will work just fine. Can't redo it anyway, so it has to be fine.
 
How large of a foot print for the crane? I think I would eliminate the foam and pex under the crane, unless you are sure of the psi rating of the foam.

You would need to subtract that area from any heatload calc and floor output (btu/ sq. ft)

Ideally the tube should be in the center of a 4" slab and in the top 1/3 for a 5 or 6" slab. You want 1-1/2 times the concrete aggreate diameter over the tube, so typically 1-1/2- 2".

The deeper the tube in the slab, the higher the temperature requirement and the greater the downward loss. It will be a big difference in a 6" slab.

The challenge becomes holding the tube in the slab when pouring and also if you plan saw cuts for crack control. Concrete finishers tell me unless you cut down 1/3 of the slab thickness those saw cuts really don't do much. I have seen cracks travel right across 1/2- 1" deep cuts.

I would keep the tube in 12" from outside walls to allow a place to anchor walls, shelves and equipment to the slab.

Take pictures or video before you pour and map out any spots where you need to bolt down machinery.

I'd advise against putting water in the tube during freezing weather conditions, unless you have a sizable compressor to blow it out the next day. The slab will stay warm from the curing process for a day or so, after that you could risk freezing, that would be a huge mess.

We did a lot of wintertime concrete pours in Utah, they were blanketed and in some cases we had a portable boiler to to run them until the concrete cured.

Concrete blankets are a must for winter pours.

Here is an article that explains tube depth better

www.pmmag.com/Articles/Column/67c66155b6fc7010VgnVCM100000f932a8c0____

hr
 
When I did my basement floor in my house, the manufacturer (Radiantec) told me to space 6" apart along any exterior wall until you are 2' off wall(4 runs)and then 12" on center after that. The exterior wall is your greatest heat loss area that's the reason for closer spacing. However I understand that's for a living space, maybe a garage is different. I run 90* water through the floor and it heats great. At 12" centers real even heat over the floor.
Also a day prior to the pour, pressurize the pex with air and periodically check over the 24 hour period to make sure there are no leaks. Can't fix leaks after pour, well not without ripping up floor. Tie the tubing down real good if pressurizing with air during pour. It will want to float. Pressurizing with water sounds alot better for the pour barring freezing temps. That would definately hold it down better. Whatever you pressurize with, watch that pressure gauge during the pour. If you see the pressure dropping, get to work real fast to fix leak. I would definately have a coupler or 2 on hand just in case. Probably won't need them but...........
I wouldn't run pex under the crane footprint. Also don't run it too close to any toilets. Floor heat is not good for wax rings.
 
A few thoughts:

1) Never sacrifice structural integrity to gain R value. So the crane & any other structural loads have priority. Insulate the rest as best you can.
2) Yes, insulate the crane pit as much as possible... but do not violate 1).
3) Use heavier plastic 6 mil CGSB required here by code. Cheapest part of the job too BTW.
4) Sounds like too much wire in the slab to me. Structurally the is no advantage (or at most a very limited one) to a second layer of wire. Trust me you will fight the wire all the way. Also if this is smooth zinc/galv coated livestock wire, the concrete will develop a very poor bond with it. Rebar is rough & usually uncoated for a reason.
5) As bigburner said PVC tubing to protect your heating tubes where they transition through the floor are a must. Make them or buy them.
6) Your tubing spacing is going to determine how comfortable your floor & building are. Hard to go wrong with tubes spaced closer together = nice warm building with lower water temps = less energy use. Easy to go wrong with them too far apart = cold uncomfortable spotty heat with high water temps = more energy use & your still not happy. Do your research/calculations make sure you have the correct diameter of tube spaced correctly to achieve the result you want in the area you live in.
7) As hr said tubing in top 1/3 of slab. Also remember not to violate 1) with tube placement.
8) As bigburner said use an uncoiler, saves a ton of grief. Make/rent/borrow/buy one.
9) Tool control joints into the slab as you pour instead of cutting, better long term results. Tool deep 1-1.5". Deeper on a 6" slab if you can. You can rent a brass tool & handle at your local rental shop, fits on the bull float handle. The slab will naturally crack along the tool lines as it dries. Fill tool lines with Elastomeric caulking after total sure of slab. To give you a totally flat floor if thats what you want, 28 days minimum for total cure. Deep Tooling works,. If you want proof of this just go to town a look at the sidewalks, deeply tooled ones crack on the tool lines, shallow tooling/cutting they crack everywhere. Why waste time/money with something that does not work.

FWIW this is how we do it:

Take plenty of time & be careful with the dirt, this will make everything you do on top of the dirt easier.
6 mil poly under entire slab & up all edges, all seams are taped. Continuous vapor barrier, same as you would on a wall.
2" of foam (high density) under entire slab & up all edges. Tape all seams. (Remember #1)
Place tubing on foam. Never a tubing joint in the slab. Tubing sized & spaced according to desired results in local climate.
Place rebar on top of tube (carefully). Typical is 12/16/24" O.C. Depends on loads etc.
Lift rebar to desired height & place on rebar chairs. (You can use bricks if you want to save $, remove the bricks as you pour as they will be weak spots in your floor if left in place).
Lift tubing up to underside of rebar & tie in place. Note that tubing is under rebar & will be protected by it in later stages. (Do not use rebar wire to tie tubes, wire can/will cut tubes) Plastic zip ties work & put far less strain on the tubes.
Now we are ready to connect the zones to a manifold etc & do an air pressure/leak test. (Do not exceed the max pressure of your tubing).
As the rebar is on top we can place planks if we are wheeling it, place/drag concrete pump hoses, walk on rebar without damaging the tubes.
Always leave the tubing pressurised with guages while we pour, you can hear/see/find even a small air leak. Not so with water as the concrete is already wet.
Always have repair tools/materials on site when we pour, quick easy fix with everything on hand.
Always leave the tubing pressurised after the pour. If a leak was missed it will be evident later, air bubble or hole in the top of slab & it is easier to remove green concrete & fix it. Even 3 day old is easier than cured.

Hope this helps. James
 
every one is saying to put the tube in the top one third but if your floor is 5" top third would put you very close to the top and higher risk of cutting tubes, making the whole thing useless. I'm still going with a third of the way up
on a 5" floor. your cut should be 1/4 the depth of the floor thickness to do any good. at 5" that's 1 1/4" putting you very close to the tube.
 
The frozen Canuck is pretty right on. When we do it the tube is on top of the wire and the wire is near the bottom of the slab. The slab will heat evenly no matter where the tube is, the T/D between the insulated ground and air above the slab will determine where the heat goes first. 2nd law of thermal dynamics I believe. Lot of these guys have only done there own system, we do this for money not just for fun. We always use high-way mats in stead of rolled wire just because it lays flatter & can be bought in heaver gauges. My two cents again.
 
jebatty said:
Although I didn't do it, I found credible info stating that the pex should be 2" down from the top of the concrete. Concrete is a poor conductor of heat, and you want most of the heat to go up, not down.

Who in the world would have told you that? It is also an excellant conducter of cold. This is why properly isnulating the slab under and around is so improtant.
 
Trzebs13 said:
jebatty said:
Although I didn't do it, I found credible info stating that the pex should be 2" down from the top of the concrete. Concrete is a poor conductor of heat, and you want most of the heat to go up, not down.

Who in the world would have told you that? It is also an excellant conducter of cold. This is why properly isnulating the slab under and around is so improtant.

Thanks for catching me on this. The result of not thinking, speaking too quickly, and trying to re-remember stuff from months ago. I think the point of embedding the pex not more than 2" down was to accomplish quicker heat transfer to the air above than if the pex were embedded deeper. Correct me on this, too, if I'm off base. Concrete absorbs heat slowly, stores heat pretty well, and then releases it slowly, which also makes it a good thermal mass substance which is useful for more than just storing heat (water would be better, but not many of us can walk on water).

And I couldn't agree more on the importance of insulating under the slab and around the perimeter. Heat would move through the concrete in all directions, and heating lots of ground under the slap is not very useful if the goal is to heat the building.

FWIW, the thermal conductivity of some materials of interest (w/mK):
0.6 water
1.13 concrete typical for floors (0.42-1.7 depending on mix properties)
2-7 solid rock
0.2 dry sand
2-4 wet sand (wet soil is also in this range)
0.02 polyurethane

As is commonly known, water holds 1 btu/lbF. Concrete is typical at 0.2 btu/lbF. Water weighs 62 lbs/cu ft; concrete typical at 150 lbs/cu ft.
 
Great recovery!! And thatnks for the stats, very intresting.
 
Just an update to this project.... The 'crete is poured!!! I tried to incorporate many of the great instructions given by everyone and am very grateful. I wish I had posted this a month ago as I am sure I would have applied more of what you all have provided. I think the pex made it about halfway for a depth. It took 49.5 yards. the crane footprint took up an area of approximately 8'x8'x2' with six 1'x3'x4' concrete slabs obtain courtesy of Illinois DOT. These were cut hi-way portions w/ 7/8" rebar stubs sticking up. I placed them in a random pattern under the footprint area and at adepth of 5' and filled in around them to the 2' depth w/ gravel. then welded rebar from them to my bolt pattern skeleton I made to fasten the jib to. I feel very comfortable with the size; depth; and ballast-weight of this. I insulated only to the edge of this area but did let the vapor barrier run down into the lower depths of the pour area. Oh... I did away w/the thin plastic vapour barrier... traded up to a thicker roll. this I layed below the insulation and then had enough to also cover the insulation befor the steel went down...... Anyway.. It's done. I bought a cast-iron pump, thermostat; controller and expansion chamber; along with 20 gal of Hydronic antifreeze ($60 /5gal pail....sheeeeesh). I hope to start setting that up by the manifold tomorrow. I bought all plastic pex connectors to avoid bimetal corrosion. I only wonder if the plastic connections are any good or am I asking for heartache at the connections to the manifold ,etc.??? will try to keep everyone posted as to progress and then... KNOCK on WOOD.... the efficiency of this project... Thanks everyone for all your support....
tin...
 
P1010069-vi.jpg


P1010049-vi.jpg


P1010050-vi.jpg


http://images112.fotki.com/v495/photos/4/31394/9266030/P1010055-vi.jpg

[ATTACH=full]214264[/ATTACH]

[ATTACH=full]214265[/ATTACH]

[ATTACH=full]214266[/ATTACH]
 

Attachments

  • P1010052-vi.jpg
    P1010052-vi.jpg
    48.9 KB · Views: 30
  • P1010051-vi.jpg
    P1010051-vi.jpg
    41.6 KB · Views: 35
  • P1010054-vi.jpg
    P1010054-vi.jpg
    35.5 KB · Views: 36
The pictures bring back fond memories of the pour in my shop last May. I can only imagine how excited you are to get your radiant heat system into operation.

A quick calculation you may find of interest: for 4" slab, concrete cu ft = 40 x 60 x 0.33 = 792 cu ft, and at 150 lbs/cu ft = 118,800 lbs, and at 0.2 btu/lbF thermal mass storage = 23,760 btuF. I have been letting my radiant floor range between 63-65F, and if you did the same, that would be 47,530 btu's in the thermal mass, which should be mostly usable except for loss to perimeter and loss to ground underneath.

If you use hot water storage, say 1000 gal pressurized as I do, I heat the tank to about 180F and run it down to about 85F. The 1000 gal water tank stores 1000 x 95 x 8.34 = 792,300 btu's over this temperature range. I can get another 83,400 btu's if I charge the tank up to 190F, or 875,700 btu's in round numbers. Divide that by heat loss and you can calculate how often you need to fire your boiler to maintain heat in the building.

Are you planning for a wood gasification boiler for heat? ... with storage? You can see the benefits of doing this.
 
Jim,
I have a 120,00 tankless at the present time. I hope this will get my slab "up and running". Eventually I would like to go to wood gasification but this will take time to put together. I hope to get the system hooked together by the weekend. If you noticed in the pics, the "pidgeon holes" above the manifolds was set there temporary. I hope to bring in my Wilmar Wrangler and move them tomorrow. This will be the first machine to drive on the new 'crete. I woould like to wait longer for the 'crete cure but this needs moved to finish the heating setup. I hope to just move it down and out ofv the way (needs painted anyway)and get out of the shop until next week with the machines.
tin
 
FIRE IN THE HOLE!!!!! YEA!!!! I finally got hooked up and started.
http://images33.fotki.com/v1072/photos/4/31394/9266030/P1010067-vi.jpg long way from finished but this is the part I have been holdin' my breath for..... Question? How doesw one figure what pump to use? there are like a gujillion different circulating pumps available... I used a Grundfos 15-58 3 speed (cost around $120) Its pushing fluid through a 110k tankless. I guess I will just have to wait and see how this performs. input temp onthe manifolds was 170 and output when I started it was around 35 degrees. it ran for about 5 hours and brought the output manifold up to 46. I am running the pump on the middle speed as it didn't want to keep the tankless fired up on low speed. I set a thermostat to 45 degrees about a foot off the floor close to the spot where all the tubes converge and left it to run all night. will update tomorrow night.. Thanks everyone for your input. I hope I have a warm building for Xmas!!!!
 
I'd run it on "High" until you are up to temp then see where you need to be to maintain your temp. As posted earlier, you have a LOT of thermal mass to heat - days worth. I believe your tankless will regulate the outlet temp (my Rennai does) by reducing flow.
 
Great progress you have made.

How does one figure what pump to use? there are like a gujillion different circulating pumps available… I used a Grundfos 15-58 3 speed (cost around $120) Its pushing fluid through a 110k tankless. ... I set a thermostat to 45 degrees about a foot off the floor close to the spot where all the tubes converge and left it to run all night. will update tomorrow night.

Determining which circ to use isn't always easy. Assuming all of your pex runs are about the same length, determine the total effective length of one run and calculate the pump head for that run based on the flow rate you want to achieve -- say 0.5 gpm for easy calculation -- equals Pump Head 1. Then multiply the 0.5 gpm by the number of pex runs, say 8, equals 4 gpm total. Then calculate the pump head in the loop including the boiler and the manifold at 4 gpm, equals Pump Head 2. Add Pump Head 1 and 2 to get total pump head at the desired flow rate, 4 gpm. Next look at pump curves and pick a pump that in the middle of its curve will deliver that flow at the calculated pump head.

There is an approximate easier way too. Some manifolds have a flow meter on each run, and you adjust the balancing valve on each run to achieve the flow you want. If the circ you have will not deliver the flow you want for each run, you need a circ that can deliver the total flow at higher pump head. A little trial and error, maybe.

I had a 007 on my system, 6 runs of 300'-1/2", plus the lines to and from the manifold. The 007 delivered just over 1/4 gpm on each run (my manifold has the flow meters). I replaced it with a used 009 that I had leftover after another project. The 009 delivers 0.5 gpm on each run, much better. Although the 009 takes just about twice the watts of the 007, it also now runs about 1/2 the time on each heating cycle than the 007 ran.

Next you have to decide the temperature you want for the shop. I buried a piece of capped off 1/2" pex into the middle of the concrete about 5' in from a wall. Into this I put the sensor going to my A419 controller, along with a DS18B20 sensor for data logging. My first try at the "right" temperature was 61F with a 1F differential. I haven't changed it. Air temp in my shop ranges between 55-63 at outside temps -10F to +40F, draft free. Since radiant warms surfaces, this is close to "body felt" temperature of 61F all the time, very comfortable for working in the shop. BTW, the DS18B20 reports 61F, although the A419 is set at 63F. I assume the DS18B20 is more accurate than the sensor for the A419.
 
Status
Not open for further replies.