Quad Castile Combustion fan cleaning

  • Active since 1995, Hearth.com is THE place on the internet for free information and advice about wood stoves, pellet stoves and other energy saving equipment.

    We strive to provide opinions, articles, discussions and history related to Hearth Products and in a more general sense, energy issues.

    We promote the EFFICIENT, RESPONSIBLE, CLEAN and SAFE use of all fuels, whether renewable or fossil.
Status
Not open for further replies.

peirhead

Feeling the Heat
Aug 8, 2008
409
PEI Canada
Wondering who removes the fan to clean it and how involved is the job. I clean the fan with a toothbrush from inside the stove, and do regular cleaning and vacuuming of the stove....including the leaf blower suck.

What should I look for if I do try to pull it to clean it. There appears to be 2 gasket numbers in the parts list for the combustion fan but where would 2 go?..do a really need to replace both?.....There is a text procedure in the owners manual but it isn't very clear...thanks all!!
 
I pulled the combustion fan on my enviro last week to clean it well. I can't get to mine easily, the exhaust channel is too narrow. The fan has a gasket that is made from some type of fiberous material. A little stuck behind, but I was able to reuse it with no problem. Is the stove giving you a problem, or are you being proactive? Good luck
 
peirhead I removed my Castile combustion blower this year to check it for cleaning. Your right there are two gaskets, but if it's like mine made in late fall 2009 you will only need the round gasket Quadrafire part number 812-4710. The other odd looking gasket mostly round with a square area on one side is for the blower housing that the motor sits inside, and you shouldn't need to take that off.

Mine was a little bit of a pain since my stove is in a corner and fairly close to the wall with my clean-out "T" right behind. Nevertheless I was able to remove and lay back my rear cover and do my thing without removing my "T".

Don't forget to unplug the stove.
Remove the convection blower to get it out of the way. Very easy to remove.

There are I think 7 screws holding the back on and it will pivot down from the bottom. I chose to cut the plastic straps on the wiring to get a little more room to work. Then disconnected the vacuum hose (vacuum line should be blown out toward the stove not toward the vacuum switch) and the thermostat wires so the back would pivot down. I did all my work lying down on the right hand side and reaching around. For me the hardest part was getting the screws back in for the motor through the new gasket. I finally opted to place the gasket on the blower and inserted a couple of the screws that were the furthest away from me. Believe me I went slow as it was my first time, but it really doesn't take a big effort. Be sure to get the new gasket before you start as the old one is very likely to rip as you remove it. The old did not have any gasket cement so I installed the new likewise.
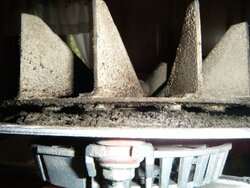
Here's a picture of my combustion blower after removing it. This is the buildup you cannot see from the inside of the stove when you clean the fins.

Lastly you might as well clean the convection blower fins while you doing all this.

The easiest way is to.
A. Take notice of how the plastic squirrel cages are installed(so they sweep the air toward the channel in mounting) so you can reinstall quickly without scratching your head.
B. Remove the little spring clamp on each cage and slide the cages off and wash them in the sink. So much easier than trying to clean these while installed.
I rinsed them with soap and water and and a small paint brush to get some of the heavier spots.

You might choose to disconnect a couple of connectors just to get more room: Just right down what the colors are if you do or mark the wires with a magic marker it they are the same color..
I reinstalled new plastic ties before closing the side panels up.
Next year It will be much faster to complete as we will both now the routine.

If you think of it take note of the identification number(s) on the exhaust blower for Tjakeman as he is compiling a list of motor numbers for future cross-reference.

Hope this helps.
 

Attachments

  • 2010_motor-cleaningA.jpg
    2010_motor-cleaningA.jpg
    126.8 KB · Views: 641
Excellent post thanks smalltown...I think I saw your pictures on an earlier post but the more elaborate procedure and tips will be invaluable. I am waiting on the round gasket (I have the other) so as soon as I get it and do the cleaning I'll report back with pics and motor numbers.
 
Hi smalltown -
Mind if I asked where you bought the gasket and how much you paid? I saw them on line for about $10-12 but the local dealer quoted me $40! Thanks in advance. Pete

smalltown said:
peirhead I removed my Castile combustion blower this year to check it for cleaning. Your right there are two gaskets, but if it's like mine made in late fall 2009 you will only need the round gasket Quadrafire part number 812-4710. The other odd looking gasket mostly round with a square area on one side is for the blower housing that the motor sits inside, and you shouldn't need to take that off.

Mine was a little bit of a pain since my stove is in a corner and fairly close to the wall with my clean-out "T" right behind. Nevertheless I was able to remove and lay back my rear cover and do my thing without removing my "T".

Don't forget to unplug the stove.
Remove the convection blower to get it out of the way. Very easy to remove.

There are I think 7 screws holding the back on and it will pivot down from the bottom. I chose to cut the plastic straps on the wiring to get a little more room to work. Then disconnected the vacuum hose (vacuum line should be blown out toward the stove not toward the vacuum switch) and the thermostat wires so the back would pivot down. I did all my work lying down on the right hand side and reaching around. For me the hardest part was getting the screws back in for the motor through the new gasket. I finally opted to place the gasket on the blower and inserted a couple of the screws that were the furthest away from me. Believe me I went slow as it was my first time, but it really doesn't take a big effort. Be sure to get the new gasket before you start as the old one is very likely to rip as you remove it. The old did not have any gasket cement so I installed the new likewise.
Here's a picture of my combustion blower after removing it. This is the buildup you cannot see from the inside of the stove when you clean the fins.

Lastly you might as well clean the convection blower fins while you doing all this.

The easiest way is to.
A. Take notice of how the plastic squirrel cages are installed(so they sweep the air toward the channel in mounting) so you can reinstall quickly without scratching your head.
B. Remove the little spring clamp on each cage and slide the cages off and wash them in the sink. So much easier than trying to clean these while installed.
I rinsed them with soap and water and and a small paint brush to get some of the heavier spots.

You might choose to disconnect a couple of connectors just to get more room: Just right down what the colors are if you do or mark the wires with a magic marker it they are the same color..
I reinstalled new plastic ties before closing the side panels up.
Next year It will be much faster to complete as we will both now the routine.

If you think of it take note of the identification number(s) on the exhaust blower for Tjakeman as he is compiling a list of motor numbers for future cross-reference.

Hope this helps.
 
I always wondered how much gunk might be under my fan on my castile. I doubt the blower has ever been removed. I did the room fans this fall and wow they were nasty. Looks like I need a gasket and some time to take out the combustion fan.
 
there is a ton of junk in them. take the time and take it off its not hard. my new gasket was 4 bucks. the dealer who said 40 is ripping you off. that's awful
 
peteinmaine said:
Hi smalltown -
Mind if I asked where you bought the gasket and how much you paid? I saw them on line for about $10-12 but the local dealer quoted me $40! Thanks in advance. Pete

These gaskets are such a scam. Quad designs them to self destruct when you take it apart and then the dealers **** you for them. Real nice.

For my Quad CB1200 I went to the local auto parts store and bought some universal exhaust manifold gasket. I think it was Fel-Pro Pro-Ramic... It was a piece maybe 12 inches by 24 inches and consists of a metal mesh with what appears to be a fabric coating on both sides. I used it for my exhaust blower a couple years ago and it's been great. The best part is that you can dis-assemble it in the future and the gasket doesn't fall apart. Some people claim that the original gasket material must be used to prevent vibration... This is BS. The gasket I bought has plenty of cushion to prevent vibration.

I paid about $12 for the gasket material and since the combustion blower gasket worked so well I also used it for the burn pot gasket recently and there's plenty of material left. So far it's working perfectly. The only hassle with this material is cutting it but if you're handy enough for that this material is great. I've used some metal cutting shears and a dremel grinder to cut mine.
 
peteinmaine
Sorry to respond a little late been quite hectic here. When I ordered mine from the local dealer it was such mess that the dealer actually ended up giving me the gasket. They have treated me very very well.

CNCPRO is correct about the gaskets. Even the new factory gasket didn't fit absolutely perfect was a small wrinkle when I installed it on the exhaust blower. They are rather thin. If I had the material I would try to make one myself, but like everything else just pulling it out of the package ready to is handy. Just be sure to have a new gasket or the material to make one as mine ripped when it was pulling away from the stove.
 
You can buy sheet gasket material fairly cheaply and roll your own.

Just make certain that it is gas tight and has the correct temperature rating.
 
Smokey Can I buy it locally here in Maine?
 
smalltown said:
Smokey Can I buy it locally here in Maine?

From a HVAC supply place, you want sheet lytherm.

It is also likely that equivalent things can be found at auto supply stores. You just need to match up thickness, be gas tight, and able to withstand the temperatures where it is being used.

It is available in several thicknesses, composition, and temperature ratings.

There are also other things that can be used in a pinch but aren't part of the stoves testing for listings.

If you can find some silicone sealant that remains flexible at the temperatures it will encounter you can even use that.

A bit of advice never use 700 degree stuff in the fire box area as it will ignite (I saw someone who should have known better do this) and do not use retort cement as it hardens and can be a real pain to break through (that is exactly what should have been used in the previous bit if advice).
 
cncpro said:
peteinmaine said:
Hi smalltown -
Mind if I asked where you bought the gasket and how much you paid? I saw them on line for about $10-12 but the local dealer quoted me $40! Thanks in advance. Pete

These gaskets are such a scam. Quad designs them to self destruct when you take it apart and then the dealers **** you for them. Real nice.

For my Quad CB1200 I went to the local auto parts store and bought some universal exhaust manifold gasket. I think it was Fel-Pro Pro-Ramic... It was a piece maybe 12 inches by 24 inches and consists of a metal mesh with what appears to be a fabric coating on both sides. I used it for my exhaust blower a couple years ago and it's been great. The best part is that you can dis-assemble it in the future and the gasket doesn't fall apart. Some people claim that the original gasket material must be used to prevent vibration... This is BS. The gasket I bought has plenty of cushion to prevent vibration.

I paid about $12 for the gasket material and since the combustion blower gasket worked so well I also used it for the burn pot gasket recently and there's plenty of material left. So far it's working perfectly. The only hassle with this material is cutting it but if you're handy enough for that this material is great. I've used some metal cutting shears and a dremel grinder to cut mine.


Hey just wondering how thick is the material you used for your gaskets?
 
I don't have the material at my current location to measure accurately but I think it's about 1/16 thick or slightly less from memory.
 
Called local dealer after 1 1/2 weeks from when they ordered it for me - still nothing. Over 2 weeks today, haven't heard anything. Bought a $9.00 gasket, supposedly the Quadra-Fire one, (but I"m thinking it's aftermarket) from a company in California, and paid the $14 for UPS ground. Should be here Wednesday. Will let you all know how it works out. And to all of you who replied to my first post, thanks! Pete
 
Status
Not open for further replies.