My Garn is finally fully operational.

  • Active since 1995, Hearth.com is THE place on the internet for free information and advice about wood stoves, pellet stoves and other energy saving equipment.

    We strive to provide opinions, articles, discussions and history related to Hearth Products and in a more general sense, energy issues.

    We promote the EFFICIENT, RESPONSIBLE, CLEAN and SAFE use of all fuels, whether renewable or fossil.
Status
Not open for further replies.

Sawyer

Minister of Fire
May 17, 2008
608
Northern WI
My Garn is finally providing heat for my house, domestic hot water, and my workshop.

All insulation is applied and today I should finish mudding the drywall on the front of the Garn

At this time I am manually controlling the pumps to the house and the shop heat exchangers. Next I will install the Taco 503 controller to control the three supply pumps.

I am keeping records of burn times and temperature changes. I have several questions but at this time I am trying to find the answers before I bother the people on this forum unnecessarily.

It was nice to shut off the gas valves and have both levels of the house comfortably warm.

Thanks to all on this forum that have helped me get this up and running. Without your help I would have not tackled this project!
 
What about the bottom front access plates for cleaning? ask what you like.Maybe I'll learn somthing too
 
Kemer said:
What about the bottom front access plates for cleaning? ask what you like.Maybe I'll learn somthing too

I have a removable access panel for cleaning. I still wanted to insulate the area to keep the heat down in the boiler room. The boiler room still gets up to 85 degrees by the time I reach 190 degree supply water. Most of the heat is now coming off the fan motor. The room is well insulated.
 
Sawyer said:
My Garn is finally providing heat for my house, domestic hot water, and my workshop.

All insulation is applied and today I should finish mudding the drywall on the front of the Garn

At this time I am manually controlling the pumps to the house and the shop heat exchangers. Next I will install the Taco 503 controller to control the three supply pumps.

I am keeping records of burn times and temperature changes. I have several questions but at this time I am trying to find the answers before I bother the people on this forum unnecessarily.

It was nice to shut off the gas valves and have both levels of the house comfortably warm.

Thanks to all on this forum that have helped me get this up and running. Without your help I would have not tackled this project!

George,

Great to see that you are online!. Your install looks very impressive. You will need a bit of time to dial things in, but I'm sure you will be satisfied with the performance of your system. We are in season 2, and it feels good not hearing the oil-boiler turn on every 5-minutes on those cold/windy days.

Merry Christmas, and enjoy!
 
I am having problems with puffing. If I loaded as Ernie does on the “Garn video†my loading door would have sparks blowing out of it. Yesterday I had a seemingly small pile of splits and small 2-3 inch sticks, all 24†long and the Garn puffed for 20 minutes. I did not have the fire brick in front of the intake. I had the brick in place for two days before and avoided the puffing but seemed to slow the gain on water temperatures.

Also Ernie got a 50* temperature rise in 2.5 hours with a startup fire and two loadings while still pumping to heat his big house. I do not get that rise with my techniques.

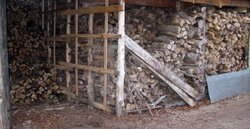
I am keeping a log on burn times, loadings and temps to try to get a handle on the best way to fire. My wood has been in the woodshed for four years, I will put a moisture meter on samples today.
 
George,

I had that happen.
If you have small or super-dry wood, (sounds like you have both) you need to slow the air flow. I was able to accomplish this by using the fire brick and taking the time to tightly pack the splits together when loading. Air needs to travel OVER the wood load, not through it as far as I understand this.
This wasn't an issue later on when I had larger splits that had only been seasoned for one year. Hope this helps.

Rick
 
Rick Stanley said:
George,

I had that happen.
If you have small or super-dry wood, (sounds like you have both) you need to slow the air flow. I was able to accomplish this by using the fire brick and taking the time to tightly pack the splits together when loading. Air needs to travel OVER the wood load, not through it as far as I understand this.
This wasn't an issue later on when I had larger splits that had only been seasoned for one year. Hope this helps.

Rick

What have you found to be the ideal split/round log size? (see my woodshed photo) I will also try to stack tighter today and consider the air flowing over the top.

Are you able to get a three hour burn?
 

Attachments

  • Woodshed.jpg
    Woodshed.jpg
    124 KB · Views: 773
George- I think we're better off splitting our wood according to what we're able to handle size-wise and what kind of splitting method we have. Then tinker with our burning methods to get the best results with the wood we have. So, what works for me, may not be the best for you. Plus, the wood will vary from year to year and maybe day to day in some cases and we'll have to adjust accordingly. I've had fire blasting out around the loading door and I've had steam belching from the overflow tube. It's that learning curve thing:)
Anyways, I split my wood no bigger than 6" dia, but end up with a good mix of sizes smaller than that. The smallest ones are handy when starting a new fire. This year I have 30" wood, not ultra-dry. The drier and smaller(dia) it is, the tighter you gotta pack it. I have my fire brick in place, laid flat, at all times.
The Garn manual says to not fill the firebox more than half-way up the loading door opening. I try to not overfill. Depending on the load on the system at the time, sometimes I raise the temp 30* with one loading.
Not sure what you mean about the 3 hr burn??
 
Thanks Rick, I expect there to be a learning curve and that I will be better at loading and burning at this time next year.

Most of my wood is hard maple.

I had read in the past of people getting a three hour burn out of a single loading in a Garn. Maybe I misunderstood and they were setting the timer for three hours and the fire was out in an hour and a half.

I will put the brick back in today when I fire.
 
Some things that made a cleaner, longer and effecient burn for me so far is

1) Tightly stack
2) Max of 2 inches of ash in firebox. ( i scoop out a little before each burn)
3) Firebrick laying flat

..... Still experimenting.....

I get 30-45 degrees in a 3 hour burn. Sometimes that's 3 small loads or 2 bigger loads.
 
Based on my past month of experience, and looking at your wood and hearing it is 4 years dry, I'd guess you'd puff like made! Before I read anything in the post but saw your picture, I though puffing problems! It does seem like bigger pieces and dare I say wetter (one year seasoned) will produce lower smoke (more efficiency).

My current wood is two years seasoned, about 22" long, maple, oak, hickory.....and I'd guess on average about twice the size of yours. I've been getting about 30-40 degrees on a load (when little heat is being sucked out of the Garn) and this happens in about 90 minutes. Especially when starting the burn around 120. In two hours, the entire pile would be gone. It burns very fast. No way could I get a three hour burn with my wood in the Garn under any kind of normal operation. In two hours, a full load is gone (with this 30-40 degree swing).

I've got more smoke than I want to see....and I fiddle around a little with a short piece of wood across the front of the pile to try and send air upwards. Apparently the short piece of wood will deflect more air upwards during the initial burn...and then it will burn up and allow the air to go in and burn up the coals.

I haven't yet figured out the sure fire why to get no smoke....but certainly less wood (no more than half the box height full) and deflecting the lower input upwards, seem to be the key.
 
Well I applied the suggestions and started a small fire at 11:15 am. Temperature at the front of the Garn was 162*, flue 150, supply line 144, and return line 138.
I put the first real load in the firebox at 11:30. Temperature at the front of the Garn was 160*, flue 280, supply line 153, and return line 142.
At 12:30 I added more wood. Temperature at the front of the Garn was 178*, flue 300, supply line 179, and return line 160.

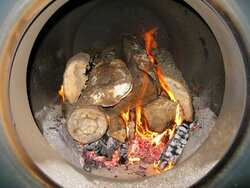
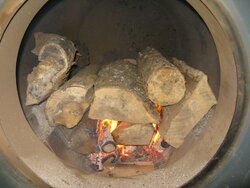
Puffing started at 12:50 and continued till 1:15. It was not loaded with small splits and the firebrick was in place. See Photo.

Maximum temperatures were reached at 2pm. Temperature at the front of the Garn was 206*, flue 240, supply line 209, and return line 189. I got nervous and did not want to boil so I turned up the thermostat in the workshop and started pumping heat into the 2400 sq/ft slab.

I shut off the fan at 2:45. Temperature at the front of the Garn was 208*, flue 180, supply line 198, and return line 182. The shop supply draws off the supply after the house; the supply was 109 and the return 162.

I was rather pleased with the gain, 209-153 (I used 153 rather than 144 as I believe the 9* change in supply temp was due to the water mixing from the fire rather than actual 9* gain) = 56 degrees. 56 degrees should be 817,600 BTU or 233,600 BTU/hr. I do not know how much heat I pumped into the shop floor but it may have helped me from boiling. Temperature outside was 26* so I was not using much heat from the boiler while firing. Maximum flue temperature observed was 430*.

I am going to try a mix of 4 year dry with some wood I put in the shed last spring to see if I can control the puffing. Possibly I should have waited longer before reloading but Garn said there maximum gains were while reloading every hour.

One of my neighbor’s wife and daughter who have an OWB stopped over to hike on my snowshoe trails. They sure like the warm loading room and the fact that they had parked on the side by the chimney and did not see any smoke. I smiled. :coolsmile:
 

Attachments

  • 2nd Load.jpg
    2nd Load.jpg
    92.1 KB · Views: 657
  • First load .jpg
    First load .jpg
    70.5 KB · Views: 658
Your wood shape ,amount and size looks like mine.I never get that kind of rise in temp except last night.I got a 53* rise with 1 fire.I don't have flue temp gauge yet .Are those flue temps normal?When you say it is puffing can you hear it inside your room?I hear my air intake flap making noise if I'm outside but nothing alarming just a slight banging.Most of my firing's net about 20*-25* per load.Yesterday I used my best wood and slightly overloaded above the half way point.I seem to get a better rise in temp on the first load vs.the reload.Same with smoking
the first load is less then the reload.
 
One other thing that I do, and that is encouraged in the Garn manual, is place the wood as far back in the firebox as I can without any danger of touching the tubing going into the reaction chamber. I place it 3 inches or so from the back. It looks like, in the pics, that it is near the front. Especially if that's 24" wood. The loading instructions on the front cover of my "Operation and Maintenance Manual" say to " maintain 8" to 16" between the lower nozzle and the front of the wood pile".
Next time you load her up, give that a try. You'll figure it out :coolsmile:
 
Kemer said:
Your wood shape ,amount and size looks like mine.I never get that kind of rise in temp except last night.I got a 53* rise with 1 fire.I don't have flue temp gauge yet .Are those flue temps normal?When you say it is puffing can you hear it inside your room?I hear my air intake flap making noise if I'm outside but nothing alarming just a slight banging.Most of my firing's net about 20*-25* per load.Yesterday I used my best wood and slightly overloaded above the half way point.I seem to get a better rise in temp on the first load vs.the reload.Same with smoking
the first load is less then the reload.

Harry, I do have a flue temperature gauge as provided by Garn. I also have an Extech 42510A Infrared thermometer. I used the IR gun for temperatures so I am using a consistent device recording temperatures at all locations. I put black hockey stick tape at all recording points to eliminate reflectivity as much as possible. I have noticed that I have to calibrate my dial thermometers as some are off by as much as 12*. The worst one is reading 12* low on my supply. If I went by that one I would boil water.

I will have to wait to see if others respond to whether these flue temps are normal or not but they seem consistent with what I have been seeing since I have been firing this short period of time.

When puffing occurs my loading door is rattling and the first time sparks were coming out. Outside I can hear the belching and the chimney smoke is heavier and seems to come in puffs. The flue temperature seems to drop slightly when puffing occurs.

I too see a very slight difference in heat gain between first and second loadings. This may be due to the fact that on the second burn half of the chamber capacity is coals rather than burning wood.

When I fire this evening I will learn more, I am not disappointed. I enjoy the learning curve, keeps this old brain active!
 
Rick Stanley said:
One other thing that I do, and that is encouraged in the Garn manual, is place the wood as far back in the firebox as I can without any danger of touching the tubing going into the reaction chamber. I place it 3 inches or so from the back. It looks like, in the pics, that it is near the front. Especially if that's 24" wood. The loading instructions on the front cover of my "Operation and Maintenance Manual" say to " maintain 8" to 16" between the lower nozzle and the front of the wood pile".
Next time you load her up, give that a try. You'll figure it out :coolsmile:

Rick, thanks for you guidance.
I will move the wood back more, the extra firebrick is place back from the nozzle about 4â€, the wood was 7-8 inch back. I will place it as you do, about 3†from the back on this today’s burn. I am also going to do my second loading if necessary/possible? After the first load burns down more to see if this eliminates the puffing I had yesterday.
 
Sawyer said:
When I fire this evening I will learn more, I am not disappointed. I enjoy the learning curve, keeps this old brain active!

It's tempting to just keep the house windows open to keep burning that beast isn't it? :)
 
sdrobertson said:
Sawyer said:
When I fire this evening I will learn more, I am not disappointed. I enjoy the learning curve, keeps this old brain active!

It's tempting to just keep the house windows open to keep burning that beast isn't it? :)

I am keeping my workshop warmer than I had planned. ;-)
 
As a follow-up, I did get a burn without puffing.

I carefully followed Rick’s suggestion and moved the wood close to the back without touching the ceramic chamber. About 2†away. Listening, it did seem to be close to puffing but the combination of loading as far back as possible and the firebrick laying flat 4†in front of the intake nozzle allowed me to burn my small, very dry wood without puffing.

I even did a small load with just small limb wood, enough for 230,000 btu storage gain while heating, without puffing.

Thanks for all the ideas!
 
I have my new controller up and running.It also has a timer on the display to time burn times.I'm surprised that it takes almost 2 1/2 hours of burn time before shut down.I used to shut down at about the 2 hour mark to leave some coals in.My flue temps reached 480*.What is considered a safe or normal flue temp?It's amazing to watch how fast it moves up and a little scary
 
First off to all, Merry Christmas!, did i read correctly about a "flap" on the combustion air inlet. Any air obstruction on the inlet side of the id fan will decrease the neg. pressure in the combustion zone, making it easier to puff. The puffing is a byproduct of the pressure changing from a negative to a momentary positive pressure in the firebox. If there is possibly too many combustables in the firebox for the given ammt of combustion air it will momentarily starve the fire, then the combustion air enters and you have reignition. By placing the wood to the rear of the firebox and a brick in front of the primary air outlet you are diffusing the primary [wood gas creating air] to the secondary burn chamber giving more air to burn the excess woodgas and control the process. The decreased flue temp is a indication of puffing[ interupted and incomplete combustion]. Also as you will learn, mixing denser, locust, oak ect with your 4 year old wood and understanding how and why it puffs will help you control. This will become intuitive and addictive.
 
Status
Not open for further replies.