
I am thinking of using ultra-fin plates ( www.pexsupply.com/Ultra-Fin-Radiant-Panel-System-1617000 )on a project. Anybody have any experience with these?
Ultra-Fin plates
- Thread starter Ncountry
- Start date
-
Active since 1995, Hearth.com is THE place on the internet for free information and advice about wood stoves, pellet stoves and other energy saving equipment.
We strive to provide opinions, articles, discussions and history related to Hearth Products and in a more general sense, energy issues.
We promote the EFFICIENT, RESPONSIBLE, CLEAN and SAFE use of all fuels, whether renewable or fossil.
You are using an out of date browser. It may not display this or other websites correctly.
You should upgrade or use an alternative browser.
You should upgrade or use an alternative browser.
- Status
- Not open for further replies.
Here's my two cents - done it every way possible -in the 70s we used PVC and in the 80's we used polyebulylene, then Wirsbo because that's all there was and now B PEX seams to the tube of choice. If you are warming floors one run of 1/2 tube down the bay with reflective bubble wrap and if you are heating with it, run two down the joist space. Just get it in the space- we usually nail it on the side of the joist,TGI etc. I don't use emission plates they can be noisy, hard to install and costly. Just tubing -300 ft or less and bubble foil, witch can be left exposed if desired, it meets the astm 84 requirement for flame spread and smoke index. IMO
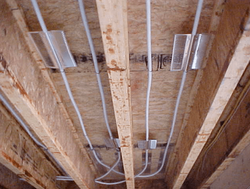
I was planning on stapling up pex 8" on center, but started to think about using these plates to avoid nails sticking through the subfloor .
barnartist
Minister of Fire
I hope they are not noisy I have some to install. My plan is to use these for the heavier carpeted rooms.
I should have them in and running in a week, so hopefully I will have something to report.
I should have them in and running in a week, so hopefully I will have something to report.
Rick Stanley
Feeling the Heat
bigburner said:Here's my two cents - done it every way possible -in the 70s we used PVC and in the 80's we used polyebulylene, then Wirsbo because that's all there was and now B PEX seams to the tube of choice. If you are warming floors one run of 1/2 tube down the bay with reflective bubble wrap and if you are heating with it, run two down the joist space. Just get it in the space- we usually nail it on the side of the joist,TGI etc. I don't use emission plates they can be noisy, hard to install and costly. Just tubing -300 ft or less and bubble foil, witch can be left exposed if desired, it meets the astm 84 requirement for flame spread and smoke index. IMO
Just a side question: Would this tube and bubblefoil approach work well for HEATING WITH LOW TEMP WATER (like 100-120 degrees) under 2-1/2'' wood floors? I'm thinking probably not.
Thanks!!
The system I described has been used on new and old construction. There is no clear cut answer your question. The floor is only one component of the whole energy system. If you got an uninsulated drafty house, won't work so good! If you had 2.5 inch floors and wanted to have this as your sole means of heating with low water temps, it would be a big stretch. If you want to complement with a another source of heat, ya it will give you warm floors. Thinking back in the residential market we have never ever only done one source of heat, meaning some radiant floor,panel heaters, Water to air HX and usually with A/C. I don't make money from selling whiz bang products we make it by having the experience of getting a comfortable home based on a primary heat source and a secondary heat source usually set up as a second stage for the extreme cold days with high winds, those are the times when low mass radiant systems fall on there face.
Rick Stanley
Feeling the Heat
bigburner said:The system I described has been used on new and old construction. There is no clear cut answer your question. The floor is only one component of the whole energy system. If you got an uninsulated drafty house, won't work so good! If you had 2.5 inch floors and wanted to have this as your sole means of heating with low water temps, it would be a big stretch. If you want to complement with a another source of heat, ya it will give you warm floors. Thinking back in the residential market we have never ever only done one source of heat, meaning some radiant floor,panel heaters, Water to air HX and usually with A/C. I don't make money from selling whiz bang products we make it by having the experience of getting a comfortable home based on a primary heat source and a secondary heat source usually set up as a second stage for the extreme cold days with high winds, those are the times when low mass radiant systems fall on there face.
That's good info. Thanks!! I was wondering if I could make better use of cooler water with the tubing/bubblefoil, but you're right, it would only work on warmer days. I can already do that with the cast iron rads I have.
in hot water
New Member
You really need to know what the heat load is for the room(s). Once you know how many BTU/ sq. ft. you need, then you design the system around that. Mid to high 20's (btu/sq.ft.) is about the best you will get from a radiant floor, regardless of how it is installed.
Conduction is always the best way to move energy into a floor. So direct contact, ideally with those aluminum transfer plates to increase the conduction surface area.
UltraFin do work well if the loads are low and you have enough temperature to drive the transfer. They move energy by convection, warm air currents in the joist bay.
Here is a job I did several years ago where I used UltraFin and transfer plates near the outside wall for extra heat transfer. This system is running on a condensing boiler set at 140f supply. I used Wirsbo PAP for less expansion movement and ran the tubes with the joist to limit the hole drilling.
Skip the bubble foil and use 6" fiberglass batts under any radiant, the bubble foil cannot equal the R-value of a thick batt, regardless of the marketing hype. Also the aluminum is of little value to reflect unless it is a smooth, clean surface. Foil covered batts or bubble quickly gather a layer of dust under floors and add little if any reflective value.
hr
Attachments
barnartist
Minister of Fire
HR, why did you go with only a few plates on the install? was that enough to do the trick? I had planned on having several, maybe 4 plates for each joist bay... maybe I only need plates closer to the walls? My thought is the more plates the lower the water temp required to help heat the area.
I did not use plates on the first half of my house. I have plush carpets with padding, I used the bubble wrap and r-19 fiberglass insulation. It heats great at 130f water. We have not been below 10F outside yet this winter, but when we do get closer to 0 as we did some days last year, I do need to turn up the temp to around 140.
I did not use plates on the first half of my house. I have plush carpets with padding, I used the bubble wrap and r-19 fiberglass insulation. It heats great at 130f water. We have not been below 10F outside yet this winter, but when we do get closer to 0 as we did some days last year, I do need to turn up the temp to around 140.
barnartist said:I did not use plates on the first half of my house. I have plush carpets with padding, I used the bubble wrap and r-19 fiberglass insulation. It heats great at 130f water. We have not been below 10F outside yet this winter, but when we do get closer to 0 as we did some days last year, I do need to turn up the temp to around 140.
Did you staple pex tight to subfloor or suspend in space close to the subfloor in the first half of your house?
in hot water
New Member
barnartist said:HR, why did you go with only a few plates on the install? was that enough to do the trick? I had planned on having several, maybe 4 plates for each joist bay... maybe I only need plates closer to the walls? My thought is the more plates the lower the water temp required to help heat the area.
I did not use plates on the first half of my house. I have plush carpets with padding, I used the bubble wrap and r-19 fiberglass insulation. It heats great at 130f water. We have not been below 10F outside yet this winter, but when we do get closer to 0 as we did some days last year, I do need to turn up the temp to around 140.
I used the transfer plates under the large windows to transfer the energy a bit more efficiently. The UF were placed every 2-1/2 feet
barnartist
Minister of Fire
Ncountry said:barnartist said:I did not use plates on the first half of my house. I have plush carpets with padding, I used the bubble wrap and r-19 fiberglass insulation. It heats great at 130f water. We have not been below 10F outside yet this winter, but when we do get closer to 0 as we did some days last year, I do need to turn up the temp to around 140.
Did you staple pex tight to subfloor or suspend in space close to the subfloor in the first half of your house?
I stapled it, left about 2" air gap and then layer of foil bubble. What I dont like about the staples is the noise when a cycle starts and ends. I was hoping the plates would help with this. I plan in leaving even extra room for expansion this time, I think I was a bit too tight the first time.
Tarmsolo60
Feeling the Heat
I just took out a pile of these from my house, I switched to extruded aluminum plates, I wanted to be able to utilize lower storage temps and run a condensing Viessman Vitodens 200 backup as efficient as possible.
Ultra fins work ok, I'm just trying to heat with the lowest temp possible. Also a believer in unfaced fiberglass below.
Ultra fins work ok, I'm just trying to heat with the lowest temp possible. Also a believer in unfaced fiberglass below.
barnartist
Minister of Fire
Wow, you actually took out plates to put these in? You must really be a believer in the extruded. I have never heard of them til you just mentioned it. I looked them up. What is the thinking that these will allow you to run at a lower temp?
They look thick and pricey- true?
They look thick and pricey- true?
Tarmsolo60
Feeling the Heat
barnartist said:Wow, you actually took out plates to put these in? You must really be a believer in the extruded. I have never heard of them til you just mentioned it. I looked them up. What is the thinking that these will allow you to run at a lower temp?
They look thick and pricey- true?
Each extruded plate give you approx 190 sq" (4"x48") of aluminum in direct contact with the subfloor. Heat transfer is more efficient because of conduction. Lower water temp required to get required surface temp.
This give you lower usable storage temps
This also gives you lower running temps cooler returns for better condensing on condensing boilers
The plates are fairly thick and are pricey but in my opinion worth it. Above floor systems like warmboard(crazy expensive) are even better for low temps, I did a job with a 157,000 heat loss and heated it with 100 degree water.
in hot water
New Member
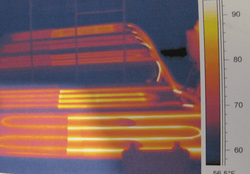
Here is a look through the lens of an infrared camera. Notice the difference when ThermoFin aluminum transfer plates are used.
Also notice where I laid a piece of carpet over the 3/4 plywood, on the back 1/2 of every demo and just a strip on the suspended tube panel, and how it changes the temperature. That was carpet without pad. All running the same amount of pex, same flow rate and same, 140F supply.
Notice on the far right panel where I pulled the transfer plate away from the floor to crimp the supply onto the copper in the transfer plate.
hr
Attachments
in hot water
New Member
The power of a conductor. this is a piece of Warmboard. Basically it is a piece of 1-1/8" plywood with grooves routered in 12" on center. Then they stamp a piece of aluminum over the entire sheet. So you snap the 1/2 pex into those aluminum grooves.
Notice where I routered through the aluminum to change a loop length and how it broke the conduction transfer.
hr
Notice where I routered through the aluminum to change a loop length and how it broke the conduction transfer.
hr
Attachments

in hot water
New Member
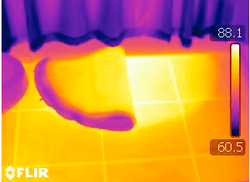
Here you go, room temperature around 56F, white is 95F.DaveBP said:hr, I love these IR scanner pictures. Can you tell us what temperature range we're seeing with the colors from purple-orange-yellow-white?
Attachments
barnartist
Minister of Fire
Having seen these examples, what benefit can an outdoor rest offer? Im not even sure how to set it up but I need to know I am at the manifold part of my install and am close to the point of no return.
I also have only a simple mixing valve, It only seems to let me run water down to 120 and no cooler unless my boiler/storage is cooler.
Any benifit to a mixing valve that can mix down further?
What do I need to run a system that adjusts the water temp on its own?
Lastly, how does water speed/flow effect the transfer- I assume it will change the temperatures at the end of each circuit....
in hot water
New Member
That picture is a classic example of how delta t drives the heat exchange. With that room sitting at 56F, i could actually deliver 20 btu/ square foot into the space with @70 degree supply temperature.
As the room cooled, driven by the outdoor temperature outdoor reset anticipates that change and starts ramping up the supply temperature.
It can also eliminate temperature swings by providing virtually constant circulation. Is it required, no. Does it improve comfort and conserve energy, yes if installed and adjusted properly.
It also allows you to drive that supply (tank) temperature down to the lowest possible temperature. But the entire system needs to be designed with that control logic in mind. You need emitters, and enough of them to be able to utilize that low temperature.
The very best is outdoor reset includes indoor feedback, with indoor feedback it can compensate for internal gains from lights, fireplaces, large parties, etc.
All things being equal more flow = more heat output. If you feed a string of hot water baseboard with 180 and leave the other end with 160 you have an average temperature through the element of 170F.
Increase the flow to go in at 180 and leave the other end at 170 now the average temperature is 175F. More heat is moved from a heat emitter the higher the average temperature.
The same thing happens on the air side. Put a fan behind some fin tube or a finned coil and increase the outputs.
But the trade off can be more pump power to move the extra flow and more noise as the velocity increases in the piping, it's a trade off.
When installers undersize a baseboard heat job, or a radiant slab, increasing flow and or temperature can correct to a degree.
To correct a long pex loop in a slab, like a 100' loop! we would install a flow reverser. Feed the supply from one end for 15 minutes, reverse flow and feed from the opposite end for 15. The result is you raise the average temperature through the loop and increase output.
hr
Willman
Minister of Fire
I installed the ultra fins in my bedroom and walk in closet 12'x24' 5 yrs ago. Went the hard way for tubing install. Perpendicular to joists. Labor intensive to say the least. I feel as if the joist bays maintain a more even temp than running parallel to joists. Wouldn't want to pay the labor on a perp install though. Used PAP for tubing.
I mix down to 140* for this loop. This is the only disadvantage to suspended install.
I used 2" foil face foam board fitted into joist bays screwed to sleepers. With 3" air space to emitters) Finished it off with another 2" foil foam board running perpendicular to first layer.
Ultra fin has a heat loss calc on their web site that determines tubing spacing as well as the number of emitters and their placement. This is all based on the location of the project as well as the rooms heat loss. Bedroom maintains a constant temp no matter what it is set at. Warm floors are a slight misnomer as target floor temps are generally high 80* ish.
When I grow up and can swing the cash to install real hardwood nail down flooring instead of the engineered I don't have to be concerned with the nail issues. Although after nailing one can cut off all the nails that penetrate for a flat plate staple up install.
I have a couple of small rugs on the floor and they are very warm when I lift them to feel floor. So I would prolly stay away from full rugs.
There is no noise issue whatsoever no matter what. Even turning on heat for the first time in the fall.
Just my opinion on the fins.
Will
hr, with 12" spacing on the warmboard and temps as shown in your IR photos, would your typical barefoot blind guy who lost his cane and had to feel his way with his toes notice the heat striping?
Sounds facetious but if I live long enough I would like to put radiant flooring in my half-finished house. I'm looking at an above-floor install between plywood sleepers with aluminum heat spreader plates and I'm wondering with a low heat load house how much difference the thickness of the spreaders can make. They are available from .010" to .024" thick from my preliminary research and various widths, even double tube strips 12" wide.
Sounds facetious but if I live long enough I would like to put radiant flooring in my half-finished house. I'm looking at an above-floor install between plywood sleepers with aluminum heat spreader plates and I'm wondering with a low heat load house how much difference the thickness of the spreaders can make. They are available from .010" to .024" thick from my preliminary research and various widths, even double tube strips 12" wide.
in hot water
New Member
Willman said:I installed the ultra fins in my bedroom and walk in closet 12'x24' 5 yrs ago. Went the hard way for tubing install. Perpendicular to joists. Labor intensive to say the least. I feel as if the joist bays maintain a more even temp than running parallel to joists. Wouldn't want to pay the labor on a perp install though. Used PAP for tubing.
I mix down to 140* for this loop. This is the only disadvantage to suspended install.
I used 2" foil face foam board fitted into joist bays screwed to sleepers. With 3" air space to emitters) Finished it off with another 2" foil foam board running perpendicular to first layer.
Ultra fin has a heat loss calc on their web site that determines tubing spacing as well as the number of emitters and their placement. This is all based on the location of the project as well as the rooms heat loss. Bedroom maintains a constant temp no matter what it is set at. Warm floors are a slight misnomer as target floor temps are generally high 80* ish.
When I grow up and can swing the cash to install real hardwood nail down flooring instead of the engineered I don't have to be concerned with the nail issues. Although after nailing one can cut off all the nails that penetrate for a flat plate staple up install.
I have a couple of small rugs on the floor and they are very warm when I lift them to feel floor. So I would prolly stay away from full rugs.
There is no noise issue whatsoever no matter what. Even turning on heat for the first time in the fall.
Just my opinion on the fins.
Will
Good point about the under rug temperature, it does dampen the output. Here is what a throw rug looks like when you fold it over. The top runs around 70F.
Attachments
stee6043
Minister of Fire
in hot water said:Willman said:I installed the ultra fins in my bedroom and walk in closet 12'x24' 5 yrs ago. Went the hard way for tubing install. Perpendicular to joists. Labor intensive to say the least. I feel as if the joist bays maintain a more even temp than running parallel to joists. Wouldn't want to pay the labor on a perp install though. Used PAP for tubing.
I mix down to 140* for this loop. This is the only disadvantage to suspended install.
I used 2" foil face foam board fitted into joist bays screwed to sleepers. With 3" air space to emitters) Finished it off with another 2" foil foam board running perpendicular to first layer.
Ultra fin has a heat loss calc on their web site that determines tubing spacing as well as the number of emitters and their placement. This is all based on the location of the project as well as the rooms heat loss. Bedroom maintains a constant temp no matter what it is set at. Warm floors are a slight misnomer as target floor temps are generally high 80* ish.
When I grow up and can swing the cash to install real hardwood nail down flooring instead of the engineered I don't have to be concerned with the nail issues. Although after nailing one can cut off all the nails that penetrate for a flat plate staple up install.
I have a couple of small rugs on the floor and they are very warm when I lift them to feel floor. So I would prolly stay away from full rugs.
There is no noise issue whatsoever no matter what. Even turning on heat for the first time in the fall.
Just my opinion on the fins.
Will
Good point about the under rug temperature, it does dampen the output. Here is what a throw rug looks like when you fold it over. The top runs around 70F.
Now you're just showing off! Ha. Love these photos. This has turned into a great thread, great read...
- Status
- Not open for further replies.
Similar threads
- Replies
- 0
- Views
- 187
- Replies
- 1
- Views
- 364
- Replies
- 0
- Views
- 515