Extending existing fireplace hearth for wood-burning insert

  • Active since 1995, Hearth.com is THE place on the internet for free information and advice about wood stoves, pellet stoves and other energy saving equipment.

    We strive to provide opinions, articles, discussions and history related to Hearth Products and in a more general sense, energy issues.

    We promote the EFFICIENT, RESPONSIBLE, CLEAN and SAFE use of all fuels, whether renewable or fossil.
Status
Not open for further replies.
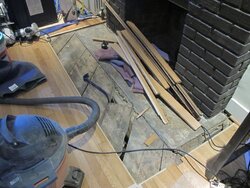
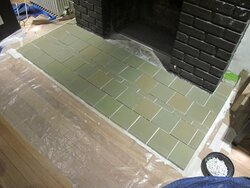
We cut out the hardwood today. Please see the attached pictures.

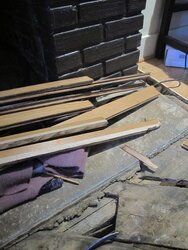
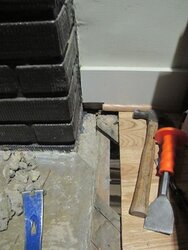
Here is the issue I see now: when they poured the slab, the concrete, in the area directly in front of the the fireplace, has oozed over the wooden joists that frame the slab (please see picture 2). So we cannot butt up the Micore directly to the slab all around. There will be a small area (unfortunately right in front of the insert) where there is wood only covered by a an inch of concrete. My husband thinks that it would not be a problem because if the slab gets heated up, it distributes the heat within itself, so no one area of the slab would get very hot. Plus, he says if the area where the concrete oozes were an issue, then we'd have that issue all around the transition from the slab to the Micore-protected area, because the slab is framed in wood about an inch below the surface (the slab as a whole is 10" thick, but there is wood framing around it - I had a picture of it from below earlier in this thread).

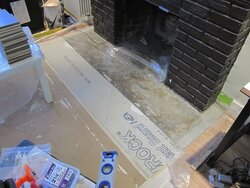
If this transition (and especially the area where the concrete has oozed over the wood) is indeed a problem, the only solution would be to lay the Micore all over the hearth, even the concrete slab. With the concrete backerboard that has to go over that, this strategy would raise the whole hearth 1" higher than we had planned. We are trying to keep the hearth low (and were going to tile directly over the concrete slab), but now I'm debating if we will have a fire safety issue because of the transition between the slab and the Micore-protected area beyond.

I hope what I wrote is not too confusing... I would be very grateful for your thoughts!
 

Attachments

  • IMG_2731.jpg
    IMG_2731.jpg
    63.3 KB · Views: 766
  • IMG_2733.jpg
    IMG_2733.jpg
    59.5 KB · Views: 714
Take a flat faced, cold chisel and clean up the edge. Just chip away the cement ooze. Wear googles, it will come off quickly. Then patch in that hole with a triangle shaped board or piece of plywood that matches the subfloor thickness. Not a big deal, this is a one hour job and you are back on track.
 
Thank you, BeGreen. We did what you suggested. It was actually easy (I wonder why in 1924 they didn't do that, and instead cut those planks short??).

So do you think that if we lay the Micore only over the wooden subfloor butting it up to the slab as planned, the transition will not be a problem (as a "heat leak" that might jeopardize the framing)?
 
Yes, just try for a snug fit with the micore. The pictures make a world of difference to see what you are doing. Now that I see it, I better understand why you were asking about the thinset.

So, looking at what you have there, is the goal to piece in the micore, then cover the existing cement hearth and the micore with one solid piece of Durock?
 
Thanks, BeGreen. Our initial plan was to piece in the Micore, and then cover everything with one solid piece of Durock. I was, however, advised by one person on the John Bridge forum, that it would be better to put Durock just over the Micore area, and have an expansion joint between the tiles on the concrete slab and the tiles on the Durock. He said we should accommodate the movement, not fight it by covering the gap with a piece of Durock. That expansion joint puts some constraints on my tile layout, but right now we are planning for it. That also allows us to keep the hearth even lower, because we can tile directly over the concrete. The one issue with this plan, however, is that on the sides, one row of tiles will have to span the old and the new area (please see attached picture, subfloor still to be repaired). We will use a very flexible thinset (1Flex crack isolation mortar by TEC) for the tiles, so hopefully that row won't crack...

To me, the "one solid piece of Durock over everything" method still sounds best, but apparently, a board of Durock overlaying the transition might crack or come loose because of the movement between the concrete slab and wooden subfloor.
 

Attachments

  • IMG_2734.jpg
    IMG_2734.jpg
    44.2 KB · Views: 577
I'm wit u.
 
Not my field of expertise by any means, but maybe more info given there?

Are the tiles intended to go directly on the cement or will a layer of durock be needed on top of the cement to match the height of the micore + durock?
 
The Micore plus Durock will bring the surrounding floor up to the height of the cement slab, so we are planning to tile directly over the slab.
 
Ah, my misunderstanding. It doesn't look like this from the picture, but looks can be deceiving. I thought the micore would bring the level up to the same as the concrete, my mistake. Given this information I agree an expansion joint is in order. Are they recommending you use a grout caulk that matches the tile grout?
 
Yes, I have a sanded caulk the same color as the grout. By the way, I'm not sure if I have the right type of grout. It is Laticrete Permacolor. Someone told me yesterday that we should definitely use an epoxy grout, since the grout on the hearth would be exposed to a lot of dirt and epoxy grouts are stain resistant. What grout do people usually prefer on hearths? Are epoxy grouts fire safe?
 
Yes it is tougher and more stain resistant. We used epoxy grout in our shower. Be sure you clean off the haze before it totally dries or it will be hard to remove.
 
And you also know people who used it on hearths (I'm still concerned how it will hold up to the heat)? Maybe I will return the Permacolor and get an epoxy grout...
 
We have never had an incident of grout fire reported here. Don't worry about it.
 
I wasn't really worried about a fire with the grout, but more about failure, like discoloration, cracking... But I think I'll go ahead and get some epoxy grout. Thanks again for all your advice!
 
Nice work. I agree with the above advice. This hearth is going to look sweet when you are done. What insert are you putting in ? (enlighten me if you haven't already stated that).
 
Thanks, Jocam! We are putting in a Drolet Escape that we bought at Northern Tool. Not a high-end insert, but we are on a budget... and everything I read about it was positive. I also like its plain look.

We are also going to tile the brick surround of the fireplace (which was covered in a glossy brown paint by the previous owner) in the same tile. But that's a whole other adventure that we are only going to tackle after we get done with some other projects in this house. This place is still a bit of a construction site, almost a year after we moved in. For now we just need to get the hearth done, so we can get the insert put in before the end of the winter! (This insert has been sitting in our living room since - gasp - last August! Or was it July? We got side-tracked by taking apart our finished attic.)

I'll post some pictures as we progress...
 
We have finished the hearth extension and installed the tile. Grouting is tomorrow, but I wanted to post some pictures of our progress. The extended area to the front is built as follows:

- sheetmetal (aluminum flashing) over the wooden plank subfloor, thinset underneath it
- 1/2" Micore 300
- 1/2" Durock laminated onto the Micore with thinset. Everything then screwed down with 2 1/4" Rock-On screws.

We used TEC Superflex thinset to laminate the subfloor sandwich, and to lay the tiles.

We used sand mix mortar to repair the firebox floor, and extend the hearth to the sides.

We also added some cross-bracing to the floor joists below, to minimize any flexing.

We have an expansion joint between the tiles over the concrete slab and the tiles over the Durock/Micore sandwich, which is going to be caulked. The concrete slab was slightly lower than the Durock area, and we tried to even that out by backbuttering the tiles over the slab. Overall, we didn't achieve a completely plane surface (the uneveness of the substrate in conjunction with the slight crookedness of the 'artisanal' tile we had chosen was a bit too much of a challenge for our first tile job!), but we'll view this as adding to the charme of the hearth! :p

The tiled hearth extension is now about 1/2" higher than the firebox floor. We are wondering if we can set the insert onto 1/2" inch of Durock, to raise it to the height of the hearth extension. If it's non-combustible, it should be fine under the insert, I would think. Has anybody done this?
 

Attachments

  • IMG_2769.jpg
    IMG_2769.jpg
    53.7 KB · Views: 633
  • IMG_2784.jpg
    IMG_2784.jpg
    49.6 KB · Views: 593
Kate1569, it's looking good! I've been keeping up with this thread as I've got to get started on ours and you've been an inspiration. I *think* mine will be a bit simpler than yours but I'm a bit apprehensive about it.

Thanks for sharing the hearth build and best wishes on the rest of it!!!

Ed
 
Looking very nice indeed. Good progress guys.

Yes, you can use a sheet of durock under the insert. I like to cover it with sheetmetal because it makes it easier to slide the insert in/out on the metal than on the raw cement board.
 
BG, are you referring to using Durock Next Gen? I haven't looked at any recent specs on it, but I see that on USG's Durock Next Gen web page they refer in several instances to it's use in "fire rated" applications. I'm just curious if Next Gen use in hearths has been upgraded from "in question" to "approved". ????

Thanks,
Ed
 
As of last communication all I know is that nextGen uses non-combustible perlite as a filler/lightener. I haven't seen any documentation for testing of the product in a hearth application yet. That said, it doesn't look like we have much choice anymore with all the primary mfgs. of cement board having gone this route.
 
Thanks for the compliments, Ed and BeGreen!

As far as I know the new Durock is still non-combustible - I believe someone quoted the data sheet in this thread to that effect. And as another member noted on this thread, underneath the insert is probably the coolest spot around it.

Tonight we'll put in the grout. I'll post more pictures then.
 
On the durock website it says, "The board is non-combustible and can be used in a variety of fire-rated designs. Its low thermaland hygrometric expansion help prevent finish cracking."

It also says that it passes ASTM test method e136 with respect to non-combustability, and the MSDS gives N/A for all the flash point and flammability blanks.
 
pyper said:
On the durock website it says, "The board is non-combustible and can be used in a variety of fire-rated designs. Its low thermaland hygrometric expansion help prevent finish cracking."

It also says that it passes ASTM test method e136 with respect to non-combustability, and the MSDS gives N/A for all the flash point and flammability blanks.
I ordered some 1/2" samples of it and have a MAPP torch standing by. Now to figure out the best way to test it. Any suggestions?

Ed
 
Status
Not open for further replies.