sesmith
Feeling the Heat
First, I'm assuming you can weld/ fabricate and have some mechanical drawing and/or caad program to design it all before hand and avoid major unforeseen problems while you're making it. Even so, I can't imagine being able to make a stove that burns better and would be cheaper to build than the cheap stoves available at the big box stores on sale this time of year.
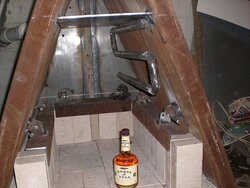
However, since you insist") , I can point you to a post I put on the other forum a couple of years ago that detailed the secondary burn tubes I put in my older stove:
, I can point you to a post I put on the other forum a couple of years ago that detailed the secondary burn tubes I put in my older stove:
http://www.arboristsite.com/firewood-heating-wood-burning-equipment/86675.htm
They continue to work great and cleaned up the burn a lot, and increased the efficiency of the stove . I'm currently working on a cat add-on for the stove that should be ready to test in a week or two. This should clean it up the rest of the way and squeeze a little more heat out of it...or be a miserable failure
Yea, I like to tinker too, but I still wouldn't spend my money making a stove when I could buy a much better one for the same price or a little more.
However, since you insist
, I can point you to a post I put on the other forum a couple of years ago that detailed the secondary burn tubes I put in my older stove:http://www.arboristsite.com/firewood-heating-wood-burning-equipment/86675.htm
They continue to work great and cleaned up the burn a lot, and increased the efficiency of the stove . I'm currently working on a cat add-on for the stove that should be ready to test in a week or two. This should clean it up the rest of the way and squeeze a little more heat out of it...or be a miserable failure
Yea, I like to tinker too, but I still wouldn't spend my money making a stove when I could buy a much better one for the same price or a little more.